pytestを4系にアップデートしたら、pytest-freezegun 0.2.0 でエラーが出た

Pythonで日付まわりをテストする場合、日付を固定できる freezegun が便利です。
spulec/freezegun: Let your Python tests travel through time

 
また、pytestの場合、pytestのプラグインとして pytest-freezegun があります。
ktosiek/pytest-freezegun: Easily freeze time in pytest test + fixtures

 
これを使うことで、pytestのmarkerとして @pytest.mark.freeze_time が追加されます。

そのため、markerを使うだけで、現在時刻が固定されます。

from datetime import datetime
import pytest

@pytest.mark.freeze_time('2018-02-03 1:23:45')
def test_time():
    assert datetime.today() == datetime(2018, 2, 3, 1, 23, 45)

 
実行結果

$ pytest
==== test session starts ====
platform darwin -- Python 3.7.2, pytest-3.7.4, py-1.7.0, pluggy-0.8.1
rootdir: /path/to/dir, inifile:
plugins: freezegun-0.2.0
collected 1 item

test_time.py .    [100%]

==== 1 passed in 0.07 seconds ====

 
そんな中、pytestを3.7.4から4.1.1へとアップデートしたところ、エラーが出ました。

# バージョン確認
$ pip list
Package          Version
---------------- -------
pytest           3.7.4
pytest-freezegun 0.2.0  

# アップデート
$ pip install -U pytest
...
Successfully installed pytest-4.2.0

# テストを実行すると、エラー
$ pytest
===== test session starts ====
platform darwin -- Python 3.7.2, pytest-4.2.0, py-1.7.0, pluggy-0.8.1
rootdir: /path/to/dir, inifile:
plugins: freezegun-0.2.0
collected 1 item

test_time.py E    [100%]

==== ERRORS ====
____ ERROR at setup of test_time ____

self = <pytest_freezegun.FreezegunPlugin object at 0x10dbea588>, item = <Function test_time>

    @pytest.hookimpl(tryfirst=True)
    def pytest_runtest_setup(self, item):
>       marker = item.get_marker('freeze_time')
E       AttributeError: 'Function' object has no attribute 'get_marker'

env/lib/python3.7/site-packages/pytest_freezegun.py:23: AttributeError

 
そこで、対応したことをメモとして残します。


環境

  • Python 3.7.2
  • pytest 3.10.1 からpytest 4.1.1 へアップデート
  • pytest-freezegun 0.2.0


対応

公式にissueがありました。pytest-freezegun の新しいバージョンで対応したようです。
pytest4.0 released and pytest-freezegun can't work. · Issue #7 · ktosiek/pytest-freezegun

 
そのため、pytest-freezegunをアップデートしたところ、問題なく動作するようになりました。

$ pip install -U pytest-freezegun
...
Successfully installed pytest-freezegun-0.3.0.post1

# テストを再実行
$ pytest
==== test session starts ====
platform darwin -- Python 3.7.2, pytest-4.2.0, py-1.7.0, pluggy-0.8.1
rootdir: /path/to/dir, inifile:
plugins: freezegun-0.3.0.post1
collected 1 item

test_time.py .    [100%]

==== 1 passed in 0.08 seconds ====

macOS + postgresqlでエラー「dyld: Library not loaded」が出た

macOS + PostgreSQLで環境構築したところ

$ psql
dyld: Library not loaded: /usr/local/opt/readline/lib/libreadline.7.dylib
  Referenced from: /usr/local

が出たため、対応した時のメモです。

 
目次


環境

  • macOS 10.13.6 (High Sierra)
  • Homebrewで postgres をインストール済
    • インストール済のpostgresは、10.3


調査

エラーメッセージを見ると、ライブラリがなさそうでした。

念のため確認してみたところ、確かにありませんでした。

$ ls -al /usr/local/opt/readline/lib
total 1448
drwxr-xr-x  11 shinano_gold  ringo     352 12 20 06:07 .
drwxr-xr-x  12 shinano_gold  ringo     384  1 28 09:24 ..
-r--r--r--   1 shinano_gold  ringo   40396  1 28 09:24 libhistory.8.0.dylib
lrwxr-xr-x   1 shinano_gold  ringo      20 12 20 06:07 libhistory.8.dylib -> libhistory.8.0.dylib
-r--r--r--   1 shinano_gold  ringo   45880 12 20 06:07 libhistory.a
lrwxr-xr-x   1 shinano_gold  ringo      20 12 20 06:07 libhistory.dylib -> libhistory.8.0.dylib
-rw-r--r--   1 shinano_gold  ringo  239252  1 28 09:24 libreadline.8.0.dylib
lrwxr-xr-x   1 shinano_gold  ringo      21 12 20 06:07 libreadline.8.dylib -> libreadline.8.0.dylib
-r--r--r--   1 shinano_gold  ringo  405848 12 20 06:07 libreadline.a
lrwxr-xr-x   1 shinano_gold  ringo      21 12 20 06:07 libreadline.dylib -> libreadline.8.0.dylib
drwxr-xr-x   3 shinano_gold  ringo      96  1 28 09:24 pkgconfig

 
そのため、Homebrewでインストールするpostgresの依存関係を見てみました。
https://formulae.brew.sh/formula/postgresql@10

すると、

readline ✅ 8.0.0   Library for command-line editing

と、手元の readline 8.0 で動作しそうでした。

 
また、Homebrewにある最新の postgres のバージョンを確認すると、11.1 でした。
https://formulae.brew.sh/formula/postgresql


対応

brew switch で readline のバージョンを切り替えることも考えました。

ただ、postgresのバージョンを上げても問題ないだろうと考え、 brew upgrade しました。

$ brew upgrade postgresql

 
その後はエラーが発生しなくなりました。

Python + Zeep にて、SOAPの wsi:swaRef でファイルを送信する

前回、swaRef にて、SOAPでファイルを送信してみました。
Python + Zeep にて、SOAPのswaRef でファイルを送信する - メモ的な思考的な

 
今回は、wsi:swaRefという仕様でファイルを送信してみます。

 
なお、今回扱うwsi:swaRefについてですが、SOAPエンベロープは、

<soap-env:Envelope xmlns:soap-env="http://schemas.xmlsoap.org/soap/envelope/">
  <soap-env:Body>
    <ns0:RequestInterface xmlns:ns0="http://example.com/HelloWorld">
      <ns0:image>cid:image=spam</ns0:image>
    </ns0:RequestInterface>
  </soap-env:Body>
</soap-env:Envelope>

のように <ns0:image>cid:image=spam</ns0:image> と、プレフィックス cid: を付与する形となります。

また、動作確認は SOAP UI を使っているため、もしかしたらそれ以外の環境では動作しないかもしれません。

 
目次


環境


実装するもの

です。

Transportについては、SwAの実装を流用できますので、今回は省略します(後述のGitHubにはTransportも実装してあります)。


WSDLの実装

今回は image elementの型として ref:swaRef を指定します。

そのため、

  • 名前空間 ref の追加
  • image elementの型を ref:swaRef と定義

をします。

 
ただ、名前空間を追加してZeepを実行すると

zeep.exceptions.NamespaceError: Unable to resolve type {http://ws-i.org/profiles/basic/1.1/xsd}swaRef. No schema available for the namespace 'http://ws-i.org/profiles/basic/1.1/xsd'.

というエラーが発生します。

 
試しにcurlを使って名前空間のページにアクセスしてみると

$ curl http://ws-i.org/profiles/basic/1.1/xsd -L
The page cannot be displayed because an internal server error has occurred.

とエラーになりました。

これにより、定義が見つからないために、Zeepがエラーを出していることが分かりました。

 
どこかに定義がないかを探してみると、仕様書の「4.4 Referencing Attachments from the SOAP Envelope」に記載がありました。

As a convenience, WS-I has published the schema for this schema type at: http://ws-i.org/profiles/basic/1.1/swaref.xsd

http://www.ws-i.org/Profiles/AttachmentsProfile-1.0-2004-08-24.html#Referencing_Attachments_from_the_SOAP_Envelope

 
指定されたURLを開くと、XMLスキーマがありました。

ただ、URLが微妙に異なっているため、WSDLの内容を差し替えてみました。

ただ、それでも同じエラーが発生しました。

No schema available for the namespace 'http://ws-i.org/profiles/basic/1.1/swaref.xsd'.

 
何か良い方法がないかを探したところ、スキーマを import する方法がありました。
XML Schemaのインポート

 
そこで、

$ curl http://ws-i.org/profiles/basic/1.1/swaref.xsd > wsi_swa_ref.xsd
  % Total    % Received % Xferd  Average Speed   Time    Time     Time  Current
                                 Dload  Upload   Total   Spent    Left  Speed
100  4058  100  4058    0     0  11694      0 --:--:-- --:--:-- --:--:-- 11728

curlxmlwsi_swa_ref.xsd として取得します。

 
次に、取得したxsdファイルをimportします。

<wsdl:types>
    <xsd:schema>
        <xsd:import namespace="http://ws-i.org/profiles/basic/1.1/xsd"
                    schemaLocation="wsi_swa_ref.xsd" />
    </xsd:schema>
    <xsd:schema elementFormDefault="qualified" targetNamespace="http://example.com/HelloWorld">
    ...

 
これにより、型 ref:swaRef が使えるようになったため、型を差し替えました。

<xsd:element name="RequestInterface">
    <xsd:complexType>
        <xsd:sequence>
            <!-- WSI:swaRefのため、swaRef型の引数を用意 -->
            <xsd:element minOccurs="0" name="image" type="ref:swaRef" />
        </xsd:sequence>
    </xsd:complexType>
</xsd:element>


Zeepを実行するスクリプト

こちらも SwA のものを流用・修正します。

wsi:swaRefの場合、

  • SOAPエンベロープ部分の image 要素を <ns0:image>cid:image=ham</ns0:image> にする
  • 添付ファイル部分の Content-ID を Content-ID: <image=ham> にする

とするため、

def run(attachment_content_id, is_base64ize=False):
    session = Session()

    # WSI:swaRefの仕様書に合わせ、添付ファイルのContent-IDにプレフィックス 'image=' を追加
    attachment_content_id_with_prefix = f'image={attachment_content_id}'
    transport = WsiSwaRefTransport(ATTACHMENT,
                                   attachment_content_id=attachment_content_id_with_prefix,
                                   is_base64ize=is_base64ize, session=session)

    history_plugin = HistoryPlugin()
    client = Client(str(WSDL), transport=transport, plugins=[history_plugin])

    # WSI:swaRefの仕様書に合わせ、imageタグの値のプレフィックスに 'cid:' を追加
    response = client.service.requestMessage(image=f'cid:{attachment_content_id_with_prefix}')

という修正を加えました。


動作確認

SwAと同様、SOAP UIを使って動作を確認します。

SOAP UIをセットアップ後に実行すると、以下の結果となりました。 (量が多いため、バイナリのまま送信したもののみ記載)

$ python wsi_swa_ref_runner.py 
----------------------------------------
添付ファイルはバイナリのまま送信
----------------------------------------
b'--boundary_62604d9834ed41c7bdfbb5a1ea5f7cf7\r\n
Content-Type: text/xml; charset=utf-8\r\n
Content-Transfer-Encoding: 8bit\r\n
Content-ID: start_6b3ff1a1815c429786706f33495e4f25\r\n\r\n

<?xml version=\'1.0\' encoding=\'utf-8\'?>\n
<soap-env:Envelope xmlns:soap-env="http://schemas.xmlsoap.org/soap/envelope/">
  <soap-env:Body>
    <ns0:RequestInterface xmlns:ns0="http://example.com/HelloWorld">
      <ns0:image>cid:image=ham</ns0:image>
    </ns0:RequestInterface>
  </soap-env:Body>
</soap-env:Envelope>\r\n
--boundary_62604d9834ed41c7bdfbb5a1ea5f7cf7\r\n
Content-Transfer-Encoding: binary\r\n
Content-Type: image/png; name="shinanogold.png"\r\n
Content-ID: <image=ham>\r\n
Content-Disposition: attachment; name="shinanogold.png"; filename="shinanogold.png"\r\n\r\n

\x89PNG...IEND\xaeB`\x82\r\n
--boundary_62604d9834ed41c7bdfbb5a1ea5f7cf7--'
--- history ---
{'envelope': <Element {http://schemas.xmlsoap.org/soap/envelope/}Envelope at 0x111cefec8>, 
 'http_headers': {
   'SOAPAction': '"http://example.com/HelloWorld/requestMessage"', 
   'Content-Type': 'multipart/related; boundary="boundary_62604d9834ed41c7bdfbb5a1ea5f7cf7";
                   type="text/xml"; start="start_6b3ff1a1815c429786706f33495e4f25"; charset=utf-8',
   'Content-Length': '6336'}}
?
--- envelope ---
<soap-env:Envelope xmlns:soap-env="http://schemas.xmlsoap.org/soap/envelope/">
  <soap-env:Body>
    <ns0:RequestInterface xmlns:ns0="http://example.com/HelloWorld">
      <ns0:image>cid:image=ham</ns0:image>
    </ns0:RequestInterface>
  </soap-env:Body>
</soap-env:Envelope>

 
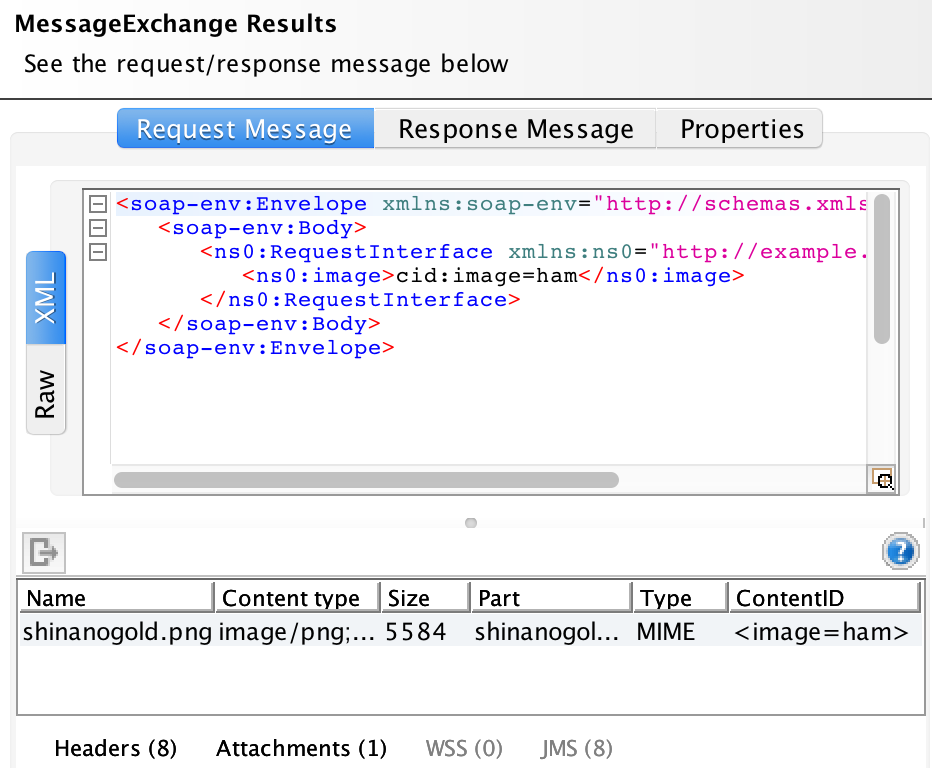
SOAP UIのログを見ると、2エントリが追加されていました。

内容は以下の通りです。

f:id:thinkAmi:20190102155653p:plain:w300

SOAP UIの説明では、wsi:swaRefだとTypeが SWAREF になるようですが、今回は MIME のままでした。
SOAP Attachments and Files | SoapUI

とはいえ、SOAP UI以外の環境がないため、今回はこれで良しとします。

 
また、ファイルをエクスポートしても、送信したファイル shinanogold.png を取得できました。


参考

ソースコード

GitHubに上げました。 file_attachments/wsi_swa_ref/ ディレクトリの中が今回のファイルです。
https://github.com/thinkAmi-sandbox/python_zeep-sample

Python + Zeep にて、SOAPのswaRef でファイルを送信する

以前、SOAP with Attachments (SwA) にて、SOAPでファイルを送信してみました。
Python + Zeep にて、SOAP with Attachment (SwA) でファイルを送信する - メモ的な思考的な

 
今回は、SwAに似た swaRefという仕様でファイルを送信してみます。
仕様書:SOAP Messages with Attachments

 
なお、今回扱うswaRefについてですが、SOAPエンベロープは、

<soap-env:Envelope xmlns:soap-env="http://schemas.xmlsoap.org/soap/envelope/">
  <soap-env:Body>
    <ns0:RequestInterface xmlns:ns0="http://example.com/HelloWorld">
      <ns0:image href="cid:spam"/>
    </ns0:RequestInterface>
  </soap-env:Body>
</soap-env:Envelope>

のように <ns0:image href="cid:spam"/> と、 href 属性を持っているため、WSI:swaRefとは異なります*1

また、動作確認は SOAP UI を使っているため、もしかしたらそれ以外の環境では動作しないかもしれません。

 
目次


環境


実装するもの

です。

Transportについては、SwAの実装を流用できますので、今回は省略します。

後述のGitHubにはTransportも実装してありますので、そちらを参照してください。


WSDLの実装

今回は image elementに href 属性を追加します。

そのため、

  • 名前空間の追加
  • ref属性を使って、要素に href 属性を追加

をします。

<!-- myという名前空間を追加 -->
<wsdl:definitions
...
        xmlns:my="http://example.com/HelloWorld"
        targetNamespace="http://example.com/HelloWorld">

    <wsdl:types>
        <xsd:schema elementFormDefault="qualified" targetNamespace="http://example.com/HelloWorld">
            <xsd:element name="RequestInterface">
                <xsd:complexType>
                    <xsd:sequence>
                        <!-- swaRef用の引数を用意:実体は別のところで定義 -->
                        <xsd:element ref="my:image"/>
                    </xsd:sequence>
                </xsd:complexType>
            </xsd:element>

            <!-- href属性を持つimage elementを用意 -->
            <xsd:element name="image">
                <xsd:complexType>
                    <xsd:attribute name="href" type="xsd:string" />
                </xsd:complexType>
            </xsd:element>


Zeepを実行するスクリプト

こちらも SwA のものを流用します。

変更は1点で、

response = client.service.requestMessage(image={'href': f'cid:{attachment_content_id}'})

と、imageタグの href 属性に値を設定するようにしています。


動作確認

SwAと同様、SOAP UIを使って動作を確認します。

SOAP UIをセットアップ後に実行すると、以下の結果となりました。 (量が多いため、バイナリのまま送信したもののみ記載)

$ python swa_ref_runner.py 
----------------------------------------
添付ファイルはバイナリのまま送信
----------------------------------------
b'--boundary_1a4cde05b2ab465a8b838ea3e15614d3\r\n
Content-Type: text/xml; charset=utf-8\r\n
Content-Transfer-Encoding: 8bit\r\n
Content-ID: start_237f3846a0214dc4ac767e5722f31eaa\r\n\r\n

<?xml version=\'1.0\' encoding=\'utf-8\'?>\n
<soap-env:Envelope xmlns:soap-env="http://schemas.xmlsoap.org/soap/envelope/">
  <soap-env:Body>
    <ns0:RequestInterface xmlns:ns0="http://example.com/HelloWorld">
      <ns0:image href="cid:ham"/>
    </ns0:RequestInterface>
  </soap-env:Body>
</soap-env:Envelope>\r\n
--boundary_1a4cde05b2ab465a8b838ea3e15614d3\r\n
Content-Transfer-Encoding: binary\r\n
Content-Type: image/png; name="shinanogold.png"\r\n
Content-ID: <ham>\r\n
Content-Disposition: attachment; name="shinanogold.png"; filename="shinanogold.png"\r\n\r\n

\x89PNG\r\n\...\x00\x00IEND\xaeB`\x82\r\n
--boundary_1a4cde05b2ab465a8b838ea3e15614d3--'
--- history ---
{'envelope': <Element {http://schemas.xmlsoap.org/soap/envelope/}Envelope at 0x10ad2cc88>, 
 'http_headers': {
   'SOAPAction': '"http://example.com/HelloWorld/requestMessage"', 
   'Content-Type': 'multipart/related; boundary="boundary_1a4cde05b2ab465a8b838ea3e15614d3"; 
                   type="text/xml"; start="start_237f3846a0214dc4ac767e5722f31eaa"; charset=utf-8',
   'Content-Length': '6321'}}
?
--- envelope ---
<soap-env:Envelope xmlns:soap-env="http://schemas.xmlsoap.org/soap/envelope/">
  <soap-env:Body>
    <ns0:RequestInterface xmlns:ns0="http://example.com/HelloWorld">
      <ns0:image href="cid:ham"/>
    </ns0:RequestInterface>
  </soap-env:Body>
</soap-env:Envelope>

 
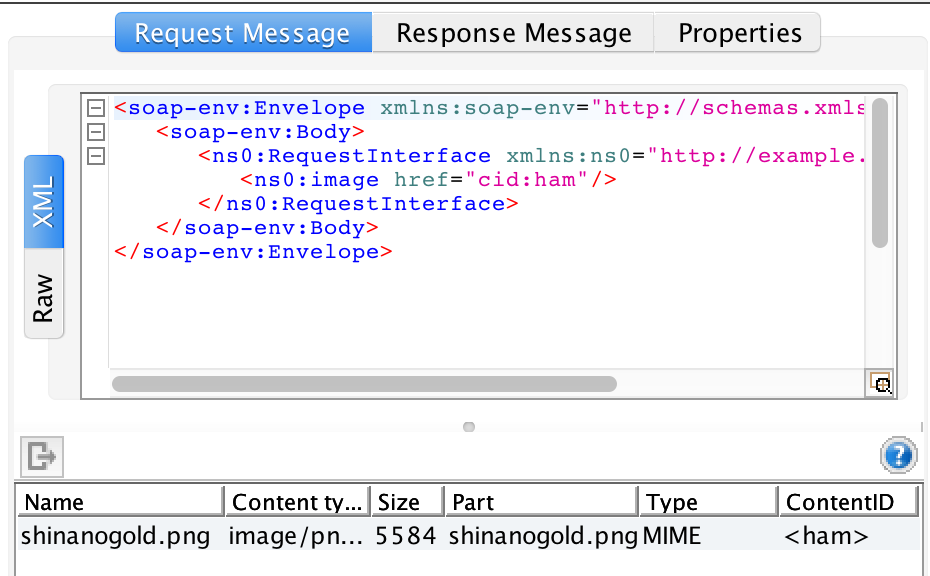
SOAP UIのログを見ると、2エントリが追加されていました。

内容は以下の通りです。

f:id:thinkAmi:20190102151032p:plain:w300

 
また、ファイルをエクスポートしても、送信したファイル shinanogold.png を取得できました。


参考


ソースコード

GitHubに上げました。 file_attachments/swa_ref/ ディレクトリの中が今回のファイルです。
https://github.com/thinkAmi-sandbox/python_zeep-sample

*1:SwA系についてはいろいろな種類があり、正直良く分かってないので、どこかに一覧でまとまっているサイト/本があれば、教えていただけるとありがたいです

WSDLのelementにattributeを追加し、Python + ZeepでSOAPのエンベロープを作成する

swaRefの仕様書を眺めていたところ、

<?xml version='1.0' ?>
<SOAP-ENV:Envelope
        xmlns:SOAP-ENV="http://schemas.xmlsoap.org/soap/envelope/">
    <SOAP-ENV:Body>
        <claim:insurance_claim_auto id="insurance_claim_document_id"
            xmlns:claim="http://schemas.risky-stuff.com/Auto-Claim">
            <theSignedForm href="cid:claim061400a.tiff@claiming-it.com"/>
            <theCrashPhoto href="cid:claim061400a.jpeg@claiming-it.com"/>
            <!-- ... more claim details go here... -->
        </claim:insurance_claim_auto>
    </SOAP-ENV:Body>
</SOAP-ENV:Envelope>

となっていました。

気になったのは

<theSignedForm href="cid:claim061400a.tiff@claiming-it.com"/>

のように、 element theSignedForm に、attribute href があったことです。

 
elementにattributeのあるWSDLを書いたことがないため、今回

  • WSDLで element に attribute を追加する方法
  • Zeepで、 attributeに値を設定する方法

をそれぞれ調べてみました。

 
目次


環境


WSDLのelementにattributeを追加する方法

WSDLXMLなので、XMLでの追加方法を調べてみました。

属性を追加する場合は、xsd:attribute要素を使用します。

複数要素を定義する4つの基本形を覚えよう:SEのためのXML Schema入門(2) - @IT

とのことなので、WSDL内の型定義を

<xsd:element name="RequestInterface">
    <xsd:complexType>
        <xsd:sequence>
            <xsd:element minOccurs="0" name="image"/>
        </xsd:sequence>

        <!-- 追加 -->
        <xsd:attribute name="href" type="xsd:string" />
    </xsd:complexType>
</xsd:element>

として、 image elementに href を追加できないか試してみました。

 
結果は、

<soap-env:Envelope xmlns:soap-env="http://schemas.xmlsoap.org/soap/envelope/">
  <soap-env:Body>
    <ns0:RequestInterface xmlns:ns0="http://example.com/HelloWorld" href="ham_spam"/>
  </soap-env:Body>
</soap-env:Envelope>

と、その親 RequestInterface elementに付きました。

 
RequestInterfaceの子の image element に追加できないかを調べたところ、同じページに

ref属性を記述した場合、要素の構造については別の場所で宣言します。そして、ref属性の値に記されている要素を参照します。

とありました。

 
そのため、WSDL

<!-- 名前空間 my (任意の名前で可)を追加 -->
<wsdl:definitions
...
        xmlns:my="http://example.com/HelloWorld"
        targetNamespace="http://example.com/HelloWorld">

    <wsdl:types>
        <!-- ここのtargetNamespaceも適当に設定(先ほどのと同じでもOK) -->
        <xsd:schema elementFormDefault="qualified" targetNamespace="http://example.com/HelloWorld">
            <xsd:element name="RequestInterface">
                <xsd:complexType>
                    <xsd:sequence>
                        <!-- このelementにattributeを設定するため、refで別の型を参照させる -->
                        <!-- SOAP UIで動作させるため、名前空間(my)を付与して、参照先を明確にする -->
                        <xsd:element minOccurs="0" ref="my:image"/>
                    </xsd:sequence>
                </xsd:complexType>
            </xsd:element>

            <!-- attributeを付けたい型の定義-->
            <xsd:element name="image">
                <xsd:complexType>
                    <xsd:attribute name="href" type="xsd:string" />
                </xsd:complexType>
            </xsd:element>

として試してみます。

 
なお、WSDL中のコメントにも記載しましたが、 ref 属性を使うときは、

  • wsdl:definitions に、my という名前空間の定義を追加
  • ref="my:image" のように名前空間付きで定義

を行います。名前空間がない場合、SOAP UIでWSDLをimportする際、エラーとなってしまいます。

参考:xml - What does the ref attribute on an element in an XSD do? - Stack Overflow

 
実行結果は

<soap-env:Envelope xmlns:soap-env="http://schemas.xmlsoap.org/soap/envelope/">
  <soap-env:Body>
    <ns0:RequestInterface xmlns:ns0="http://example.com/HelloWorld">
      <ns0:image href="foo_bar"/>
    </ns0:RequestInterface>
  </soap-env:Body>
</soap-env:Envelope>

と、image elementに href attribute が追加されました。

 
ちなみに、

<xsd:element name="RequestInterface">
    <xsd:complexType>
        <xsd:sequence>
            <xsd:element minOccurs="0" name="image"/>

            <!-- sequenceの中にattributeを追加 -->
            <xsd:attribute name="href" type="xsd:string" />
        </xsd:sequence>
    </xsd:complexType>
</xsd:element>

と、 <xsd:sequence> の中に <xsd:attribute> を入れると、以下のエラーになります。

zeep.exceptions.XMLParseError: Unexpected element {http://www.w3.org/2001/XMLSchema}attribute in xsd:sequence


WSDLのattributeに、Zeepから値を設定する

WSDLでelementにattributeを付けられたものの、どうすればZeepから値を与えられるのかが分かりませんでした。

調べてみたところ、Stack Overflowに回答があったため、それを参考に実装してみます。
Python Zeep - how to set attributes for element - Stack Overflow


親要素のattributeを設定する

client.service.requestMessage(href='ham_spam') と、attribute名の引数に対し、設定したい値を渡します。

history_plugin = HistoryPlugin()
child_wsdl = BASE_PATH.joinpath('root_attribute.wsdl')
client = Client(str(child_wsdl), plugins=[history_plugin])

# Zeepと同様、requests_mockを使って、POSTをMockする
# https://github.com/mvantellingen/python-zeep/blob/3.2.0/tests/integration/test_http_post.py#L15
with requests_mock.mock() as m:
    m.post('http://localhost:9500/attributeBindingSoap11', text='<root>mocked!</root>')

    # requestMessage()の結果がWSDLの内容と異なるため、常にXMLSyntaxErrorが出る
    # 今回は送信したSOAPエンベロープの値を見たいので、例外は無視する
    try:
        response = client.service.requestMessage(href='ham_spam')
    except XMLSyntaxError:
        pass

    print(etree.tostring(history_plugin.last_sent['envelope'],
                         pretty_print=True, encoding='unicode'))

 
実行すると、親要素の RequestInterfacehref に値が設定されました。

<soap-env:Envelope xmlns:soap-env="http://schemas.xmlsoap.org/soap/envelope/">
  <soap-env:Body>
    <ns0:RequestInterface xmlns:ns0="http://example.com/HelloWorld" href="ham_spam"/>
  </soap-env:Body>
</soap-env:Envelope>


子要素のattributeを設定する

親要素との変更点は、 client.service.requestMessage(image={'href': 'foo_bar'}) と、element名の引数に対し、属性名のdictを渡すことだけです。

history_plugin = HistoryPlugin()
child_wsdl = BASE_PATH.joinpath('child_attribute.wsdl')
client = Client(str(child_wsdl), plugins=[history_plugin])

with requests_mock.mock() as m:
    m.post('http://localhost:9501/attributeBindingSoap11', text='<root>mocked!</root>')
    try:

        # image elementの要素をdictで渡す
        response = client.service.requestMessage(image={'href': 'foo_bar'})

    except XMLSyntaxError:
        pass

    print(etree.tostring(history_plugin.last_sent['envelope'],
                         pretty_print=True, encoding='unicode'))

 
実行すると、子要素の imagehref に値が設定されました。

<soap-env:Envelope xmlns:soap-env="http://schemas.xmlsoap.org/soap/envelope/">
  <soap-env:Body>
    <ns0:RequestInterface xmlns:ns0="http://example.com/HelloWorld">
      <ns0:image href="foo_bar"/>
    </ns0:RequestInterface>
  </soap-env:Body>
</soap-env:Envelope>


ソースコード

GitHubに上げました。 wsdl_attribute/ ディレクトリの中が今回のファイルです。
https://github.com/thinkAmi-sandbox/python_zeep-sample

Python + Zeep にて、SOAP with Attachment (SwA) でファイルを送信する

前回、inline (Base64エンコード) にて、SOAPでファイルを送信してみました。
Python + Zeepにて、SOAPのinline(Base64エンコード)でファイルを送信する - メモ的な思考的な

 
今回は、SOAP with attachments (以降、SwA) でファイルを送信してみます。実装に誤りがあれば、ご指摘いただけるとありがたいです。

 
目次


SwAの種類

SwAの定義は

このSwAの内容は、要するに上記のようなMIMEマルチパートにおいて最初のパーツに本文となるSOAPメッセージを配置し、2つ目以降のパーツにはSOAPメッセージに添付されるデータを配置するための決まりごとだ。

http://www.atmarkit.co.jp/fdotnet/special/wse04/wse04_01.html

です。

ただ、調べた中だと、SwAに該当するものは3つありました。

いずれも MIMEマルチパートを使っていますが、細かな点で実装が異なりました。

 
以降、個人的な理解です。


swaRefの実装

swaRefは、SOAPエンベロープ

<soap-env:Envelope xmlns:soap-env="http://schemas.xmlsoap.org/soap/envelope/">
  <soap-env:Body>
    <ns0:RequestInterface xmlns:ns0="http://example.com/HelloWorld">
      <ns0:image href="cid:spam"/>
    </ns0:RequestInterface>
  </soap-env:Body>
</soap-env:Envelope>

の中にある <ns0:image href="cid:spam"/> のような、

  • href 属性を用意
  • href属性に、添付ファイルパートのContent-IDと同じ値を指定

という方式です。


wsi:swaRefの実装

wsi:swaRefは、WSDL

<xsd:schema elementFormDefault="qualified" targetNamespace="http://example.com/HelloWorld">
     <xsd:element name="RequestInterface">
         <xsd:complexType>
             <xsd:sequence>
                 <!-- WSI:swaRefのため、swaRef型の引数を用意 -->
                 <xsd:element minOccurs="0" name="image" type="ref:swaRef" />
             </xsd:sequence>
         </xsd:complexType>
     </xsd:element>

のような、

  • WSDLswaRef 型で定義
  • そのelement (上記例だとimage)に、添付ファイルパートのContent-IDと同じ値を指定

という方式です。


SwAの実装

SwAは、添付ファイルパートのContent-IDが一意であれば良く、SOAPエンベロープには何も指定しません。

 
ということで、今回は一番簡単そうなSwAについて実装してみます。

なお、今回のSwAで送信するファイルは1つのみです。仕様的には複数添付することも可能なようですので、一部実装を変更すれば動作すると思います。


環境


WSDLの実装

SwAでは送信するファイルはSOAPエンベロープの外側にあるため、リクエストパラメータは必要としません。

そのため、今回はリクエストパラメータ無しのWSDLを用意します。

swa.wsdl

<?xml version="1.0" encoding="UTF-8"?>
<wsdl:definitions
        xmlns:wsdl="http://schemas.xmlsoap.org/wsdl/"
        xmlns:soap11="http://schemas.xmlsoap.org/wsdl/soap/"
        xmlns:http="http://schemas.xmlsoap.org/wsdl/http/"
        xmlns:mime="http://schemas.xmlsoap.org/wsdl/mime/"
        xmlns:xsd="http://www.w3.org/2001/XMLSchema"
        xmlns:ns0="http://example.com/HelloWorld"
        targetNamespace="http://example.com/HelloWorld">

    <wsdl:types>
        <xsd:schema elementFormDefault="qualified" targetNamespace="http://example.com/HelloWorld">
            <xsd:element name="ResponseInterface">
                <xsd:complexType>
                    <xsd:sequence>
                        <xsd:element minOccurs="0" name="returnMessage" type="xsd:string" />
                    </xsd:sequence>
                </xsd:complexType>
            </xsd:element>
        </xsd:schema>
    </wsdl:types>

    <wsdl:message name="messageIn">
    </wsdl:message>
    <wsdl:message name="messageOut">
        <wsdl:part name="parameters" element="ns0:ResponseInterface" />
    </wsdl:message>

    <wsdl:portType name="SwAPort">
        <wsdl:operation name="requestMessage">
            <wsdl:input message="ns0:messageIn"/>
            <wsdl:output message="ns0:messageOut"/>
        </wsdl:operation>
    </wsdl:portType>

    <wsdl:binding name="SwABindingSoap11" type="ns0:SwAPort">
        <soap11:binding transport="http://schemas.xmlsoap.org/soap/http" style="document"/>
        <wsdl:operation name="requestMessage">
            <soap11:operation soapAction="http://example.com/HelloWorld/requestMessage" />
            <wsdl:input>
                <soap11:body use="literal"/>
            </wsdl:input>
            <wsdl:output>
                <soap11:body use="literal"/>
            </wsdl:output>
        </wsdl:operation>
    </wsdl:binding>

    <wsdl:service name="SwAService">
        <wsdl:port name="SwAServicePort" binding="ns0:SwABindingSoap11">
            <soap11:address location="http://localhost:9401/SwABindingSoap11"/>
        </wsdl:port>
    </wsdl:service>
</wsdl:definitions>


Zeepでの実装方法を検討

今回はMTOMのpull requestを参考にして実装してみます。
https://github.com/mvantellingen/python-zeep/pull/314/files

その中では

  • Zeep本体のパッチ
  • Transportの差し替え

にて、MTOMを実装していました。

Zeep本体のパッチは行いたくないため、今回はTransportの差し替えのみで動作するよう、実装してみます。

 
既存のTransportクラスのソースコードを見ると、 post_xml() にコメントが書かれていました。

Post the envelope xml element to the given address with the headers. This method is intended to be overriden if you want to customize the serialization of the xml element. By default the body is formatted and encoded as utf-8. See zeep.wsdl.utils.etree_to_string.

https://github.com/mvantellingen/python-zeep/blob/3.2.0/src/zeep/transports.py#L86

そのため、post_xml()をオーバーライドして実装するのが正しいやり方っぽいです。


SwAを使った時のHTTPヘッダ・ボディについて

SwAを使った時のHTTPヘッダ・ボディの公式的な仕様を調べてみましたが、それらしい仕様書が見当たりませんでした*1

そのため、もしSwAが必要になるのであれば、リクエスト/レスポンスの仕様書が渡されると思うので、それを参考に実装するしかないのかなと感じました。

 
そのため、この記事では、SOAP UIで動作した時のHTTPヘッダ・ボディについて書いていきます。

他の環境では動作しないかもしれませんが、気にしないことにします。


HTTPヘッダ

HTTPヘッダには、以下のようなエントリがあれば良さそうです。

'http_headers': {
    'SOAPAction': '"http://example.com/HelloWorld/requestMessage"',
    'Content-Type': 'multipart/related; boundary="boundary_ec6c66dd25d44f84b27510babf3f1be0"; type="text/xml"; start="start_e876dcbdba0b4671bc3168ec12685c98"; charset=utf-8',
    'Content-Length': '8056'}

この中で、自分で実装すべきものは

  • Content-Typeヘッダ
  • Content-Lengthヘッダ

の2つです。

詳細は以下の通りです。

ヘッダ 項目 備考
Content-Type メディアタイプ Multipart/Related 1
boundary 任意の値 2
type text/xml
start SOAPメッセージパートの Content-ID の値と同じ値(任意の値)
charset utf-8
Content-Length リクエストボディの長さ

 
備考1. メディアタイプについて

XMLペイロードからバイナリ情報を取り除き、その情報をmultipart/related MIMEコンテンツとして、直接HTTPリクエストに格納すると言うことです。

https://www.ibm.com/developerworks/jp/xml/library/x-tippass/index.html

 
備考2. Content-Typeのboundaryパラメータについて

パート間の区切りを示すための文字列で、 --バウンダリ文字列 を設定します。

また、パート全体が終了する場合は、 --バウンダリ文字列-- を設定します。

参考:MIME(Multipurpose Internet Mail Extensions)~後編:インターネット・プロトコル詳説(4) - @IT


HTTPリクエストボディ

shinanogold.png ファイルを

  • ファイル形式は、バイナリ
  • boundaryパラメータは、 boundary_ec6c66dd25d44f84b27510babf3f1be0
  • startパラメータは、 start_e876dcbdba0b4671bc3168ec12685c98

として送信する時のリクエストボディ例は、以下となります。

なお、下記例は、実際のログに

  • iVB...rkJggg== の部分は実際のpngファイルなものの、長いため途中を省略
  • 見やすくするよう、「SOAPメッセージ部分」「送信ファイル部分」のコメントを追加

と手を加えていることに注意します。

<!-- SOAPメッセージ部分 -->
--boundary_ec6c66dd25d44f84b27510babf3f1be0
Content-Type: text/xml; charset=utf-8
Content-Transfer-Encoding: 8bit
Content-ID: start_e876dcbdba0b4671bc3168ec12685c98

<?xml version='1.0' encoding='utf-8'?>
<soap-env:Envelope xmlns:soap-env="http://schemas.xmlsoap.org/soap/envelope/">
  <soap-env:Body/>
</soap-env:Envelope>
<!-- 送信ファイル部分 -->
--boundary_ec6c66dd25d44f84b27510babf3f1be0
Content-Transfer-Encoding: binary
Content-Type: image/png; name="shinanogold.png"
Content-ID: <ham>
Content-Disposition: attachment; name="shinanogold.png";filename="shinanogold.png"

iVB...rkJggg==
--boundary_ec6c66dd25d44f84b27510babf3f1be0--

 
コード中で設定すべき内容は以下です。

パート 項目
SOAPメッセージ Content-ID HTTPヘッダの start パラメータと合わせる
添付ファイル Content-Transfer-Encoding バイナリの場合 binaryBase64エンコードの場合 base64
Content-Type - メディアタイプ 送信するファイルに合わせる (今回はpngのため、 image/png )
Content-Type - name パラメータ 送信ファイル名
Content-ID 添付ファイルごとに一意になる値、内容は任意
Content-Disposition namefilename パラメータとも、送信ファイル名


Transportを実装

既存の zeep.transports.Transport クラスを拡張して、Transportを実装します。

MIMEデータであれば、Pythonの標準モジュール email を使うことで、実装量が減るかもしれません。
19.1. email — 電子メールと MIME 処理のためのパッケージ — Python 3.6.5 ドキュメント

ただ、今回は理解を深めるため、自分で実装していきます。


__init__() 部分

元々の __init__() をオーバーライドし、SwAで必要なものを受け取れるようにします。

また、クラス定数 NEW_LINE_FOR_SWA_BODY を bytes型の改行コードとして定義します。

class SwATransport(Transport):
    """ SOAP with Attachment (SwA、非swaRef)用のTransport

    添付ファイルは、binary/Base64エンコードのどちらも可 (引数is_base64izeで切り替え)
    なお、Type Hints は、自作部分のみ記載(Zeepのものは不明/差し替わる可能性があるため)
    """
    NEW_LINE_FOR_SWA_BODY = b'\r\n'

    def __init__(self, file: pathlib.Path, attachment_content_id: str, is_base64ize: bool = False,
                 cache=None, timeout=300, operation_timeout=None, session=None) -> None:
        self.file = file
        self.attachment_content_id = attachment_content_id
        self.is_base64ize = is_base64ize

        # boundaryとSOAP部分のContentIDは任意の値で良いため、内部で生成する
        self.boundary = f'boundary_{self._generate_id_without_hyphen()}'
        self.soap_message_content_id = f'start_{self._generate_id_without_hyphen()}'

        super().__init__(cache=cache, timeout=timeout, operation_timeout=operation_timeout,
                         session=session)


改行コードをbytes型で定義した理由

メソッド post_xml() で使う引数 message は、最終的にはrequestsライブラリのSessionクラスにあるメソッド post() の引数 data となります。

 
post()のソースコードを見ると、コメントとして

(optional) Dictionary, list of tuples, bytes, or file-like object to send in the body of the :class:Request.

https://github.com/requests/requests/blob/v2.21.0/requests/sessions.py#L574

とありました。

 
Zeepではどの型を渡しているかというと、

# https://github.com/mvantellingen/python-zeep/blob/3.2.0/src/zeep/transports.py#L94
message = etree_to_string(envelope)
return self.post(address, message, headers)

とあり、 etree_to_string() の結果となります。

 
etree_to_string()は、 lxml.etree.tostring() になるようです。

# https://github.com/mvantellingen/python-zeep/blob/3.2.0/src/zeep/wsdl/utils.py#L24
def etree_to_string(node):
    return etree.tostring(
        node, pretty_print=False, xml_declaration=True, encoding='utf-8')

 
lxmlのドキュメントを読むと、

Defaults to ASCII encoding without XML declaration. This behaviour can be configured with the keyword arguments 'encoding' (string) and 'xml_declaration' (bool). Note that changing the encoding to a non UTF-8 compatible encoding will enable a declaration by default.

You can also serialise to a Unicode string without declaration by passing the unicode function as encoding (or str in Py3), or the name 'unicode'. This changes the return value from a byte string to an unencoded unicode string.

https://lxml.de/api/lxml.etree-module.html#tostring

とあり、bytes型が返ってくるようです。

これより、 etree_to_string(envelope) は、SOAPエンベロープXML tree を bytes型へ変換します。よって、requestsにもbytes型で渡すことになります。

requestsには、MIMEメッセージヘッダとSOAPエンベロープを改行コードで連結したものを渡します。SOAPエンベロープがbytes型であることから、改行コードもbytes型にしました。

また、改行コードをbytes型にしたのに合わせ、SwATransportクラスの文字リテラルもbytes型で定義しました。

 
ちなみに、 __init__() では、引数 attachment_content_id はstr型を想定しています。そのため、bytes型リテラルに attachment_content_id を埋め込む時は %演算子 + %a を使います。 *2


ユーティリティメソッド

ユーティリティメソッドを2つ用意します。

def _generate_id_without_hyphen(self) -> str:
    """ uuid4()でIDを生成する

    uuid4()だとハイフンも含まれるため、削除しておく
    """
    return str(uuid.uuid4()).replace("-", "")

def _format_bytes(self, target: bytes, values: Iterable[str]) -> bytes:
    """ bytes型にstr型を埋め込む

    埋め込むと、シングルクォート(')まで含まれてしまうため、削除しておく
    """
    return (target % values).replace(b"'", b"")

前者は、任意の値でよかった

  • boundaryパラメータ
  • startパラメータ

向けのID生成メソッドとして使用します。

後者はコメント通りです。今回のリテラルではシングルクォートが存在しなかったため、問題ないと判断しました。


残りを実装

あとは、SOAPメッセージ部分を生成するメソッドと

def _create_soap_part(self, envelope) -> bytes:
    """ レスポンスボディのうち、SOAP部分を作成する """
    mime_message_header = self.NEW_LINE_FOR_SWA_BODY.join([
        self._format_bytes(b'--%a', (self.boundary,)),
        b'Content-Type: text/xml; charset=utf-8',
        b'Content-Transfer-Encoding: 8bit',
        self._format_bytes(b'Content-ID: %a', (self.soap_message_content_id,)),
        b'',
    ])

    # etree_to_string()にて、envelopeをbytes型の送信データへ変換する
    return self.NEW_LINE_FOR_SWA_BODY.join([
        mime_message_header,
        etree_to_string(envelope),
    ])

 
SwAで添付するファイル部分を生成するメソッドを用意します。

def _create_attachment_part(self) -> bytes:
    """ レスオンスボディのうち、添付ファイル部分を作成する """
    if not self.file:
        return b''

    transfer_encoding = 'base64' if self.is_base64ize else 'binary'

    # ファイル名からMIMEタイプを推測するが、戻り値はタプルであることに注意
    # Content-Type向けのは1つ目の要素
    # https://docs.python.jp/3/library/mimetypes.html#mimetypes.guess_type
    content_type, _ = mimetypes.guess_type(str(self.file))

    mime_part_header = self.NEW_LINE_FOR_SWA_BODY.join([
        self._format_bytes(b'--%a', (self.boundary,)),
        self._format_bytes(b'Content-Transfer-Encoding: %a', (transfer_encoding,)),
        self._format_bytes(b'Content-Type: %a; name="%a"', (content_type, self.file.name)),
        self._format_bytes(b'Content-ID: <%a>', (self.attachment_content_id,)),
        self._format_bytes(b'Content-Disposition: attachment; name="%a"; filename="%a"',
                           (self.file.name, self.file.name)),
        b'',
    ])

    # 添付ファイルはバイナリ(bytes型)であることに注意
    with self.file.open(mode='rb') as f:
        attachment_data = f.read()

    if transfer_encoding == 'base64':
        attachment_data = base64.b64encode(attachment_data)

    return self.NEW_LINE_FOR_SWA_BODY.join([
        mime_part_header,
        attachment_data,
    ])

 
そして、SOAPメッセージ部分と添付ファイル部分を連結するメソッドを用意します。

def _create_message(self, envelope) -> bytes:
    """ SwA用のリクエストボディを作成する

    requests.post() で送信するため、bytes型で返すこと
    """

    # SOAP部分の作成
    soap_part = self._create_soap_part(envelope)
    # 添付ファイル部分の作成
    attachment_part = self._create_attachment_part()

    return self.NEW_LINE_FOR_SWA_BODY.join([
        soap_part,
        attachment_part,
        self._format_bytes(b'--%a--', (self.boundary,)),
    ])

 
最後に、HTTPリクエストヘッダに追加します。

def _add_swa_header(self, headers: dict, message: bytes):
    """ SwA用のヘッダを追加する """

    headers["Content-Type"] = "; ".join([
        "multipart/related",
        'boundary="{}"'.format(self.boundary),
        'type="text/xml"',
        'start="{}"'.format(self.soap_message_content_id),
        "charset=utf-8"
    ])
    headers["Content-Length"] = str(len(message))

 
上記で各メソッドがそろったため、 post_xml() でそれらを呼び出せば完成です。

def post_xml(self, address, envelope, headers):
    """ オーバーライドして、SwAデータをPOSTできるようにする """

    message = self._create_message(envelope)
    self._add_swa_header(headers, message)

    # SwAの添付ファイル部分はSOAP envelopeの外側にあり、HistoryPluginでは表示されないため、
    # 送信時のmessageを見るためにprint()しておく
    print(message)

    # etree_to_string()はすでに実行済のため、元々のpost_xml()にあった、self.post()だけ実装する
    return self.post(address, message, headers)


作成したSwATransportを使用してリクエストを送信

作成した SwATransport クラスは、Zeep Clientを生成する時に使います。

以下は、WSDLに書かれたエンドポイントに requestMessage() を使ってファイルを送信する例です。

# swa_runner.py
def run(attachment_content_id, is_base64ize=False):
    session = Session()
    transport = SwATransport(ATTACHMENT, attachment_content_id=attachment_content_id,
                             is_base64ize=is_base64ize, session=session)

    history_plugin = HistoryPlugin()
    client = Client(str(WSDL), transport=transport, plugins=[history_plugin])
    response = client.service.requestMessage()

    print('--- history ---')
    print('-- header --')
    print(history_plugin.last_sent)
    print('-- SOAP envelope --')
    print(etree.tostring(history_plugin.last_sent['envelope'],
                         pretty_print=True, encoding='unicode'))
    print('--- response ---')
    print(response)


if __name__ == '__main__':
    print('-' * 40)
    print('添付ファイルはバイナリのまま送信')
    print('-' * 40)
    run(attachment_content_id='ham', is_base64ize=False)

    print('-' * 40)
    print('添付ファイルはBASE64化して送信')
    print('-' * 40)
    run(attachment_content_id='spam', is_base64ize=True)

 
ちなみに、Clientを生成した後でも、 transport 属性に設定すれば差し替えられます。

transport = SwATransport(...)
client.transport = transport


動作確認

SOAP UIの MockService を使って動作を確認します。

以下の内容を指定して作成後、MockServiceを起動し、 running on port 9401 と表示されればOKです。

項目
initial WSDL 上記で指定した swa.wsdl
Path WSDLで指定したエンドポイント /SwABindingSoap11
Port WSDLで指定したポート 9401

 
また、送信するファイルとして、 shinanogold.png を用意します。
f:id:thinkAmi:20190101165407p:plain:w100

 
次に上記で作成した swa_runner.py を実行します。

実行結果は以下です。見づらかったため、一部を改行しています。

$ python swa_runner.py 
----------------------------------------
添付ファイルはバイナリのまま送信
----------------------------------------
b'--boundary_80e8b8b01b1c47a7870a71622ec74c0b\r\n
Content-Type: text/xml; charset=utf-8\r\n
Content-Transfer-Encoding: 8bit\r\nContent-ID: start_e4e758dda9fc4671a4232b48e4a53360\r\n\r\n

<?xml version=\'1.0\' encoding=\'utf-8\'?>\n
<soap-env:Envelope xmlns:soap-env="http://schemas.xmlsoap.org/soap/envelope/">
  <soap-env:Body/>
</soap-env:Envelope>\r\n
--boundary_80e8b8b01b1c47a7870a71622ec74c0b\r\n
Content-Transfer-Encoding: binary\r\n
Content-Type: image/png; name="shinanogold.png"\r\n
Content-ID: <ham>\r\n
Content-Disposition: attachment; name="shinanogold.png"; filename="shinanogold.png"\r\n\r\n\

x89PNG...\x00IEND\xaeB`\x82\r\n
--boundary_80e8b8b01b1c47a7870a71622ec74c0b--'
--- history ---
-- header --
{'envelope': <Element {http://schemas.xmlsoap.org/soap/envelope/}Envelope at 0x10ff59cc8>, 
'http_headers': {
  'SOAPAction': '"http://example.com/HelloWorld/requestMessage"', 
  'Content-Type': 'multipart/related; boundary="boundary_80e8b8b01b1c47a7870a71622ec74c0b"; type="text/xml"; start="start_e4e758dda9fc4671a4232b48e4a53360"; charset=utf-8', 
  'Content-Length': '6192'}}
-- SOAP envelope --
<soap-env:Envelope xmlns:soap-env="http://schemas.xmlsoap.org/soap/envelope/">
  <soap-env:Body/>
</soap-env:Envelope>

--- response ---
?
----------------------------------------
添付ファイルはBASE64化して送信
----------------------------------------
b'--boundary_ddb04f0720aa4685ab41072a28818d2a\r\n
Content-Type: text/xml; charset=utf-8\r\n
Content-Transfer-Encoding: 8bit\r\n
Content-ID: start_e5e8c71ed781455a9ed66f214da1a5a7\r\n\r\n

<?xml version=\'1.0\' encoding=\'utf-8\'?>\n
<soap-env:Envelope xmlns:soap-env="http://schemas.xmlsoap.org/soap/envelope/">
  <soap-env:Body/>
</soap-env:Envelope>\r\n
--boundary_ddb04f0720aa4685ab41072a28818d2a\r\n
Content-Transfer-Encoding: base64\r\n
Content-Type: image/png; name="shinanogold.png"\r\n
Content-ID: <spam>\r\n
Content-Disposition: attachment; name="shinanogold.png"; filename="shinanogold.png"\r\n\r\n

iVBOR...AAAABJRU5ErkJggg==\r\n
--boundary_ddb04f0720aa4685ab41072a28818d2a--'
--- history ---
-- header --
{'envelope': <Element {http://schemas.xmlsoap.org/soap/envelope/}Envelope at 0x11004d388>, 
'http_headers': {
  'SOAPAction': '"http://example.com/HelloWorld/requestMessage"', 
  'Content-Type': 'multipart/related; boundary="boundary_ddb04f0720aa4685ab41072a28818d2a"; type="text/xml"; start="start_e5e8c71ed781455a9ed66f214da1a5a7"; charset=utf-8',
  'Content-Length': '8057'}}
-- SOAP envelope --
<soap-env:Envelope xmlns:soap-env="http://schemas.xmlsoap.org/soap/envelope/">
  <soap-env:Body/>
</soap-env:Envelope>

--- response ---
?

 
SOAP UIのログを見ると、2つエントリが追加されています。

前者がバイナリ形式での送信、後者がBase64エンコードでの送信のため、それぞれのログを確認します。


バイナリ送信の結果

SOAP UIの Headers タブでリクエストヘッダを確認します。

f:id:thinkAmi:20190101165028p:plain:w300

 
Attachments タブで、ファイルが送信されてきたことが確認できました。

また、Type列が MIME となっています。このページの解説より、SOAP UIでもSwAのファイルとして認識されているようです。

f:id:thinkAmi:20190101165127p:plain:w300

 
ファイルを選択し、 Exports the selected attachment to a file でファイルをエクスポートして確認します。
f:id:thinkAmi:20190101165221p:plain:w150

送信したファイルを取得できました。


Base64エンコード送信の結果

こちらも、SOAP UI のHeadersタブの結果です。binaryで送信するよりもContent-Lengthが増加しています。
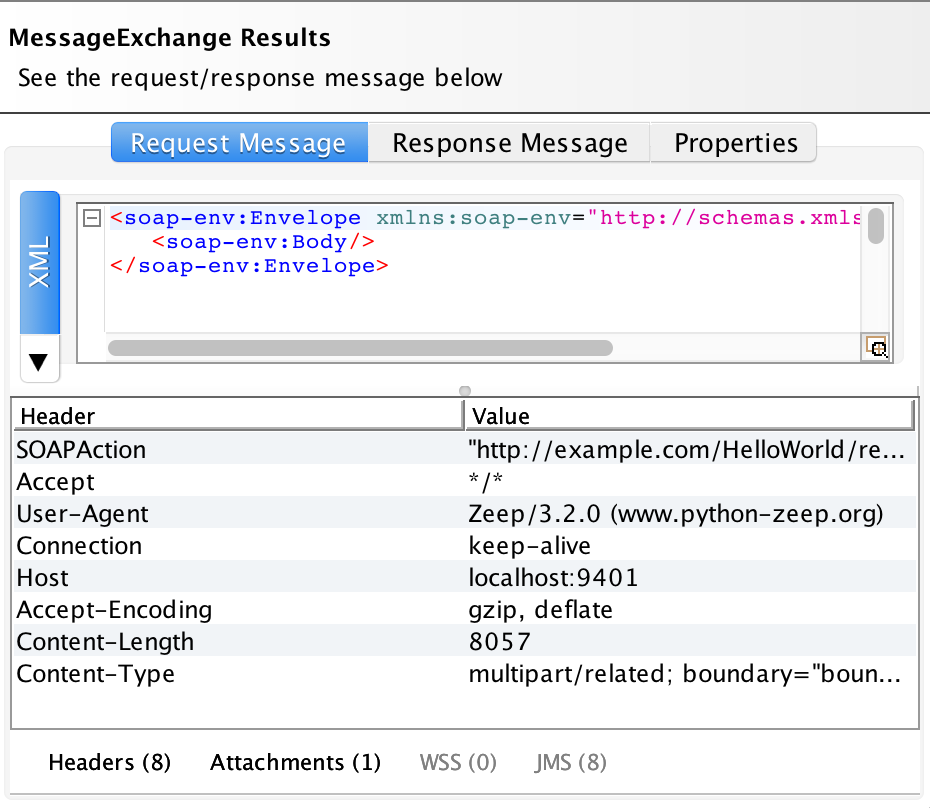
f:id:thinkAmi:20190101165449p:plain:w300

 
Attachmentsタブでも、ファイルが送信されています。Content-IDも、Base64エンコードスクリプトで指定した <spam> になっています。

f:id:thinkAmi:20190101165552p:plain:w300

 
エクスポートした結果も同じです。

f:id:thinkAmi:20190101165543p:plain:w150


参考文献

MIMEまわりの定義を知るために読みました。
O'Reilly Japan - 電子メールプロトコル

古い書籍のため、 multipart/related については記載されていませんでしたが、それ以外については参考になりました。


ソースコード

GitHubに上げました。 file_attachments/swa 以下が今回のファイルです。
https://github.com/thinkAmi-sandbox/python_zeep-sample
*1:swaRefであれば、W3Cにありました:https://www.w3.org/TR/SOAP-attachments#HTTPBinding

*2:このあたりは以前書きました:Python3で、bytes型の文字列にstr型の文字列を埋め込むため、%演算子 + %a を使う - メモ的な思考的な / http://thinkami.hatenablog.com/entry/2018/12/30/181438

Python + Zeepにて、SOAPのinline(Base64エンコード)でファイルを送信する

SOAPでファイルを送信する方法を調べたところ、5つほど見つかりました。

  1. inline (Base64 エンコード)
  2. SOAP with Attachments (SwA)
  3. swaRef
  4. wsi:swaRef
  5. MTOM

参考:SOAP Attachments and Files | SoapUI

 
Zeepではどれが実装されているかを調べたところ、elementに直接送信ファイルを埋め込む形であるinlineはあるものの、他は実装されていなさそうでした。

ただ、MTOMについては、issueやPRがありました。

また、以下のcommitが取り込まれているため、将来的にはサポートされるかもしれません。
https://github.com/mvantellingen/python-zeep/commit/e346e91d6d8b0a37a84ab2bd9b423c25ddfd88f1#diff-40cce0d06cb2448df518c74200e882ae

 
そこで今回は、inline (Base64エンコード) でのファイル送信を試してみました。

なお、前提は以下です。

 
目次


環境


WSDLでの実装

inlineでデータを送信する場合、型(type)として xsd:base64Binary を使った定義を用意します。

<!-- xmlns:xsd="http://www.w3.org/2001/XMLSchema" -->
<xsd:element name="RequestInterface">
    <xsd:complexType>
        <xsd:sequence>
            <xsd:element minOccurs="0" name="image" type="xsd:base64Binary" />
        </xsd:sequence>
    </xsd:complexType>
</xsd:element>

 
残りの部分は、以前作成したものと同じです。
Python + Zeep + SOAP UI + 自作WSDLで、SOAPのリクエストとレスポンスを試してみた - メモ的な思考的な

全体像はこんな感じです。

inline.wsdl

<?xml version="1.0" encoding="UTF-8"?>
<wsdl:definitions
        xmlns:wsdl="http://schemas.xmlsoap.org/wsdl/"
        xmlns:soap11="http://schemas.xmlsoap.org/wsdl/soap/"
        xmlns:http="http://schemas.xmlsoap.org/wsdl/http/"
        xmlns:mime="http://schemas.xmlsoap.org/wsdl/mime/"
        xmlns:xsd="http://www.w3.org/2001/XMLSchema"
        xmlns:ns0="http://example.com/HelloWorld"
        targetNamespace="http://example.com/HelloWorld">

    <wsdl:types>
        <xsd:schema elementFormDefault="qualified" targetNamespace="http://example.com/HelloWorld">
            <xsd:element name="RequestInterface">
                <xsd:complexType>
                    <xsd:sequence>
                        <xsd:element minOccurs="0" name="image" type="xsd:base64Binary" />
                    </xsd:sequence>
                </xsd:complexType>
            </xsd:element>
            <xsd:element name="ResponseInterface">
                <xsd:complexType>
                    <xsd:sequence>
                        <xsd:element minOccurs="0" name="returnMessage" type="xsd:string" />
                    </xsd:sequence>
                </xsd:complexType>
            </xsd:element>
        </xsd:schema>
    </wsdl:types>

    <wsdl:message name="messageIn">
        <wsdl:part name="parameters" element="ns0:RequestInterface" />
    </wsdl:message>
    <wsdl:message name="messageOut">
        <wsdl:part name="parameters" element="ns0:ResponseInterface" />
    </wsdl:message>

    <wsdl:portType name="HelloPort">
        <wsdl:operation name="requestMessage">
            <wsdl:input message="ns0:messageIn"/>
            <wsdl:output message="ns0:messageOut"/>
        </wsdl:operation>
    </wsdl:portType>

    <wsdl:binding name="InlineAttachmentBindingSoap11" type="ns0:HelloPort">
        <soap11:binding transport="http://schemas.xmlsoap.org/soap/http" style="document"/>
        <wsdl:operation name="requestMessage">
            <soap11:operation soapAction="http://example.com/HelloWorld/requestMessage" />
            <wsdl:input>
                <soap11:body use="literal"/>
            </wsdl:input>
            <wsdl:output>
                <soap11:body use="literal"/>
            </wsdl:output>
        </wsdl:operation>
    </wsdl:binding>

    <wsdl:service name="HelloService">
        <wsdl:port name="InlineAttachmentServicePort" binding="ns0:InlineAttachmentBindingSoap11">
            <soap11:address location="http://localhost:9400/inlineAttachmentBindingSoap11"/>
        </wsdl:port>
    </wsdl:service>
</wsdl:definitions>


Zeepでの実装

Zeepでは、以下の流れで実装すれば良さそうです。

コードだとこんな感じです。

# バイナリ形式でファイルを読み込み
with ATTACHMENT.open(mode='rb') as f:
    attachment_data = f.read()

# ファイルをBase64エンコード
encoded_data = base64.b64encode(attachment_data)

client = Client(str(WSDL))

# ZeepクライアントにBase64エンコードしたデータを渡す
# この場合、上記で定義した `image` elementに渡している
response = client.service.requestMessage(image=encoded_data)


動作確認

SOAP UIにて動作確認します。

そこで、SOAP UIのMockServiceをSOAPサーバとして動作させます。

  • SOAP UIにて、上記の inline.wsdl を指定してプロジェクトを作成します。
  • エンドポイント inlineAttachmentBindingSoap11 を右クリックし、 Generate SOAP Mock Service を選択
  • Generate MockService ダイアログでは、以下を指定
    • Pathに、WSDLと同じ /inlineAttachmentBindingSoap11
    • Portに、WSDLと同じ 9400
    • Starts the MockService immediately にチェックを入れ、MockServiceを起動
  • Generate SOAP MockService ダイアログでは、以下を指定
    • Specify name of MockService to createは、デフォルト値
  • MockServiceダイアログが表示されるため、実行ボタンを押す
    • 右側に run on port 9400 が表示されればOK

 
あとは、Zeepで作成したSOAPクライアントを実行します。

なお、送信時のSOAPエンベロープの内容を確認するため、History pluginを使います。
Python + Zeep + History pluginで、SOAPのリクエストとレスポンスを確認してみた - メモ的な思考的な

 
全体像は以下の通りです。

import base64
import pathlib

from lxml import etree
from zeep import Client
from zeep.plugins import HistoryPlugin

BASE_PATH = pathlib.Path(__file__).resolve().parents[0]
WSDL = BASE_PATH.joinpath('inline.wsdl')
ATTACHMENT = BASE_PATH.joinpath('shinanogold.png')


def run():
    with ATTACHMENT.open(mode='rb') as f:
        attachment_data = f.read()
    encoded_data = base64.b64encode(attachment_data)

    history_plugin = HistoryPlugin()
    client = Client(str(WSDL), plugins=[history_plugin])
    response = client.service.requestMessage(image=encoded_data)

    print('--- request body ---')
    print(etree.tostring(history_plugin.last_sent['envelope'], pretty_print=True, encoding='unicode'))

    print('--- response ---')
    print(response)


if __name__ == '__main__':
    run()

 
上記のPythonスクリプトを実行したところ、image要素に画像のBase64エンコードデータが含まれて送信されました(スペースの関係上、途中は省略しました)。

responseで ? が返ってきていますが、SOAP UIで何も設定していないため、デフォルトのレスポンス値の ? となっています。

$ python inline_runner.py 
--- request body ---
<soap-env:Envelope xmlns:soap-env="http://schemas.xmlsoap.org/soap/envelope/">
  <soap-env:Body>
    <ns0:RequestInterface xmlns:ns0="http://example.com/HelloWorld">
    
      <!-- Base64エンコードした画像データ(途中省略) -->
      <ns0:image>aVZ...PT0=</ns0:image>
      
    </ns0:RequestInterface>
  </soap-env:Body>
</soap-env:Envelope>

--- response ---
?

 
MockServiceダイアログを見ると、アクセスした時のログが追加されているため、ダブルクリックで表示します。

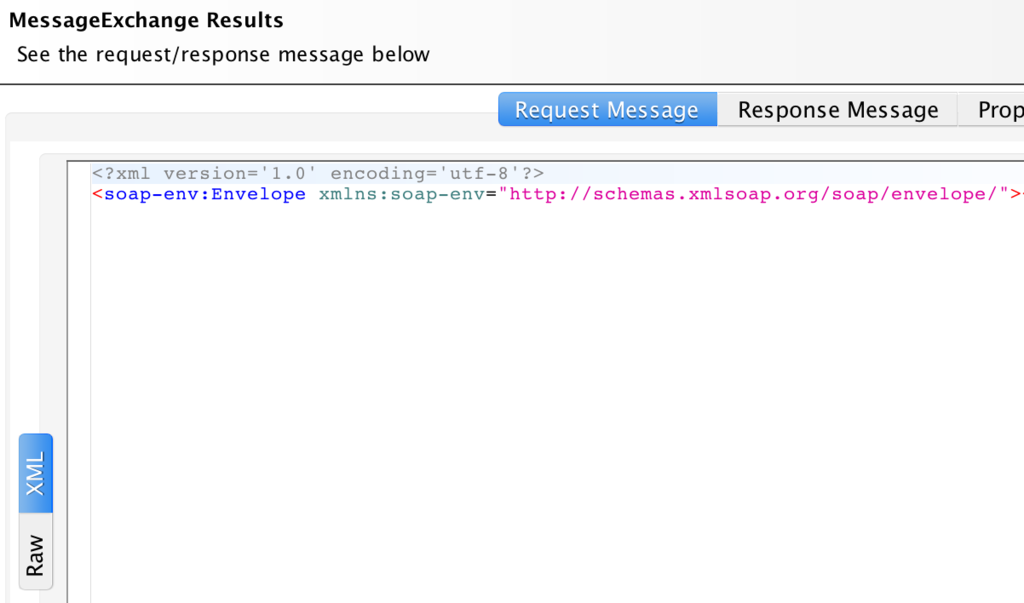
Request Messageタブを見ると、Zeepからリクエストした時のデータが表示されていました。

f:id:thinkAmi:20190101115607p:plain:w300

上記の内容を以下に転記しますが、History pluginの内容と一致しているため、うまく送信できたと考えられました。

<?xml version='1.0' encoding='utf-8'?>
<soap-env:Envelope xmlns:soap-env="http://schemas.xmlsoap.org/soap/envelope/"><soap-env:Body><ns0:RequestInterface xmlns:ns0="http://example.com/HelloWorld"><ns0:image>aVZ...PT0=</ns0:image></ns0:RequestInterface></soap-env:Body></soap-env:Envelope>

 
本当に一致しているかはBase64デコードして確認する必要がありますが、今回は省略します。


ソースコード

GitHubに上げました。 file_attachments/inline/ ディレクトリの中が今回のものです。
https://github.com/thinkAmi-sandbox/python_zeep-sample