Python + Bottleで、フォームやCookieに日本語を設定したら文字化けした

Python + Bottleで、フォームやCookieに日本語を使ったら文字化けしたため、メモを残します。

目次


環境


フォームやCookieに設定した値の取得について

フォームやCookieに設定した値は

  • フォームに入力した値:request.forms
  • Cookieに設定した値:request.cookies

という、FormsDict型のオブジェクトとして保存されています。

 
例えば、

<form action="/" method="POST">
    <div>
        <label for="input">入力</label>
        <input type="text" name="input" size="60">
    </div>
    <div>
        <input type="submit">
        <a href="/delete_cookie">Cookie削除</a>
    </div>
</form>

というフォームがあった場合、

from bottle import Bottle, request

app = Bottle()

@app.post('/')
def post_form():
    result = request.forms.get('input')

として値を取得します。

 
また、Cookieの場合は、

response.set_cookie('key', 'value')

Cookieに値を設定し、

cookie_by_get = request.get_cookie('key')

で値を取得します。


日本語の文字化けと対応について

ただ、上記のrequest.forms.get()request.get_cookie()では、日本語などのマルチバイト文字の場合に文字化けします。

result = request.forms.get('input')
print(result)
#=> ã

 
BottleのチュートリアルのNoteに、原因の記載があります。

In Python 3 all strings are unicode, but HTTP is a byte-based wire protocol. The server has to decode the byte strings somehow before they are passed to the application. To be on the safe side, WSGI suggests ISO-8859-1 (aka latin1), a reversible single-byte codec that can be re-encoded with a different encoding later. Bottle does that for FormsDict.getunicode() and attribute access, but not for the dict-access methods

request.forms.get(key)request.forms[key]では、latin1でデコードした値となるため、文字化けしているようです。

latin1でのデコードについては、PEP3333(日本語訳)のこのあたりで触れられています。
Unicode の問題 | PEP 3333: Python Web Server Gateway Interface v1.0.1 — knzm.readthedocs.org 2012-12-31 documentation

 
そのため、utf-8でデコードした値を取得するには、

などを使います。
INTRODUCING FORMSDICT | Tutorial — Bottle 0.13-dev documentation

 
フォームの値について、

# 値を取得
form_by_get = request.forms.get('input')
form_by_dict_key = request.forms['input']
form_by_getunicode = request.forms.getunicode('input')
form_by_attr = request.forms.input
form_by_decode = request.forms.decode().get('input')
form_by_getall = request.forms.getall('input')
form_by_getall_first = request.forms.getall('input')[0]
form_by_decode_getall = request.forms.decode().getall('input')
form_by_decode_getall_first = request.forms.decode().getall('input')[0]

# テンプレートへ反映
return jinja2_template(
    'form.html',
    form_by_get=form_by_get,
    form_by_dict_key=form_by_dict_key,
    form_by_getunicode=form_by_getunicode,
    form_by_attr=form_by_attr,
    form_by_decode=form_by_decode,
    form_by_getall=form_by_getall,
    form_by_getall_first=form_by_getall_first,
    form_by_decode_getall=form_by_decode_getall,
    form_by_decode_getall_first=form_by_decode_getall_first)

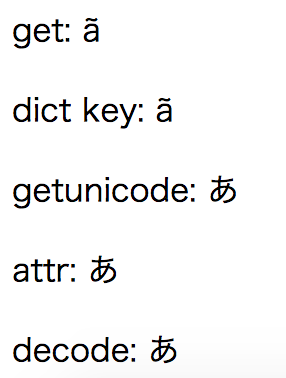
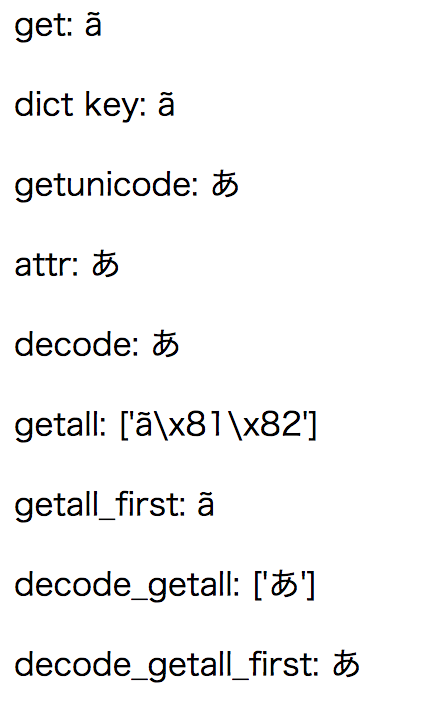
としてブラウザで確認したところ、

f:id:thinkAmi:20170409170633p:plain:w170

となりました。

 
また、Cookieの場合も、POSTで

response.set_cookie('input', request.forms.get('input'))

と値を設定してから、GETで

cookie_by_get = request.get_cookie('input', '')
cookie_by_dict_key = request.cookies['input'] if request.cookies else ''
cookie_by_getunicode = request.cookies.getunicode('input', default='')
cookie_by_attr = request.cookies.input if request.cookies else ''
cookie_by_decode = request.cookies.decode().get('input', '')

と値を取得してブラウザで表示したところ、

f:id:thinkAmi:20170409170718p:plain:w120

となりました。


その他

以前、WebTestのサンプルで、Bottleのフォームを使った時に文字化けしていました。
Pythonで、WebTestを使って、WSGIサーバを起動せずにWSGIアプリのテストをする - メモ的な思考的な

 
当時、文字化けの原因がつかめませんでしたが、POSTされたフォームの値をget()で取得していたのが原因でした。

そのため、上記のサンプルはget()ではなく、getunicode()を使うように書き換えました。


ソースコード

GitHubに上げました。e.g._FormsDict_using_multi_byte_stringディレクトリ以下が今回のサンプルです。
thinkAmi-sandbox/Bottle-sample: Bottle (python web framework) sample codes

Python + modulefinder + collections.Counterで、モジュールがimportされた回数を調べる

複数のPythonスクリプトを対象に、モジュールがimportされた回数を知りたくなりました。

ロードされているモジュールはsys.modulesなどが使えますが、これではimportされた回数が分かりません。

調べてみたところ、標準ライブラリmodulefinder + collections.Counterを使えば、importされた回数がわかりそうだったため、その時のメモを残します。

 
目次


環境


pyenvのupgrade

本題とは関係ありませんが、Python3.6.1がリリースされたため、pyenvをupgradeしてインストールしました。

# 現在のpyenvのバージョンを確認
$ pyenv --version
pyenv 1.0.7

# インストールできるPythonのバージョンを確認
$ pyenv install --list
Available versions:
...
  3.6.0
  3.6-dev
  3.7-dev

# brewでpyenvをアップグレード
$ brew upgrade pyenv
...
🍺  /usr/local/Cellar/pyenv/1.0.10: 560 files, 2.2MB, built in 12 seconds

# 再度確認
$ pyenv --version
pyenv 1.0.10

$ pyenv install --list
Available versions:
...
  3.6.0
  3.6-dev
  3.6.1
  3.7-dev

# インストール
$ pyenv install 3.6.1
...
Installed Python-3.6.1 to /Users/kamijoshinya/.pyenv/versions/3.6.1

# インストールされているバージョンを確認
$ pyenv versions
  system
* 3.6.0
  3.6.1

# Pythonのバージョンを切り替え
$ pyenv global 3.6.1

# Pythonのバージョンを確認
$ python --version
Python 3.6.1


用意したモジュールやPythonスクリプト

こんな感じのディレクトリ・ファイルを用意します。

$ tree
.
├── from_import.py
├── from_import_ham_only.py
├── from_import_spam_only.py
├── import.py
├── eggs_package
│   ├── __init__.py
│   └── eggs_module.py
├── ham_package
│   ├── __init__.py
│   └── ham_module.py
└── spam_package
    ├── __init__.py
    └── spam_module.py

 
各モジュールにはprint()があるだけです。

spam_package/spam_module.py

def spam():
    print('spam')

 
ham_package/ham_module.py

def ham():
    print('ham')

 
eggs_package/eggs_module.py

def eggs():
    print('eggs')

 
上記のモジュールをimportするPythonスクリプトはこんな感じです。

import.py

import ham_package.ham_module
import eggs_package.eggs_module
import spam_package.spam_module

ham_package.ham_module.ham()
eggs_package.eggs_module.eggs()
spam_package.spam_module.spam()

 
from_import.py

from ham_package.ham_module import ham
from eggs_package.eggs_module import eggs
from spam_package.spam_module import spam

ham()
eggs()
spam()

 
from_import_spam_only.py

from spam_package.spam_module import spam

 
from_import_ham_only.py

from ham_package.ham_module import ham


ModuleFinderの属性

ModuleFinderオブジェクトやModuleオブジェクトの属性を調べてみました。

finder = ModuleFinder()
finder.run_script('from_import.py')
print('dir ModuleFinder: {}'.format(dir(finder)))

    for name, mod in finder.modules.items():
        print('type:{}'.format(type(mod)))
        #=> type:<class 'modulefinder.Module'>
        print('dir Module object:{}'.format(dir(mod)))

実行結果

# ModuleFinderオブジェクトの属性
dir ModuleFinder: ['__class__', '__delattr__', '__dict__', '__dir__', '__doc__', '__eq__', '__format__', '__ge__', '__getattribute__', '__gt__', '__hash__', '__init__', '__init_subclass__', '__le__', '__lt__', '__module__', '__ne__', '__new__', '__reduce__', '__reduce_ex__', '__repr__', '__setattr__', '__sizeof__', '__str__', '__subclasshook__', '__weakref__', '_add_badmodule', '_safe_import_hook', 'add_module', 'any_missing', 'any_missing_maybe', 'badmodules', 'debug', 'determine_parent', 'ensure_fromlist', 'excludes', 'find_all_submodules', 'find_head_package', 'find_module', 'import_hook', 'import_module', 'indent', 'load_file', 'load_module', 'load_package', 'load_tail', 'modules', 'msg', 'msgin', 'msgout', 'path', 'processed_paths', 'replace_paths', 'replace_paths_in_code', 'report', 'run_script', 'scan_code', 'scan_opcodes']

# Moduleオブジェクトの属性
dir:['__class__', '__code__', '__delattr__', '__dict__', '__dir__', '__doc__', '__eq__', '__file__', '__format__', '__ge__', '__getattribute__', '__gt__', '__hash__', '__init__', '__init_subclass__', '__le__', '__lt__', '__module__', '__name__', '__ne__', '__new__', '__path__', '__reduce__', '__reduce_ex__', '__repr__', '__setattr__', '__sizeof__', '__str__', '__subclasshook__', '__weakref__', 'globalnames', 'starimports']


ModuleFinderの中身

ModuleFinder.run_script()後の属性値を見てみます。

finder = ModuleFinder()
finder.run_script('from_import_ham_only.py')

for name, mod in finder.modules.items():
    print('-'*10)
    print('name:{}'.format(name))
    print('globalnames:{}'.format(mod.globalnames))
    print('modules:{}'.format(','.join(list(mod.globalnames.keys()))))
    print('starimports:{}'.format(mod.starimports))

print('bad modules:{}'.format(','.join(finder.badmodules.keys())))

実行結果

----------
name:__main__
globalnames:{'ham': 1}
modules:ham
starimports:{}
----------
name:ham_package
globalnames:{}
modules:
starimports:{}
----------
name:ham_package.ham_module
globalnames:{'ham': 1}
modules:ham
starimports:{}
bad modules:


複数のファイルに対してrun_script()する時の注意点

ModuleFinderオブジェクトを使い回し、複数ファイルに対して、ModuleFinder.run_script()してみます。

files = ['from_import_spam_only.py', 'from_import_ham_only.py']
# ModuleFinderオブジェクトを使いまわす
finder = ModuleFinder()

for f in files:
    finder.run_script(f)
    for name, mod in finder.modules.items():
        print('-'*10)
        print('file:{}'.format(f))
        print('name:{}'.format(name))
        print('modules:{}'.format(','.join(list(mod.globalnames.keys()))))

 
実行結果を見ると、from_import_ham_only.pyはimportしているhamの他、spamも含まれていました。

----------
file:from_import_spam_only.py
name:__main__
modules:spam
----------
file:from_import_spam_only.py
name:spam_package
modules:
----------
file:from_import_spam_only.py
name:spam_package.spam_module
modules:spam
----------
file:from_import_ham_only.py
name:__main__
modules:spam,ham     <= hamだけなのにspamがいる
----------
file:from_import_ham_only.py
name:spam_package
modules:
----------
file:from_import_ham_only.py
name:spam_package.spam_module
modules:spam
----------
file:from_import_ham_only.py
name:ham_package
modules:
----------
file:from_import_ham_only.py
name:ham_package.ham_module
modules:ham

 
そのため、ModuleFinderオブジェクトを使いまわさずに、

files = ['from_import_spam_only.py', 'from_import_ham_only.py']

for f in files:
    # ModuleFinderオブジェクトは、ファイルごとに生成する
    finder = ModuleFinder()
    finder.run_script(f)
    for name, mod in finder.modules.items():
        print('-'*10)
        print('file:{}'.format(f))
        print('name:{}'.format(name))
        print('modules:{}'.format(','.join(list(mod.globalnames.keys()))))

としたところ、正しい結果が出ました。

----------
file:from_import_spam_only.py
name:__main__
modules:spam
----------
file:from_import_spam_only.py
name:spam_package
modules:
----------
file:from_import_spam_only.py
name:spam_package.spam_module
modules:spam
----------
file:from_import_ham_only.py
name:__main__
modules:ham                  <= hamだけになった
----------
file:from_import_ham_only.py
name:ham_package
modules:
----------
file:from_import_ham_only.py
name:ham_package.ham_module
modules:ham


importとfrom~importの違い

from ham_package.ham_module import hamimport ham_package.ham_moduleで違いがあるかをみてみます。

files = ['from_import.py', 'import.py']

for f in files:
    print('='*10)
    print('filename:{}'.format(f))
    # ModuleFinderオブジェクトは、ファイルごとに生成する
    finder = ModuleFinder()
    finder.run_script(f)
    for name, mod in finder.modules.items():
        print('-'*10)
        print('name:{}'.format(name))
        print('modules:{}'.format(','.join(list(mod.globalnames.keys()))))

 
__main__以外の結果は同じようです。

==========
filename:from_import.py
----------
name:__main__
modules:ham,eggs,spam
----------
name:ham_package
modules:
----------
name:ham_package.ham_module
modules:ham
----------
name:eggs_package
modules:
----------
name:eggs_package.eggs_module
modules:eggs
----------
name:spam_package
modules:
----------
name:spam_package.spam_module
modules:spam
==========
filename:import.py
----------
name:__main__
modules:ham_package,eggs_package,spam_package
----------
name:ham_package
modules:
----------
name:ham_package.ham_module
modules:ham
----------
name:eggs_package
modules:
----------
name:eggs_package.eggs_module
modules:eggs
----------
name:spam_package
modules:
----------
name:spam_package.spam_module
modules:spam


モジュールがimportされた回数を調べる

ここからが本題ですが、ModuleFinderとcollections.Counterを使って、モジュールがimportされた回数を調べてみます。

from modulefinder import ModuleFinder
import os
from collections import Counter


def is_target(filename):
    if '__' in filename:
        # __file__や__init__.pyを除外
        return False
    if 'report' in filename:
        return False
    if os.path.splitext(filename)[1] != '.py':
        return False
    return True


def collect_files():
    root_dir = os.path.abspath(os.path.dirname(__file__))
    results = []
    for root, dirs, files in os.walk(root_dir):
        dirs[:] = [d for d in dirs if 'env' not in os.path.join(root, d)]
        targets = [os.path.join(root, f) for f in files if is_target(f)]
        results.extend(targets)
    return results


def main():
    files = collect_files()

    modules = []
    for f in files:
        finder = ModuleFinder()
        finder.run_script(f)

        for name, mod in finder.modules.items():
            if name == '__main__':
                continue
            if not mod.globalnames.keys():
                continue
            modules.append(name)

    c = Counter(modules)
    print(c.most_common())


if __name__ == '__main__':
    main()

 
Pythonスクリプトでimportしているのは、

  • import.py (spam, ham, eggs)
  • from_import.py (spam, ham, eggs)
  • from_import_ham_only.py (ham)
  • from_import_spam_only.py (spam)

なので、実行結果の

[('ham_package.ham_module', 3), ('spam_package.spam_module', 3), ('eggs_package.eggs_module', 2)]

は正しく数え上げられているようです。


ソースコード

GitHubに上げました。
thinkAmi-sandbox/python_modulefinder-sample
Pythonで、os.walk()を使って、特定のディレクトリを除いたファイル一覧を取得する

Pythonで、特定のディレクトリを除いたファイル一覧を取得することがあったため、メモを残します。

 
目次

環境

 
また、ディレクトリやファイル構成は以下の通りです。

$ pwd
path/to/root/e.g._os_walk

$ tree
.
├── bar
│   ├── foo.txt
│   ├── fuga
│   │   ├── ham.txt
│   │   └── spam.txt
│   └── hoge
│       ├── ham.txt
│       └── spam.txt
├── baz
│   ├── fuga
│   └── hoge
├── foo
│   ├── foo.txt
│   └── hoge
│       ├── ham.txt
│       └── spam.txt
├── make_file.py
└── os_walk.py

 
上記の構成を再現する場合は、以下のPythonスクリプトを流します。

今回は、pathlibのPathでtouch()でファイルを作成しています。
utility - Implement touch using Python? - Stack Overflow

from pathlib import Path

# parents=Trueとして、親ディレクトリがない場合は同時に作成
Path('foo/hoge').mkdir(parents=True, exist_ok=True)
Path('foo/foo.txt').touch()
Path('foo/hoge/spam.txt').touch()
Path('foo/hoge/ham.txt').touch()
Path('bar/hoge').mkdir(parents=True, exist_ok=True)
Path('bar/fuga').mkdir(parents=True, exist_ok=True)
Path('bar/foo.txt').touch()
Path('bar/hoge/spam.txt').touch()
Path('bar/hoge/ham.txt').touch()
Path('bar/fuga/spam.txt').touch()
Path('bar/fuga/ham.txt').touch()
Path('baz/hoge').mkdir(parents=True, exist_ok=True)
Path('baz/fuga').mkdir(parents=True, exist_ok=True)


os.walk()の動き

こんな感じのPythonスクリプトを用意し、動作を確認します。

root_dir = os.path.abspath(os.path.dirname(__file__))

for root, dirs, files in os.walk(root_dir):
    print('-'*10)
    print('root:{}'.format(root))
    print('dirs:{}'.format(dirs))
    print('files:{}'.format(files))

 
実行すると、bar -> baz -> fooの順でディレクトリを検索しているようでした。

$ python os_walk.py 
----------
root:path/to/root/e.g._os_walk
dirs:['bar', 'baz', 'foo']
files:['make_file.py', 'os_walk.py']
----------
root:path/to/root/e.g._os_walk/bar
dirs:['fuga', 'hoge']
files:['foo.txt']
----------
root:path/to/root/e.g._os_walk/bar/fuga
dirs:[]
files:['ham.txt', 'spam.txt']
----------
root:path/to/root/e.g._os_walk/bar/hoge
dirs:[]
files:['ham.txt', 'spam.txt']
----------
root:path/to/root/e.g._os_walk/baz
dirs:['fuga', 'hoge']
files:[]
----------
root:path/to/root/e.g._os_walk/baz/fuga
dirs:[]
files:[]
----------
root:path/to/root/e.g._os_walk/baz/hoge
dirs:[]
files:[]
----------
root:path/to/root/e.g._os_walk/foo
dirs:['hoge']
files:['foo.txt']
----------
root:path/to/root/e.g._os_walk/foo/hoge
dirs:[]
files:['ham.txt', 'spam.txt']


ファイルの一覧を取得

os.walk()を使って、ファイル一覧を取得してみます。

root_dir = os.path.abspath(os.path.dirname(__file__))

target_files = []
for root, dirs, files in os.walk(root_dir):
    targets = [os.path.join(root, f) for f in files]
    target_files.extend(targets)

for f in target_files:
    print(f)

 
実行すると、空ディレクトリ(/baz/hoge/baz/fuga)以外のファイル一覧を取得できました。

path/to/root/e.g._os_walk/make_file.py
path/to/root/e.g._os_walk/os_walk.py
path/to/root/e.g._os_walk/bar/foo.txt
path/to/root/e.g._os_walk/bar/fuga/ham.txt
path/to/root/e.g._os_walk/bar/fuga/spam.txt
path/to/root/e.g._os_walk/bar/hoge/ham.txt
path/to/root/e.g._os_walk/bar/hoge/spam.txt
path/to/root/e.g._os_walk/foo/foo.txt
path/to/root/e.g._os_walk/foo/hoge/ham.txt
path/to/root/e.g._os_walk/foo/hoge/spam.txt


特定のディレクトリを除いたファイルの一覧を取得

公式ドキュメントを読むと、

topdown が True のとき、呼び出し側は dirnames リストを、インプレースで ( たとえば、 del やスライスを使った代入で ) 変更でき、 walk() は dirnames に残っているサブディレクトリ内のみを再帰します。これにより、検索を省略したり、特定の訪問順序を強制したり、呼び出し側が walk() を再開する前に、呼び出し側が作った、または名前を変更したディレクトリを、 walk() に知らせたりすることができます。

os.walk() | 16.1. os — 雑多なオペレーティングシステムインタフェース — Python 3.6.1 ドキュメント

とのことでした。

os.walk()の引数topdownのデフォルト値はTrueのため、dirnamesリストを変更すれば良さそうです。

今回は、hogeディレクトリ以下を除外したファイルの一覧を作成してみます。


スライス(dirs[:])で差し替え

まずは、dirsをスライス(dirs[:])にて差し替えます。

root_dir = os.path.abspath(os.path.dirname(__file__))

target_files = []
for root, dirs, files in os.walk(root_dir):
    dirs[:] = [d for d in dirs if 'hoge' not in os.path.join(root, d)]
    targets = [os.path.join(root, f) for f in files]
    target_files.extend(targets)

for f in target_files:
    print(f)

 
実行してみると、

  • path/to/root/os_walk/bar/hoge/ham.txt
  • path/to/root/e.g._os_walk/bar/hoge/spam.txt
  • path/to/root/e.g._os_walk/foo/hoge/ham.txt
  • path/to/root/e.g._os_walk/foo/hoge/spam.txt

が除外されたファイル一覧を取得できました。

path/to/root/e.g._os_walk/make_file.py
path/to/root/e.g._os_walk/os_walk.py
path/to/root/e.g._os_walk/bar/foo.txt
path/to/root/e.g._os_walk/bar/fuga/ham.txt
path/to/root/e.g._os_walk/bar/fuga/spam.txt
path/to/root/e.g._os_walk/foo/foo.txt

 
念のため、この時のos.walk()の挙動も確認します。

root_dir = os.path.abspath(os.path.dirname(__file__))

target_files = []
for root, dirs, files in os.walk(root_dir):
    dirs[:] = [d for d in dirs if 'hoge' not in os.path.join(root, d)]
    print('-'*10)
    print('root:{}'.format(root))
    print('dirs:{}'.format(dirs))
    print('files:{}'.format(files))
    targets = [os.path.join(root, f) for f in files]
    target_files.extend(targets)

 
実行してみると、hogeディレクトリが結果に含まれていませんでした。

----------
root:path/to/root/e.g._os_walk
dirs:['bar', 'baz', 'foo']
files:['make_file.py', 'os_walk.py']
----------
root:path/to/root/e.g._os_walk/bar
dirs:['fuga']
files:['foo.txt']
----------
root:path/to/root/e.g._os_walk/bar/fuga
dirs:[]
files:['ham.txt', 'spam.txt']
----------
root:path/to/root/e.g._os_walk/baz
dirs:['fuga']
files:[]
----------
root:path/to/root/e.g._os_walk/baz/fuga
dirs:[]
files:[]
----------
root:path/to/root/e.g._os_walk/foo
dirs:[]
files:['foo.txt']


remove(dirs.remove('hoge'))で差し替え

続いて、dirsdirs.remove('hoge')にて差し替えます。

list.remove()は該当するものがない場合は例外を送出することに注意します。
python - Is there a simple way to delete a list element by value? - Stack Overflow

target_files = []
for root, dirs, files in os.walk(root_dir):
    try:
        dirs.remove('hoge')
    except:
        pass

    targets = [os.path.join(root, f) for f in files]
    target_files.extend(targets)

for f in target_files:
    print(f)

 
実行結果はスライスと同じだったため、省略します。


代入で差し替え (NG)

スライスを使わない代入で差し替えてみます。

    target_files = []
    for root, dirs, files in os.walk(root_dir):
        dirs = [d for d in dirs if 'hoge' not in os.path.join(root, d)]
        print('-'*10)
        print('root:{}'.format(root))
        print('dirs:{}'.format(dirs))
        print('files:{}'.format(files))

        targets = [os.path.join(root, f) for f in files]
        target_files.extend(targets)

    for f in target_files:
        print(f)

 
実行するとhogeディレクトリが含まれたままでした。 公式ドキュメントのように、スライスなどを使うのが良さそうです。

----------
root:path/to/root/e.g._os_walk
dirs:['bar', 'baz', 'foo']
files:['make_file.py', 'os_walk.py']
----------
root:path/to/root/e.g._os_walk/bar
dirs:['fuga']
files:['foo.txt']
----------
root:path/to/root/e.g._os_walk/bar/fuga
dirs:[]
files:['ham.txt', 'spam.txt']
----------
root:path/to/root/e.g._os_walk/bar/hoge
dirs:[]
files:['ham.txt', 'spam.txt']
----------
root:path/to/root/e.g._os_walk/baz
dirs:['fuga']
files:[]
----------
root:path/to/root/e.g._os_walk/baz/fuga
dirs:[]
files:[]
----------
root:path/to/root/e.g._os_walk/baz/hoge
dirs:[]
files:[]
----------
root:path/to/root/e.g._os_walk/foo
dirs:[]
files:['foo.txt']
----------
root:path/to/root/e.g._os_walk/foo/hoge
dirs:[]
files:['ham.txt', 'spam.txt']
path/to/root/e.g._os_walk/make_file.py
path/to/root/e.g._os_walk/os_walk.py
path/to/root/e.g._os_walk/bar/foo.txt
path/to/root/e.g._os_walk/bar/fuga/ham.txt
path/to/root/e.g._os_walk/bar/fuga/spam.txt
path/to/root/e.g._os_walk/bar/hoge/ham.txt
path/to/root/e.g._os_walk/bar/hoge/spam.txt
path/to/root/e.g._os_walk/foo/foo.txt
path/to/root/e.g._os_walk/foo/hoge/ham.txt
path/to/root/e.g._os_walk/foo/hoge/spam.txt


ソースコード

GitHubに上げました。e.g._os_walkディレクトリ以下が今回のファイルです。
thinkAmi-sandbox/python_misc_samples

Pythonで、WebTestを使って、WSGIサーバを起動せずにWSGIアプリのテストをする

Pythonで、「WSGIサーバを起動せずにWSGIアプリをテストする」方法を探してみたところ、ライブラリWebTestがありました。
Pylons/webtest: Wraps any WSGI application and makes it easy to send test requests to that application, without starting up an HTTP server.

そこで、以下を参考にして、WebTestを使ったテストコードを書いてみました。

 
目次


環境

  • Mac OS X 10.11.6
  • Python 3.6.0
  • WebTest 2.0.27
    • 依存パッケージ
      • BeautifulSoup4 4.5.3
      • WebOb 1.7.2
  • pytest 3.0.7
    • テストランナー


Hello world的なWSGIアプリのテスト

Hello worldを表示するWSGIアプリを作成しました。

def application(environ, start_response):
    start_response('200 OK', [('Content-Type', 'text/plain')])
    return [b"Hello, world."]

 
次にテストコードを書きます。

WebTestではTestAppを使うことで、擬似的なHTTPリクエスト・レスポンスをテストできます。

GETのテストコードを書いてみたところ、テストをパスしました。

from webtest import TestApp
import simple_wsgi_app

class Test_simple_wsgi_app(object):
    def test_get(self):
        # TestAppにテスト対象のアプリケーションを渡す
        sut = TestApp(simple_wsgi_app.application)
        # getリクエストを送信
        actual = sut.get('/')

        # ステータスコード・content-type、ボディのテスト
        assert actual.status_code == 200
        assert actual.content_type == 'text/plain'
        assert actual.body == b'Hello, world.'


GETやPOSTでjinja2テンプレートを返すWSGIアプリのテスト

続いて、以前作成したWSGIアプリを使って、GETやPOSTのテストを書いてみます。bbs_wsgi_app.pyが今回使うアプリです。
wsgi_application-sample/bbs_wsgi_app.py

 
このアプリは、

  • WSGIフレームワークは使っていない
  • GETでjinja2テンプレートを返す
  • POSTでリダイレクトし、jinja2テンプレートに値を埋めて返す

というモノです。

import datetime
import cgi
import io
from jinja2 import Environment, FileSystemLoader

class Message(object):
    def __init__(self, title, handle, message):
        self.title = title
        self.handle = handle
        self.message = message
        self.created_at = datetime.datetime.now()


class MyWSGIApplication(object):
    def __init__(self):
        self.messages = []

    def __call__(self, environ, start_response):
        if environ['REQUEST_METHOD'].upper() == "POST":
            decoded = environ['wsgi.input'].read().decode('utf-8')
            header_body_list = decoded.split('\r\n')
            body = header_body_list[-1]
            encoded_body = body.encode('utf-8')
            with io.BytesIO(encoded_body) as bytes_body:
                fs = cgi.FieldStorage(
                    fp=bytes_body,
                    environ=environ,
                    keep_blank_values=True,
                )
            self.messages.append(Message(
                title=fs['title'].value,
                handle=fs['handle'].value,
                message=fs['message'].value,
            ))
            location = "{scheme}://{name}:{port}/".format(
                scheme = environ['wsgi.url_scheme'],
                name = environ['SERVER_NAME'],
                port = environ['SERVER_PORT'],
            )
            start_response(
                '301 Moved Permanently',
                [('Location', location), ('Content-Type', 'text/plain')])
            # 適当な値を返しておく
            return [b'1']

        else:
            jinja2_env = Environment(loader=FileSystemLoader('./templates', encoding='utf8'))
            template = jinja2_env.get_template('bbs.html')
            html = template.render({'messages': self.messages})
            start_response('200 OK', [('Content-Type', 'text/html')])
            return [html.encode('utf-8')]


app = MyWSGIApplication()


GETのテスト

TestAppを使ってGETのテストを書いてみます。

レスポンスボディの取得方法は2つあったため、それぞれ試してみます。

  • bodyで、バイト文字列のレスポンスボディを取得
  • textで、ユニコード文字列のレスポンスボディを取得


class Test_simple_wsgi_app(object):
    def test_get(self):
        """GETのテスト"""
        sut = TestApp(get_post_app.app)
        actual = sut.get('/')

        assert actual.status_code == 200
        assert actual.content_type == 'text/html'
        # bodyは、レスポンスボディをバイト文字列で取得
        assert 'テスト掲示板'.encode('utf-8') in actual.body
        # textは、レスポンスボディをユニコード文字列で取得
        assert 'テスト掲示板' in actual.text


直接POSTするテスト

続いて、直接POSTリクエストを送信するテストを書いてみます。

なお、このアプリではPOSTの後にリダイレクトしています。

リダイレクトに追随するには、follow()を使ってリダイレクト先のレスポンスを取得します。
follow(**kw) | webtest API — WebTest 2.0.28.dev0 documentation

def test_post(self):
    """直接POSTのテスト"""
    sut = TestApp(get_post_app.app)
    actual = sut.post(
        '/',
        {'title': 'ハム', 'handle': 'スパム', 'message': 'メッセージ'})

    assert actual.status_code == 301
    assert actual.content_type == 'text/plain'
    assert actual.location == 'http://localhost:80/'
    assert actual.body == b'1'

    # redirectの検証には、follow()を使う
    redirect_response = actual.follow()
    assert 'ハム' in redirect_response.text
    assert 'スパム さん' in redirect_response.text
    assert 'メッセージ' in redirect_response.text


フォームのsubmitを使ってPOSTするテスト

WebTestではフォームのsubmitボタンを押すこともできるため、

  • GETでフォームを取得
  • フォームに入力し、submitボタンを押してPOSTする

というテストも行えます。

def test_form_post(self):
    """GETして、formに入力し、submitボタンを押すテスト"""
    sut = TestApp(get_post_app.app)
    # 属性formを使って、フォームの中身をセット
    form = sut.get('/').form
    form['title'] = 'ハム'
    form['handle'] = 'スパム'
    form['message'] = 'メッセージ'
    # submit()を使って、フォームデータをPOST
    actual = form.submit()

    assert actual.status_code == 301
    assert actual.content_type == 'text/plain'
    assert actual.location == 'http://localhost:80/'
    assert actual.body == b'1'

    redirect_response = actual.follow()
    assert 'ハム' in redirect_response.text
    assert 'スパム さん' in redirect_response.text
    assert 'メッセージ' in redirect_response.text


BeautifulSoupを使ったPOSTの検証

WebTestではBeautifulSoupを使った値取得もできます。

 
BeautifulSoupを使ったテストコードを書いてみます。

def test_post_with_beautifulsoup(self):
    """BeautifulSoupを使って検証する"""
    sut = TestApp(get_post_app.app)
    response = sut.post(
        '/',
        {'title': 'ハム', 'handle': 'スパム', 'message': 'メッセージ'})
    redirect_respose = response.follow()

    # response.htmlで、BeautifulSoupオブジェクトを取得できる
    actual = redirect_respose.html

    title = actual.find('span', class_='title')
    # BeautifulSoupのget_text()で出力してみると、文字化けしていた
    print(title.get_text())  #=> ������������

    assert '「ハム」' == actual.find('span', class_='title').get_text()

get_text()の結果が文字化けしたことにより、テストは失敗しました。

 
試しにレスポンスの内容を出力してみたところ、

def test_print_respose_object(self):
    """レスポンスオブジェクトを表示してみる"""
    sut = TestApp(get_post_app.app)
    actual = sut.get('/')
    print(actual)
    assert False
    """
    Response: 200 OK
    Content-Type: text/html
    <html>
        <head>
            <meta charset="UTF-8">
            <title>���������������������</title>
        </head>
        <body>
            <h1>������������������</h1>
            <form action="/" method="POST">
                ��������������� <input type="text" name="title" size="60"><br>
                ������������������ <input type="text" name="handle"><br>
                <textarea name="message" rows="4" cols="60"></textarea>
                <input type="submit">
            </form>
            <hr>
        </body>
    </html>
    """

日本語を表示する部分が文字化けしていました。

これが原因のようですが、今回は深く追求しません。


Bottleアプリのテスト

今まではWebフレームワークを使わないWSGIアプリをテストしました。

今度は、WebフレームワークであるBottleを使ってWSGIアプリを作成し、WebTestを使ってテストコードを書いてみます。

Bottleの公式ページにも、WebTestを使ってテストを書いている例がありました。
FUNCTIONAL TESTING BOTTLE APPLICATIONS | Recipes — Bottle 0.13-dev documentation

アプリコードは以下の通りです。

なお、フォームの入力値を取得する場合、request.forms.ge()だと日本語が文字化けします。そのため、request.forms.getunicode()を使います。

from bottle import Bottle, get, post, run, request, HTTPResponse
from bottle import TEMPLATE_PATH, jinja2_template
import datetime
import json


class Message(object):
    """Bottleのjinja2テンプレートへ値を引き渡すためのクラス"""
    def __init__(self, title, handle, message):
        self.title = title
        self.handle = handle
        self.message = message
        self.created_at = datetime.datetime.now()

# テストコードで扱えるよう、変数appにインスタンスをセット
app = Bottle()

@app.get('/')
def get_top():
    return jinja2_template('bbs', message=None)

@app.post('/')
def post_top():
    print(request.forms.get('handle'))
    message = Message(
        # get()だと文字化けするため、getunicode()を使う
        title=request.forms.getunicode('title'),
        handle=request.forms.getunicode('handle'),
        message=request.forms.getunicode('message'),
    )
    return jinja2_template('bbs', message=message)

@app.post('/json')
def post_json():
    json_body = request.json
    print(json_body)

    body = json.dumps({
        'title': json_body.get('title'),
        'message': json_body.get('message'),
        'remarks': '備考'})
    r = HTTPResponse(status=200, body=body)
    r.set_header('Content-Type', 'application/json')
    return r


if __name__ == "__main__":
    run(app, host="localhost", port=8080, debug=True, reloader=True)

 
また、HTMLテンプレートとしてjinja2を使います。

<!DOCTYPE html>
<html>
    <head>
        <meta charset="UTF-8">
        <title>テストタイトル</title>
    </head>
    <body>
        <h1>テスト掲示板</h1>
        <form action="/" method="POST">
            タイトル: <input type="text" name="title" size="60"><br>
            ハンドル名: <input type="text" name="handle"><br>
            <textarea name="message" rows="4" cols="60"></textarea><br>
            <input type="submit">
        </form>
        <hr>

        {% if message %}
            <p>
                <span class="title">「{{ message.title }}」</span>&nbsp;&nbsp;
                <span class="handle">{{ message.handle }} さん</span>&nbsp;&nbsp
                <span class="created_at">{{ message.created_at }}</span>
            </p>
            <p class="message">{{ message.message }}</p>
            <hr>
        {% endif %}
    </body>
</html>


フォームからPOSTするテスト

GETでフォームを取得し、フォームにデータをセットして、submitボタンでデータをPOSTするテストを作成します。

class Test_bottle_app(object):
    @pytest.mark.xfail
    def test_form_submit(self):
        """GETして、formに入力し、submitボタンを押すテスト"""
        sut = TestApp(bottle_app.app)
        response = sut.get('/')
        form = response.form
        form['title'] = u'ハム'.encode('utf-8').decode('utf-8')
        form['handle'] = b'\xe3\x81\x82' #あ
        form['message'] = 'メッセージ'
        actual = form.submit()

        assert actual.status_code == 200
        assert actual.content_type == 'text/html'

        assert 'ハム' in actual.text
        assert 'あ さん' in actual.text
        assert 'メッセージ' in actual.text

実行したところ、テストはパスしました。

また、直接POSTするコードもパスしました。


JSONをPOSTするテスト

続いてJSONをPOSTするテストを書いてみます。

フォームのときと同じだろうかと心配しましたが、最近クローズされたissueにてJSONに関する修正が入っていました。
Decoding issue for non-ASCII characters in JSON response · Issue #177 · Pylons/webtest

そこで、どうなるのかを試してみました。


def test_post_json(self):
    sut = TestApp(bottle_app.app)
    actual = sut.post_json('/json', dict(title='タイトル', message='メッセージ'))

    assert actual.status_code == 200
    assert actual.content_type == 'application/json'

    assert actual.json.get('title') == 'タイトル'
    assert actual.json.get('message') == 'メッセージ'
    assert actual.json.get('remarks') == '備考'

実行したところ、テストはパスしました。


ソースコード

GitHubにあげました。
thinkAmi-sandbox/wsgi_webtest-sample

Python + pytestにて、pytest.raisesを使って例外をアサーションする時の注意点

Python + pytestにて、「pytest.raisesを使って例外をアサーションする」テストコードを作成する機会がありました。

ただ、書き方を誤りうまくアサーションできなかっため、メモを残します。

 
目次


環境

  • Python 3.6.0
    • unittest.mock.patchを使用
  • pytest 3.0.7


状況

テスト対象のメソッドtarget_method()は、以下とします。

pytest_raises.py

from with_statement_library import Validator

class Target(object):
    def target_method(self):
        """テスト対象のメソッド"""
        validator = Validator()
        validator.run()

 
テスト対象クラスでimportしているValicationクラスは、(今回省略していますが)長い行に渡って検証処理があり、エラーがあったら最後に例外を送出しています。

pytest_raises_library.py

class Validator(object):
    def run(self):
        """長い行検証処理をしていて、エラーがあったら例外を送出するメソッド"""
        raise RuntimeError

 
今回のテストでは、run()メソッドをテストするためのデータを用意するのが難しいと仮定して、Validator.run()をモックに差し替える方法を取ります。

 
モックを使ったテストコードとして

from unittest.mock import patch, MagicMock
import pytest
from with_statement import Target

class Test_Target(object):
    def test_mock_patch(self):
        mock_run = MagicMock()
        with patch('with_statement.Validator.run', mock_run):
            sut = Target()
            actual = sut.target_method()
            # モックが呼ばれている回数は1回か
            assert mock_run.call_count == 1

としたところ、テストをパスしました。

 
続いて、例外を送出するよう、patchとpytest.raisesを使って

    def test_mistake_usage_pytest_raises(self):
        mock_run = MagicMock(side_effect=AssertionError)
        # with文にpytest.raisesを追加
        with patch('with_statement.Validator.run', mock_run), \
                pytest.raises(AssertionError):
            sut = Target()
            actual = sut.target_method()
            assert mock_run.call_count == 1

としたところ、これもテストをパスしました。

 
念のため、失敗するテストとして

    def test_mistake_usage_pytest_raises_but_test_pass(self):
        mock_run = MagicMock(side_effect=AssertionError)
        with patch('with_statement.Validator.run', mock_run), \
                pytest.raises(AssertionError):
            sut = Target()
            actual = sut.target_method()
            # 呼ばれた回数を2回としてアサーションする
            # 実際に呼ばれるのは1回なので、テストは失敗するはず
            assert mock_run.call_count == 2

と書いてみたところ、このテストがパスしてしまいました。


原因

pytestの公式ドキュメント(英語版)に記載がありました*1

When using pytest.raises as a context manager, it’s worthwhile to note that normal context manager rules apply and that the exception raised must be the final line in the scope of the context manager. Lines of code after that, within the scope of the context manager will not be executed.

Helpers for assertions about Exceptions/Warnings raises | Pytest API and builtin fixtures — pytest documentation 

例外が発生したメソッド以降の処理は、実行されないようでした。

 
今回の場合、

with patch('with_statement.Validator.run', mock_run), \
        pytest.raises(AssertionError):
    sut = Target()

    # ここで例外が発生
    actual = sut.target_method()
    # このassertは処理されないため、テストがパスする
    assert mock_run.call_count == 2

のため、テストがパスしたと考えられました。


対応

with文をネストして、モック用とpytest.raises用に分けます。

def test_correct_usage_pytest_raises_and_test_fail(self):
    mock_run = MagicMock(side_effect=AssertionError)
    # モック用のwith文
    with patch('with_statement.Validator.run', mock_run):

        # pytest.raisesのwith文は別途用意
        with pytest.raises(AssertionError):
            sut = Target()
            # この中の最後に、例外を送出するメソッドを書く
            actual = sut.target_method()

        # 検証は、インデントを一つ上げて書く
        assert mock_run.call_count == 2

 
テストを実行したところ、正しく失敗しました。

$ pytest
==== test session starts ====
platform darwin -- Python 3.6.0, pytest-3.0.6, py-1.4.32, pluggy-0.4.0
rootdir: /Users/kamijoshinya/thinkami/try/pytest_sample, inifile: pytest.ini
collected 4 items

test_pytest_raises.py ...F

==== FAILURES ====
____ Test_Target.test_correct_usage_pytest_raises_and_test_fail ____
...
>           assert mock_run.call_count == 2
E           assert 1 == 2
E            +  where 1 = <MagicMock id='4422285968'>.call_count

test_pytest_raises.py:58: AssertionError


ソースコード

GitHubにあげました。e.g._pytest_raisesディレクトリが今回のものです。
thinkAmi-sandbox/python_mock-sample

*1:対象バージョンが古いためか、日本語版には記載がありません

Pythonで、モックに差し替えたメソッドが呼ばれた回数や呼ばれた時の引数を検証する

Pythonにて、「モックに差し替えたメソッドが呼ばれた回数や呼ばれた時の引数を検証する」テストコードを作成する機会があったため、メモを残します。

目次


環境

  • Python 3.6.0
    • モックは、unittest.mock.MagicMock
  • pytest 3.0.6
    • テストランナーとして使用


状況

複雑な処理はするけど戻り値を返さないテスト対象メソッドTarget.target_method()があります。

called_count.py

import called_count_library

class Target(object):
    def target_method(self):
        c = called_count_library.Complex()
        c.set_complex('ham')
        c.set_complex('spam')
        c.set_complex('egg')
        c.set_complex('egg')
        c.set_complex_dict('hoge', {'fuga': 'piyo', 'くだもの': 'りんご'})
        c.set_complex_with_keyword('foo', str_arg='bar', dict_arg={'baz': 'qux', 'quux': 'foobar'} )

 
importして使っているcalled_count_library.pyの各メソッドも、複雑な処理をしている上に戻り値を返さないものでした。

なお、called_count_library.pyは十分にテストされているものとします。

called_count_library.py

class Complex(object):
    def set_complex(self, key):
        # 複雑な処理だけど、戻り値を返さない
        pass

    def set_complex_dict(self, key, dict):
        # 複雑な処理だけど、戻り値を返さない
        pass

    def set_complex_with_keyword(self, no_keyword, str_arg, dict_arg):
        # 複雑な処理だけど、戻り値を返さない
        pass

    def uncall_method(self):
        # 呼ばれないメソッド
        pass


対応

called_count.Target.target_method()のテストを書きます。

importしているcalled_count_library.pyは十分にテストされているため、今回は

  • called_count_library.Complexをモックに差し替え
  • モックを使って、メソッド(set_complexなど)が何回呼ばれたかを検証
  • モックを使って、メソッドを呼び出した時の引数がどんなものだったかを検証
  • モックを使って、呼んでいないメソッドを検証

としました。

 
検証方法については、unittest.mock.Mockunittest.mock.MagicMockには検証用のメソッドや属性があるため、それを利用してテストします。

テスト対象のメソッド呼び出しまではこんな感じです。unittest.mock.patch()を使ってComplexクラスを差し替えます。  

from unittest.mock import patch, MagicMock, call
from called_count import Target

class Test_Target(object):
    def test_valid(self):
        mock_lib = MagicMock()
        with patch('called_count_library.Complex', return_value=mock_lib):
            sut = Target()
            sut.target_method()


メソッドが呼ばれた回数を検証

<モックオブジェクト>.<検証対象のメソッド>.<検証メソッド>で、対象クラスのメソッドを検証します。

検証メソッド・属性として

  • called
    • 呼ばれたか
  • assert_called()
    • 呼ばれたか
  • assert_called_once()
    • 1回だけ呼ばれたか
  • call_count
    • 呼ばれた回数

があります。

# 複数回呼んでるメソッドの確認
## set_complex()が呼ばれたか
assert mock_lib.set_complex.called is True

## set_complex()が1回でも呼ばれたか
mock_lib.set_complex.assert_called()

## set_complex()を呼んだ回数は4回か
assert mock_lib.set_complex.call_count == 4


# 1回だけ呼んでるメソッドの確認
## set_complex_dict()が1回呼ばれたか
mock_lib.set_complex_dict.assert_called_once()

## set_complex_dict()を呼んだ回数は1回か
assert mock_lib.set_complex_dict.call_count == 1


メソッドが呼ばれた時の引数を検証

<モックオブジェクト>.<検証対象のメソッド>.<検証用属性>で、対象クラスのメソッドを検証します。

検証用の属性として

  • call_args
    • 最後に呼ばれた時の引数を取得
  • call_args_list
    • 呼ばれた順に、引数をリストとして取得
    • callオブジェクトがリストになっているため、要素を指定してアンパックすることで、中身をタプルとして得られる

があります。

# call_argsの例
## 引数が1個の場合
args, kwargs = mock_lib.set_complex.call_args
assert args[0] == 'egg'
assert kwargs == {}

## 引数が複数の場合
multi_args, multi_kwargs = mock_lib.set_complex_dict.call_args
assert multi_args[0] == 'hoge'
assert multi_args[1] == {'fuga': 'piyo', 'くだもの': 'りんご'}
assert multi_kwargs == {}

## 名前付き引数を使っている場合
exist_args, exist_kwargs = mock_lib.set_complex_with_keyword.call_args
assert exist_args[0] == 'foo'
assert exist_kwargs == {'str_arg': 'bar', 'dict_arg': {'baz': 'qux', 'quux': 'foobar'}}


# call_args_listの例
list_args = mock_lib.set_complex.call_args_list
assert list_args == [call('ham'), call('spam'), call('egg'), call('egg')]
## callの中身はアンパックで取得
unpack_args, unpack_kwargs = list_args[0]
assert unpack_args == ('ham', )
assert unpack_kwargs == {}


メソッドが呼ばれた回数と引数を同時に検証

<モックオブジェクト>.<検証対象のメソッド>.<検証メソッド>で、対象クラスのメソッドを検証します。

検証メソッドとして

  • assert_called_with()
    • 最後に呼ばれた時の引数が一致するか
  • assert_called_once_with()
    • 指定した引数で1回だけ呼ばれたか
  • assert_any_call()
    • 指定した引数の呼び出しがあったか
  • assert_has_calls()
    • 順番通りに呼ばれたか
    • 順番通りでなくてもよいが、どの引数も呼ばれたか (any_order=True)

があります。

# 最後に呼んだ時の引数は'egg'か
mock_lib.set_complex.assert_called_with('egg')
# 引数'ham'は一番最初で呼んでいるため、以下の書き方ではテストが失敗する
# mock_lib.set_complex.assert_called_with('ham')

# 引数'hoge', {'fuga': 'piyo', 'くだもの': 'りんご'}で、1回だけ呼ばれたか
mock_lib.set_complex_dict.assert_called_once_with('hoge', {'fuga': 'piyo', 'くだもの': 'りんご'})

# 引数'ham'や'spam'で呼ばれたか
mock_lib.set_complex.assert_any_call('ham')
mock_lib.set_complex.assert_any_call('spam')

# 引数が'ham' > 'spam' > 'egg' > 'egg' の順で呼ばれたか
mock_lib.set_complex.assert_has_calls([call('ham'), call('spam'), call('egg'), call('egg')])
# ちなみに、同じ引数がある場合、片方を省略してもPASSした
mock_lib.set_complex.assert_has_calls([call('ham'), call('spam'), call('egg')])
# 順番は気にしないけど、どの引数でも呼ばれたか
mock_lib.set_complex.assert_has_calls([call('spam'), call('egg'), call('ham')], any_order=True)


メソッドが呼ばれていないことを検証

<モックオブジェクト>.<検証対象のメソッド>.<検証メソッド>で、対象クラスのメソッドを検証します。

検証メソッドはassert_not_calledです。

# uncall()は1回も呼ばれていないか
mock_lib.uncall_method.assert_not_called()


参考


ソースコード

GitHubに上げました。e.g._called_countディレクトリが今回のものです。
thinkAmi-sandbox/python_mock-sample

Pytnonで、unittest.mock.patch.objectのautospecとside_effectを使って、テスト対象の属性(self.attr)を更新する

Pythonにて、「メソッドを差し替え、テスト対象オブジェクトの属性を更新する」テストコードを作成する機会があったため、メモを残します。

なお、良いタイトルが思い浮かびませんでしたので、mock.object(autospect=True)のサンプルとして考えてください…

 
目次


環境

  • Python 3.6.0
    • unittest.mock.patch.objectを使用
  • pytest 3.0.6
    • テストランナーとして使用


状況

こんなテスト対象コードがありました。

class Target(object):
    def target_method(self):
        self.can_print = False
        # この中でself.can_printを更新しているが、戻り値は何もない
        self.validate()
        if self.can_print:
            return 'OK'
        return 'NG'

    def validate(self):
        is_ok = False
        # 複雑な処理の結果、is_okの値を変えている
        if is_ok:
            self.can_print = True

 
このコードの対してテストを書きますが、

  • 属性self.can_printは、メソッド内で初期化しているため、外部からデータを与えられない
  • validate()メソッドは、内部でデータベースなどで複雑な処理をしているため、is_ok=Trueとなるデータを用意できない

のため、validate()メソッドをモックに差し替えたいと考えています。

 
そこで、

class Test_Target(object):
    def test_can_not_patch(self):
        def validate_mock(self):
            self.can_print = True

        with patch.object(Target, 'validate', side_effect=validate_mock):
            sut = Target()
            actual = sut.target_method()
            assert actual == 'OK'

と、patch.object()の引数side_effectを使って、validateメソッドをvalidate_mockメソッドに差し替えようと考えました。

しかし、これではvalidate_mock()の引数の数が合わず、テストを実行するとエラーになります。

# > ret_val = effect(*args, **kwargs)
# E TypeError: validate_mock() missing 1 required positional argument: 'self'


対応

unittest.mock.patch.object()の引数autospecを使います。

autospecは、  

autospec は mock の API を元のオブジェクト (spec) に制限しますが、再帰的に適用される (lazy に実装されている) ので、 mock の属性も spec の属性と同じ API だけを持つようになります。さらに、 mock された関数/メソッドは元と同じシグネチャを持ち、正しくない引数で呼び出されると TypeError を発生させます。

(中略)

patch() か patch.object() に autospec=True を渡すか、 create_autospec() 関数を使って spec をもとに mock を作ることができます。 patch() の引数に autospec=True を渡した場合、置換対象のオブジェクトが spec オブジェクトとして利用されます。 spec は遅延処理される (mock の属性にアクセスされた時に spec が生成される) ので、非常に複雑だったり深くネストしたオブジェクト (例えばモジュールをインポートするモジュールをインポートするモジュール) に対しても大きなパフォーマンスの問題なしに autospec を使うことができます。

26.5.5.8. autospec を使う | 26.5. unittest.mock — モックオブジェクトライブラリ — Python 3.6.0 ドキュメント

とある通り、autospec=Trueとすることで、mockの属性と対象オブジェクト(Target.validate())の属性が一致します。

 
これで引数selfが使えるため、オブジェクトの属性self.can_printを更新できます。

class Test_Target(object):
    def test_can_patch(self):
        def validate_mock(self):
            self.can_print = True

        with patch.object(Target, 'validate', autospec=True, side_effect=validate_mock):
            sut = Target()
            actual = sut.target_method()
            assert actual == 'OK'

 
テストもpassしました。


ソースコード

GitHubにあげました。e.g._set_self_attrディレクトリが今回のものです。
thinkAmi-sandbox/python_mock-sample