Dockerで、Alpine3.4 + Apache2.4.25 + Python3.6.0の環境を作って、CGIを動かしてみた

以前、httpd:alpineのApacheを使ってみました。
Docker for Macにて、httpd:alpineのApacheを使ってみた - メモ的な思考的な

今回は、DockerでAlpine3.4 + Apache2.4.25 + Python3.6.0の環境を作って、CGIPythonスクリプトを動かしてみます。

 
目次


環境


Dockerfile作成

当初、ApacheとPython3.6のDockerfileをマージしようかと考えました。

ただ、両者のDockerfileを比べると、

と、alpineのバージョンが異なっていました。試しに、PythonのDockerfileをalpine3.5としてコピペして作ってみましたが、うまくいきませんでした。

そこで今回は、Python3.6のalpine版のイメージ + ApacheをセットアップするDockerfileを作成することにしました。

Apacheのalpine3.4版を探したところ、このあたりがApache2.4.25 + alpine3.4の組み合わせでしたので、これを流用します。
https://github.com/docker-library/httpd/blob/0e4a0b59e1f4e2a5a14ca197516beb2d4df1ffb8/2.4/alpine/Dockerfile

 
追加箇所としては、

です。

それを反映させたDockerfileは以下です。

FROM python:3.6.0-alpine

# ここにhttpd:2.4.25-alpineの内容をコピー(記載は省略)

COPY httpd-foreground /usr/local/bin/

RUN ["chmod", "+x", "/usr/local/bin/httpd-foreground"]

COPY httpd.conf /usr/local/apache2/conf/

COPY hello.py /usr/local/apache2/cgi-bin/
RUN ["chmod", "755", "/usr/local/apache2/cgi-bin/hello.py"]

EXPOSE 80

CMD httpd-foreground


Apacheの設定

デフォルトの設定を確認

alpine3.4に設定されているApacheの状態が分からなかったため、以下を参考に、一度DockerでApacheを起動して確認します。

# ビルド
$ docker build -t alpine:python360_httpd2425_cgi .
...
Successfully built b49daed5ae56

# 起動
$ docker run -p 8081:80 --name temp alpine:python360_httpd2425_cgi

# Apacheでloadされているモジュールを確認
$ docker exec -it `docker ps | grep temp | awk '{print $1}'` /bin/bash
bash-4.3# httpd -M
Loaded Modules:
 core_module (static)
 so_module (static)
 http_module (static)
 mpm_event_module (static)
 authn_file_module (shared)
 authn_core_module (shared)
 authz_host_module (shared)
 authz_groupfile_module (shared)
 authz_user_module (shared)
 authz_core_module (shared)
 access_compat_module (shared)
 auth_basic_module (shared)
 reqtimeout_module (shared)
 filter_module (shared)
 mime_module (shared)
 log_config_module (shared)
 env_module (shared)
 headers_module (shared)
 setenvif_module (shared)
 version_module (shared)
 unixd_module (shared)
 status_module (shared)
 autoindex_module (shared)
 cgid_module (shared)
 dir_module (shared)
 alias_module (shared)


# 別のコンソールを起動して、Dockerを停止
$ docker stop temp
temp

# ローカルでhttpd.confを確認するため、
# tempコンテナからhttpd.confをローカルの任意のディレクトリ(ここではdir)へコピー
$ docker cp temp:/usr/local/apache2/conf/httpd.conf /path/to/dir/httpd.conf

 
httpd.confを読むと、コメントアウトされているものの#Include conf/extra/httpd-mpm.confとの記載があっため、そちらもローカルへコピーして内容を確認します。

$ docker cp 4ee9667e6b7e:/usr/local/apache2/conf/extra/httpd-mpm.conf /path/to/dir/httpd-mpm.conf


必要最低限の設定へと変更

httpd.confhttpd -Mを見ると、いくつか不要そうなのがあったため、ロードするモジュールを以下に変更します。

 
上記を反映したhttpd.confは以下です。

# ServerRoot: The top of the directory tree
ServerRoot "/usr/local/apache2"

# Listen: Allows you to bind Apache to specific IP addresses and/or ports
Listen 80

# LoadModule
LoadModule authz_core_module modules/mod_authz_core.so
LoadModule authz_host_module modules/mod_authz_host.so
LoadModule mime_module modules/mod_mime.so
LoadModule log_config_module modules/mod_log_config.so
LoadModule env_module modules/mod_env.so
LoadModule setenvif_module modules/mod_setenvif.so
LoadModule unixd_module modules/mod_unixd.so
LoadModule status_module modules/mod_status.so
LoadModule cgid_module modules/mod_cgid.so

# CGIをAliasで動かすので使用
LoadModule alias_module modules/mod_alias.so


# unixd_module settings
User daemon
Group daemon

# 'Main' server configuration

# ServerAdmin: Your address, where problems with the server should be e-mailed.
ServerAdmin you@example.com

# Deny access to the entirety of your server's filesystem.
<Directory />
    AllowOverride none
    Require all denied
</Directory>

# DocumentRoot
DocumentRoot "/usr/local/apache2/htdocs"
<Directory "/usr/local/apache2/htdocs">
    Options Indexes FollowSymLinks
    AllowOverride None
    Require all granted
</Directory>

# The following lines prevent .htaccess and .htpasswd files
<Files ".ht*">
    Require all denied
</Files>

# Log settings
ErrorLog /proc/self/fd/2
LogLevel warn


# log_config_module settings
LogFormat "%h %l %u %t \"%r\" %>s %b \"%{Referer}i\" \"%{User-Agent}i\"" combined
LogFormat "%h %l %u %t \"%r\" %>s %b" common
CustomLog /proc/self/fd/1 common

# alias_module settings
ScriptAlias /cgi-bin/ "/usr/local/apache2/cgi-bin/"

# CGI directory
<Directory "/usr/local/apache2/cgi-bin">
    AllowOverride None
    Options ExecCGI
    SetHandler cgi-script
    Require all granted
</Directory>


# mime_module settings
TypesConfig conf/mime.types
AddType application/x-compress .Z
AddType application/x-gzip .gz .tgz


Pythonスクリプトの作成

Hello worldスクリプトを作成します。

CGIで動かすため、先頭のshebangも必要です。そのため、shebangに指定するPythonを調べてみました。

# コンテナに入る
$ docker exec -it `docker ps | grep temp | awk '{print $1}'` /bin/bash

# pythonのありかを調べる
bash-4.3# which python
/usr/local/bin/python

 
これを元に、Pythonスクリプトを作成します。

#!/usr/local/bin/python

# デバッグのために使用
import cgitb
cgitb.enable()

print('Content-Type: text/plain;charset=utf-8\n')
print('Hello World!')


Dockerを起動して確認

設定ファイルを色々修正したため、Dockerイメージを作り直して動作を確認します。

# コンテナの全削除
docker rm $(docker ps -a -q)

# イメージIDの確認
$ docker images
REPOSITORY          TAG                        IMAGE ID            CREATED             SIZE
alpine              python360_httpd2425_cgi    b49daed5ae56        About an hour ago   170 MB

# イメージの削除
$ docker rmi b49daed5ae56

# イメージの再作成
$ docker build -t alpine:python360_httpd2425_cgi .

# 起動
$ docker run -p 8081:80 --name temp2 alpine:python360_httpd2425_cgi

# 別のコンソールからアクセス
$ curl http://localhost:8081/cgi-bin/hello.py
Hello World!

動作しているようです。


ソースコード

GitHubに上げました。alpine_apache_python36_cgiディレクトリの中が、今回のものです。
thinkAmi-sandbox/Docker_Apache-sample

Pythonで、MagicMockのreturn_valueを使って、モックから別のモックを返してみた

Pythonにて、「モックから別のモックを返す」テストコードを作成する機会がありました。

そこで、以下を参考に作成した時のメモを残します。

 
目次


環境

  • Python 3.6.0
    • unittest.mock.MagicMockを使用
  • pytest 3.0.6
    • テストランナーとして使用


状況

Targetクラスのrun()メソッドについて、戻り値の辞書に正しく値が設定されているかを確認します。

target.py

from cook import Cook

class Target:
    def run(self, material):
        # 引数materialは作るのに手間がかかるオブジェクト
        cook = Cook(material)
        cuisine = cook.bake()
        return {
            'name': 'maindish',
            'cuisine': cuisine.get_name(),
        }

 
Cookクラスのbake()メソッドでは、さらに別のクラス(Ham, Spam, Egg)のインスタンスを返します。

cook.py

from cuisine import Ham, Spam, Egg

class Cook:
    def __init__(self, material):
        self.__material = material

    def bake(self):
        try:
            # 実際には、materialの中身によって複雑な処理がある
            if material:
                return Ham()
            else:
                return Spam()
        except:
            # なかなかEggを出すデータを作れないとする
            return Egg()

 
Ham, Spam, Eggの各クラスは、それぞれget_name()メソッドを持っています。

cuisine.py

class Ham:
    def get_name(self):
        return 'ham'

class Spam:
    def get_name(self):
        return 'spam'

class Egg:
    def get_name(self):
        return 'egg'

 
そんな中で、Target.run()の戻り値を検証しようとしましたが、

  • get_name()で取得するオブジェクトは、run()の引数materialに依存する
  • 引数material用のオブジェクトを生成するのは難しい

と、このままではテスト作成に手間がかかりそうでした。


対応

そこで今回は、unittest.mock.MagicMockを使って2つモックを作ることで、引数material用のオブジェクトを生成しなくても済むようにします*1

 
1つは、戻り値としてeggを返すget_name()メソッドを持つモックです。

<MagicMockオブジェクト>.<差し替えたいメソッド名>.return_valueに、戻り値eggをセットします。

from unittest.mock import MagicMock

def test_bake():
    # cuisineのモックを作る
    mock_cuisine = MagicMock()
    # get_name()メソッドは、'egg'を返すように指定
    mock_cuisine.get_name.return_value = 'egg'

 
もう1つは、bake()メソッドを持ち、上記で作成したモックmock_cuisineを返すモックです。このモックはCookクラスと差し替えるのに使います。

import cook

def test_bake():
    ...
    # bake()メソッドでcuisineのモックを返す、モックを作る
    mock_cook = MagicMock()
    # bake()メソッドは、上記で作ったモック'mock_cuisine'を返すように指定
    mock_cook.bake.return_value = mock_cuisine
    # Cookクラスはモックを返すモックに差し替える
    cook.Cook = mock_cook

 
準備ができたため、あとはテストコードを書きます。

from target import Target

def test_bake():
    ...
    sut = Target()
    # runの引数materialは、本来は作るのが面倒
    # 今回はモック向けなので、何かあれば良い
    actual = sut.run('dummy')
    assert actual['cuisine'] == 'egg'

 
実行してみます。

$ python -m pytest
==== test session starts ====
platform darwin -- Python 3.6.0, pytest-3.0.6, py-1.4.32, pluggy-0.4.0
rootdir: /Users/kamijoshinya/thinkami/try/python_mock_sample, inifile: pytest.ini
collected 1 items 

test_get_mock_object.py .

==== 1 passed in 0.07 seconds ====

Target.run()メソッドの戻り値が差し替わり、テストがpassしました。


ソースコード

GitHubにあげました。e.g._get_mock_objectディレクトリの中が今回のファイルです。
thinkAmi-sandbox/python_mock-sample

*1:他の解決方法があるかもしれませんが、今回はモックから別のモックを返すための例なので…

Python + pytestで、monkeypatch.setattr()を使ってみた

pytestでは、monkeypatchを使ってmockを作成できます。

 
今回は、monkeypatch.setattr()を使って、

  • プロダクションコードのメソッドや関数
  • Python標準モジュールのメソッド

を差し替え(mock化)してみた時のメモです。

 
目次


環境


使い方

プロダクションコードのメソッドを差し替え

プロダクションコード

class Target(object):
    CONST_VALUE = 'foo'

    def get_const(self):
        return self.CONST_VALUE

get_const()メソッドを差し替えるには、

  • ダミーメソッドを用意して差し替え
  • lambdaを使って差し替え

のどちらかを使います。

# ダミーメソッドを用意して差し替える場合
# pytestのテストコードの引数に、`monkeypatch`を追加
def test_patch_by_dummy_function(self, monkeypatch):
    # run_dummyというダミーメソッドを用意し、この中で差し替える戻り値を設定
    # Target.get_constは引数selfがあるため、差し替えメソッドでも引数(arg)を用意
    def run_dummy(arg):
        return 'ham'
    
    # monkeypatch.setattr()を使って差し替え
    # 第一引数:importしたプロダクションコードのクラス
    # 第二引数:差し替え対象のメソッド
    # 第三引数:差し替えたダミーメソッド
    monkeypatch.setattr(Target, 'get_const', run_dummy)
    sut = Target()
    actual = sut.get_const()
    assert actual == 'ham'


# lambdaを使って差し替える場合
def test_patch_by_lambda(self, monkeypatch):
    expected = 'ham'
    # ダミーメソッドを用意する手間を省くために、lambdaを使っても良い
    # lambdaでも引数は必要(今回の場合、`x`)
    monkeypatch.setattr(Target, 'get_const', lambda x: expected)
    sut = Target()
    actual = sut.get_const()
    assert actual == expected


標準ライブラリを差し替え

プロダクションコード

import platform

class Target(object):
    def get_platform(self):
        return platform.system()

で使われている標準モジュールplatform.system()の戻り値をhamという文字列に差し替えるには、

import platform
class Test_target:
    def test_patch_standard_library(self, monkeypatch):
        monkeypatch.setattr(platform, 'system', lambda: 'ham')

とします。


差し替え対象モジュールをimportせずに差し替え

モジュールをimportせず、モジュール名を文字列で渡しても差し替えが可能です。

例えば、テストコードでimport osせずに、os.sysmtem()を差し替える場合は、

def test_patch_no_import(self, monkeypatch):
    monkeypatch.setattr('os.system', lambda: expected)

OKです。


定数の差し替え

プロダクションコード

class Target(object):
    CONST_VALUE = 'foo'

の定数CONST_VALUEを差し替えます。

定数なので、lambdaを使う必要はないです。

def test_const(self, monkeypatch):
    monkeypatch.setattr(Target, 'CONST_VALUE', expected)


複数の引数を持つメソッドを差し替え

プロダクションコード

class Target(object):
    def get_multi_args(self, foo, bar):
        return ''.join([foo, bar])

の複数の引数を持つget_multi_args()メソッドを差し替えます。

同じ数の引数か可変長引数をlambdaに渡します。

def test_function_multi_args1(self, monkeypatch):
    # 同じ数の引数を渡す
    monkeypatch.setattr(Target, 'get_multi_args', lambda x, y, z: expected)

def test_function_multi_args2(self, monkeypatch):
    # 可変長引数を渡す
    monkeypatch.setattr(Target, 'get_multi_args', lambda *_: expected)


プライベートメソッドの差し替え

プロダクションコードに面倒なプライベートメソッド__run_complex()があり、テストではこのプライベートメソッドで何も処理してほしくないとします。

class Target(object):
    def call_private_function(self):
        self.__run_complex()
        return self.CONST_VALUE

    def __run_complex(self):
        # 何行も続いて、最後にうまくいってないときはraiseする
        # さらに戻り値は返さないという、面倒なプライベートメソッド
        raise Exception

 
この場合、プライベートメソッドをマングリングした表現で指定し、Noneを返すように差し替えます。

def test_patch_private_function(self, monkeypatch):
    monkeypatch.setattr(Target, '_Target__run_complex', lambda x: None)


複数の戻り値を持つメソッドの差し替え

プロダクションコード

class Target(object):
    def get_multi_return_values(self):
        return ('foo', 'bar')

の複数の戻り値を持つget_multi_return_values()メソッドを差し替えるには、戻り値をタプルなどで返します。

def test_patch_multi_return_values(self, monkeypatch):
    monkeypatch.setattr(Target, 'get_multi_return_values', lambda x: ('ham', 'spam'))


例外を送出するように差し替え

プロダクションコード

class Target(object):
    def raise_exception(self):
        raise RuntimeError('foo')

で例外RuntimeErrorを送出するraise_exception()メソッドを、別の例外AssertionErrorを送出するように差し替えます。

この場合、ジェネレータ式のthrow()を使ったlambdaのワンライナーを使います。

def test_patch_exception(self, monkeypatch):
    monkeypatch.setattr(Target, 'raise_exception', lambda x: (_ for _ in ()).throw(AssertionError('ham')))
    sut = Target()
    # 差し替えた例外AssertionErrorが発生したかをチェック
    with pytest.raises(AssertionError) as excinfo:
        sut.raise_exception()
    assert 'ham' == str(excinfo.value)


プロダクションコードがimportしているモジュールの属性を差し替え

プロダクションコード(target.py)で

# target.py
import outer_import
class Target(object):
    def get_outer_import(self):
        return outer_import.FOO

# outer_import.py
FOO = 'baz'

のように、outer_import.pyをimportしているouter_import.FOOを差し替えます。

方法は、ここまで見てきたものと同じです。  

def test_patch_import(self, monkeypatch):
    expected = 'ham'
    monkeypatch.setattr(outer_import, 'FOO', expected)
    sut = Target()
    actual = sut.get_outer_import()
    assert actual == expected


プロダクションコードがfrom … importしているモジュールの属性を差し替え

前項と異なり、プロダクションコード(target.py)で

# target.py
from outer_from_import import BAR
class Target(object):
    def get_outer_from_import(self):
        return BAR

# outer_from_import.py
BAR = 'baz'

のように、outer_from_import.pyをfrom ... importしているouter_from_import.BARを差し替えます。

今まで通り、

def test_patch_from_import(self, monkeypatch):
    expected = 'ham'
    monkeypatch.setattr(outer_from_import, 'BAR', expected)
    sut = Target()
    actual = sut.get_outer_from_import()
    assert actual == expected

としても差し替わらず、以下のエラーとなります。

E       assert 'baz' == 'ham'
E         - baz
E         + ham

 
from ... importした場合には、モジュール名前空間が変わるためです。
参考:そんなpatchで大丈夫か? (mockについてのメモ〜後編〜) - Qiita

そこで、monkeypatch.setattr('target.BAR', expected)のように差し替えます。

def test_patch_from_import(self, monkeypatch):
    expected = 'ham'
    monkeypatch.setattr('target.BAR', expected)
    sut = Target()
    actual = sut.get_outer_from_import()
    assert actual == expected


標準出力の差し替え

プロダクションコード

class Target(object):
    def write_stdout(self):
        print('foo')

write_stdout()で標準出力へ出力している内容を差し替えます。

この場合、pytestのcapsysを併用して差し替えと検証をします。
Capturing of the stdout/stderr output ? pytest documentation

def test_patch_stdout(self, monkeypatch, capsys):
    # pytestのcapsysを併用した例
    # http://doc.pytest.org/en/latest/capture.html
    def print_dummy(arg):
        print('ham')
    # python3ではprintは式なので、lambdaに指定可能
    monkeypatch.setattr(Target, 'write_stdout', lambda x: print('ham'))
    # python2ではprintは文なので、lamdbaに指定できないことから、ダミー関数を使う
    # monkeypatch.setattr(Target, 'write_stdout', print_dummy)
    sut = Target()
    actual = sut.write_stdout()
    actual, _ = capsys.readouterr()
    assert actual == 'ham\n'

 
なお、プロダクションコードが標準出力へ文字コードcp932などで出していた場合、

class Target(object):
    def write_cp932_stdout(self):
        print('ほげ'.encode('cp932'))

差し替えてもうまく動作しません。

def test_stdout_cp932(self, capsys):
    sut = Target()
    actual = sut.write_cp932_stdout()
    actual, _ = capsys.readouterr()
    assert actual == 'ほげ\n'.encode('cp932')
    # E assert "b'\\x82\\xd9\\x82\\xb0'\n" == b'\x82\xd9\x82\xb0\n'
    # E  +  where b'\x82\xd9\x82\xb0\n' = <built-in method encode of str object at 0x101bb4990>('cp932')
    # E  +    where <built-in method encode of str object at 0x101bb4990> = 'ほげ\n'.encode


関数の差し替え

プロダクションコード

def standard_function():
    return 'standard'

の関数standard_functionを差し替えます。

import functions
def test_standard_function(self, monkeypatch):
    expected = 'ham'
    monkeypatch.setattr(functions, 'standard_function', lambda: expected)
    actual = functions.standard_function()
    assert actual == expected


プライベート関数の差し替え

プロダクションコードの

def __private_function():
    return 'private'

プライベート関数(先頭にアンダースコアが2つある関数)である__private_function()を差し替えます。

この場合、以下を組み合わせて差し替えます。

from functions import __private_function as pf
def test_private_function(self, monkeypatch):
    expected = 'ham'
    monkeypatch.setattr(sys.modules[__name__], 'pf', lambda: expected)
    actual = pf()
    assert actual == expected


sys.exc_infoの差し替え

pytestが内部で使っているようで、

def test_do_not_patch_exc_info(self, monkeypatch):
    expected = ('ham', 'spam', 'egg')
    def patch_exc_info(arg):
        return expected
    monkeypatch.setattr(sys, 'exc_info', patch_exc_info)
    sut = Target()
    actual = get_sys_exc_info()

とすると、実行ログで

  • テストは通る
  • 以下のエラーが出て、pytestの結果が乱れる

となります。そのため、差し替えないほうがいいようです。

test_monkeypatch.py ...............
========================== 15 passed in 0.09 seconds ===========================
...
Traceback (most recent call last):
  TypeError: patch_exc_info() missing 1 required positional argument: 'arg'
  During handling of the above exception, another exception occurred:


datetimeの差し替え

datetimeの差し替えはfreezegunを使うと便利です。
spulec/freezegun: Let your Python tests travel through time

 
ただ、pytestだけで差し替えたい場合は、以下が参考にして差し替えます。

def test_patch_datetime(self, monkeypatch):
    expected = datetime.datetime.now()
    class PatchedDatetime(datetime.datetime):
        @classmethod
        def now(cls):
            return expected
    monkeypatch.setattr('datetime.datetime', PatchedDatetime)
    sut = Target()
    actual = sut.get_current_datetime()
    assert actual == expected

 
なお、datetime.datetimeはC拡張の組込型です。

そのため、

def test_cannot_patch_datetime(self, monkeypatch):
    expected = datetime.datetime.now()
    monkeypatch.setattr('datetime.datetime.now', lambda: expected)
    sut = Target()
    actual = sut.get_current_datetime()
    assert actual == expected

としても、エラーとなります。
built-in object を拡張する禁断の果実を齧ろう - Qiita

E TypeError: can't set attributes of built-in/extension type 'datetime.datetime'


ソースコード

GitHubに上げました。e.g._monkeypatchディレクトリの中が今回のファイルです。
thinkAmi-sandbox/python_pytest-sample

 
なお、プロダクションコードとテストコードは、同じディレクトリに入れてあります。

そのため、実行時PYTHONPATHを通すために、python -m pytestで実行します。
python - PATH issue with pytest ‘ImportError: No module named YadaYadaYada’ - Stack Overflow

Python2で、type()関数を使うと<type 'instance'>が返ってきた

Python2でprintデバッグをした際、インスタンスの型名が知りたくなりました。

type()関数を使ったところ、<type 'instance'>が返ってきたので、これは何だろうと思って調べた時のメモです。
type() | 2. 組み込み関数 — Python 2.7.x ドキュメント


環境


結果

Python2で古い形式でクラス定義をしていると、type()関数では<type 'instance'>が返ってくるようでした。
python - Why does type(myField) return <type 'instance'> and not <type 'Field'>? - Stack Overflow

 
そのため、<インスタンス>.__class__のように__class__属性を使うのが良いとのことです。
instance.class | 5. 組み込み型 — Python 2.7.x ドキュメント

 
ためしてみます。

type_instance.py

# -*- coding:utf-8 -*-

class Py2OldStyle1:
    pass

class Py2OldStyle2():
    pass
    
class Py2NewStyle(object):
    pass


if __name__ == "__main__":
    print('Python2の古い形式1: {}'.format(type(Py2OldStyle1())))
    print('Python2の古い形式2: {}'.format(type(Py2OldStyle2())))
    print('Python2の新しい形式: {}'.format(type(Py2NewStyle())))
    print('Python2の古い形式1で__class__を使う: {}'.format(Py2OldStyle1().__class__))
    print('Python2の古い形式2で__class__を使う: {}'.format(Py2OldStyle2().__class__))
    print('Python2の新しい形式で__class__を使う: {}'.format(Py2NewStyle().__class__))

 
実行してみます。

# Python 2.xの確認
$ python --version
Python 2.7.13

# 実行
$ python type_instance.py 
Python2の古い形式1: <type 'instance'>
Python2の古い形式2: <type 'instance'>
Python2の新しい形式: <class '__main__.Py2NewStyle'>
Python2の古い形式1で__class__を使う: __main__.Py2OldStyle1
Python2の古い形式2で__class__を使う: __main__.Py2OldStyle2
Python2の新しい形式で__class__を使う: <class '__main__.Py2NewStyle'>

__class__でクラス名を取得できました。

 
ちなみに、Python3.x系でも試してみたところ、

$ python --version
Python 3.6.0

$ python type_instance.py 
Python2の古い形式1: <class '__main__.Py2OldStyle1'>
Python2の古い形式2: <class '__main__.Py2OldStyle2'>
Python2の新しい形式: <class '__main__.Py2NewStyle'>
Python2の古い形式1で__class__を使う: <class '__main__.Py2OldStyle1'>
Python2の古い形式2で__class__を使う: <class '__main__.Py2OldStyle2'>
Python2の新しい形式で__class__を使う: <class '__main__.Py2NewStyle'>

となりました。

 
Python2.xの旧形式の表記は、Python3.xでは新形式の省略形として扱えるので、上記のような結果となりました。
Python class inherits object - Stack Overflow

PythonのReportLabで、表(TableやTableStyle)について調べてみた

ReportLabでpdfに表を描いてみたところ、悩んだところがあったため、メモを残しておきます。

なお、詳細はReportLabの公式ドキュメント中の「ReportLab PDF LibraryUser Guide」のp77〜にも記載があります。

 
目次


環境

 
今回使うReportLabの実装は、基本的な形は以下となります。必要に応じてこのクラスを継承、_draw()メソッドをオーバーライドして各表を描きます。

注意点として、デフォルトと異なり、pdfの原点を左上(bottomup=False)にしてあります。

base.py

from django.http import HttpResponse
from django.views import View

from reportlab.lib.pagesizes import A4
from reportlab.lib.pagesizes import portrait
from reportlab.pdfbase import pdfmetrics
from reportlab.pdfbase.cidfonts import UnicodeCIDFont
from reportlab.pdfgen import canvas
from reportlab.lib.units import mm


class BaseView(View):
    filename = 'example.pdf'
    title = 'title: example'
    font_name = 'HeiseiKakuGo-W5'
    is_bottomup = False

    def get(self, request, *args, **kwargs):
        # pdf用のContent-TypeやContent-Dispositionをセット
        response = HttpResponse(status=200, content_type='application/pdf')
        response['Content-Disposition'] = 'filename="{}"'.format(self.filename)
        # 即ダウンロードしたい時は、attachmentをつける
        # response['Content-Disposition'] = 'attachment; filename="{}"'.format(self.filename)

        # 日本語が使えるゴシック体のフォントを設定する
        pdfmetrics.registerFont(UnicodeCIDFont(self.font_name))

        # A4縦書きのpdfを作る
        size = portrait(A4)

        # pdfを描く場所を作成:位置を決める原点は左上にする(bottomup)
        # デフォルトの原点は左下
        doc = canvas.Canvas(response, pagesize=size, bottomup=self.is_bottomup)

        # pdfのタイトルを設定
        doc.setTitle(self.title)

        # pdf上にも、タイトルとして使用したクラス名を表示する
        doc.drawString(10*mm, 10*mm, self.__class__.__name__)

        self._draw(doc)

        return response


    def _draw(self, doc):
        pass


複数列・複数行の表を作成

複数列・複数行の表を描くには、

  • 複数列:配列の要素が複数あるデータを用意
  • 複数行:2次元配列としてデータを用意

とします。

以下の場合、3列3行の表のデータとなります。

data = [
    ['行1-列1', '行1-列2-*********', '行1-列3-*********-*********'],
    ['行2-列1', '行2-列2-*********', '行2-列3-*********-*********'],
    ['行3-列1', '行3-列2-*********', '行3-列3-*********-*********'],
]

 
上記のデータを使って表を描いてみます。

multi_rows.py

class BasicMultiRows(BaseView):
    def _draw(self, doc):
        # 複数行の表を用意したい場合、二次元配列でデータを用意する
        data = [
            ['行1-列1', '行1-列2-*********', '行1-列3-*********-*********'],
            ['行2-列1', '行2-列2-*********', '行2-列3-*********-*********'],
            ['行3-列1', '行3-列2-*********', '行3-列3-*********-*********'],
        ]

        table = Table(data)
        # TableStyleを使って、Tableの装飾をします
        table.setStyle(TableStyle([
            # 表で使うフォントとそのサイズを設定
            ('FONT', (0, 0), (-1, -1), self.font_name, 9),
            # 四角に罫線を引いて、0.5の太さで、色は黒
            ('BOX', (0, 0), (-1, -1), 1, colors.black),
            # 四角の内側に格子状の罫線を引いて、0.25の太さで、色は赤
            ('INNERGRID', (0, 0), (-1, -1), 0.25, colors.red),
            # セルの縦文字位置を、TOPにする
            # 他にMIDDLEやBOTTOMを指定できるのでお好みで
            ('VALIGN', (0, 0), (-1, -1), 'TOP'),
        ]))

        # tableを描き出す位置を指定
        table.wrapOn(doc, 50*mm, 10*mm)
        table.drawOn(doc, 50*mm, 10*mm)

        # pdfを保存
        doc.save()

 
結果は以下の通りです。bottomup=Falseなので、原点は左上になります。

indexの降順で、表の上から下に並びます。

f:id:thinkAmi:20170117060903p:plain

 
ちなみに、bottomup=Trueにした場合、原点は左下となり、こんな感じになります。

indexの昇順で、表の上から下に並びます。

f:id:thinkAmi:20170117060906p:plain


複数列・複数行の表で、セルの高さや幅を指定

上の例では、表のセルの高さや幅は自動計算で設定されました。

任意の位置にあるセルの高さや幅を指定したい場合は、Tableオブジェクトを生成する際にrowHeights(行の高さ)やcolWidths(列の幅)を使います。

列・行ごとに設定したい場合はタプルで長さを渡し、全て一律で設定したい場合は単一値を指定します。

 
例えば、列幅は左から20mm・40mm・60mm、行の高さは一律10mmとしたい場合、

table = Table(data, colWidths=(20*mm, 40*mm, 60*mm,), rowHeights=10*mm)

と書くと、結果は以下となります。

f:id:thinkAmi:20170117060926p:plain


セルごとの設定

一番左の列のみ色を塗る

ここまでは表のセル全体に関する設定でしたので、次はセルごとの設定を行います。

ReportLabでは、セルごとの設定はTableStyleを使います。

TableStyleで指定するセル位置の表記は、ExcelでいうところのR1C1形式にて、(列, 行)のタプルで表現します。

また、列と行のindexは0から始まります。

 
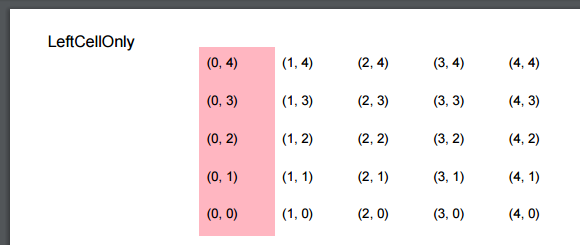
例えば、5x5の表に対して左側の列だけ色塗りをする場合、

table.setStyle(TableStyle([
    ('VALIGN', (0, 0), (-1, -1), 'TOP'),
    # 指定された範囲の背景色を変える
    ('BACKGROUND', (0, 0), (0, 4), colors.lightpink),
]))

のようにTableStyleのコンストラクタにて、

  • タプルの2番目の要素に、開始セル位置: (0, 0)
  • タプルの3番目の要素に、終了セル位置: (0, 4)

をそれぞれ指定します。

結果は、

f:id:thinkAmi:20170117060928p:plain

となります。


一番左の列のみ色を塗る (indexはマイナスバージョン)

(列, 行)のindexにはマイナス値も設定することができます。

Pythonのindexのマイナス値と同じ考え方ですので、-1は最後、-2は最後から2番目となります。

例えば左側の列だけ色塗りするには、

table.setStyle(TableStyle([
    ('BACKGROUND', (0, 0), (0, -1), colors.lightpink),
]))

のように指定します。

f:id:thinkAmi:20170117060931p:plain

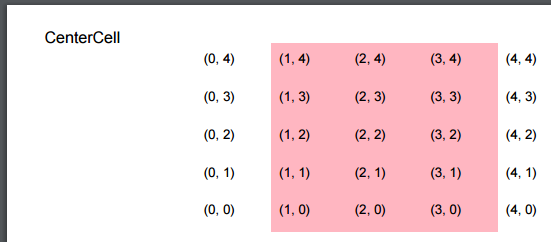
応用として、中央の範囲を色塗りする場合は、

table.setStyle(TableStyle([
    ('BACKGROUND', (1, 0), (3, 4), colors.lightpink),
]))

とすると、

f:id:thinkAmi:20170117060934p:plain

となります。

 
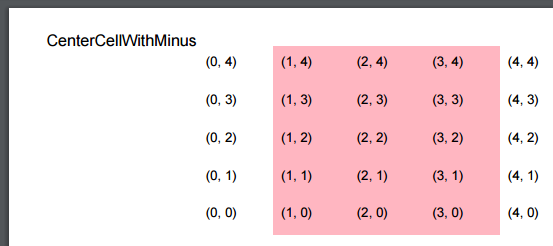
また、マイナスのindexを使う場合は、

table.setStyle(TableStyle([
    ('BACKGROUND', (1, 0), (-2, -1), colors.lightpink),
]))

とすると、

f:id:thinkAmi:20170118060743p:plain

となります。


罫線を引く

ReportLabではTableStyleのLine Commandsを使って罫線を引きます。

Line Commandsにはいくつかの種類がありますので、それぞれ試してみます。

なお、Line Commandsの形式は以下の通りです。

table.setStyle(TableStyle([
    # 決められた範囲で、太さや色を指定して、罫線を引く
    (<Line Comamnd名のリテラル>, 開始セルを示したタプル, 終了セルを示したタプル, 線の太さを示す数値, 線の色),
]))


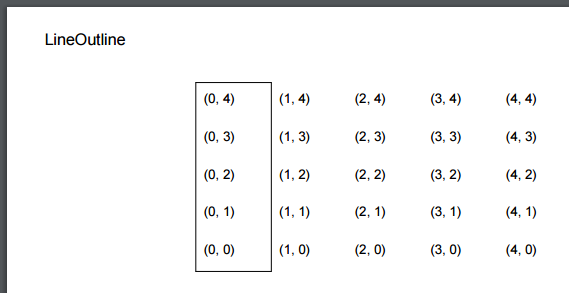
セルの左側に罫線を引く

LINEBEFOREを使います。

table.setStyle(TableStyle([
    ('LINEBEFORE', (0, 0), (0, 4), 0.25, colors.black),
]))

f:id:thinkAmi:20170117060945p:plain


セルの右側に罫線を引く

LINEAFTERを使います。

table.setStyle(TableStyle([
    ('LINEAFTER', (0, 0), (0, 4), 0.25, colors.black),
]))

f:id:thinkAmi:20170117060948p:plain


セルの上に罫線を引く (bottomupの影響あり)

LINEABOVEを使います。

table.setStyle(TableStyle([
    ('LINEABOVE', (0, 0), (0, 4), 0.25, colors.black),
]))

なお、今回の場合、bottomup=Falseと原点を左上にしていますので、セルの下側に罫線があります。

f:id:thinkAmi:20170117060953p:plain


セルの下に罫線を引く (bottomupの影響あり)

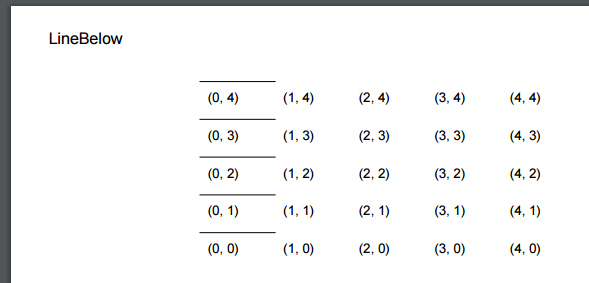
LINEBELOWを使います。

table.setStyle(TableStyle([
    ('LINEBELOW', (0, 0), (0, 4), 0.25, colors.black),
]))

なお、こちらもbottomup=Falseの影響を受け、セルの上側に罫線があります。

f:id:thinkAmi:20170117060958p:plain


セルの外枠に罫線を引く

BOXを使います。

table.setStyle(TableStyle([
    ('BOX', (0, 0), (0, 4), 0.25, colors.black),
]))

f:id:thinkAmi:20170117061002p:plain

 
もしくは、OUTLINEでも同じ結果になります。

table.setStyle(TableStyle([
    ('OUTLINE', (0, 0), (0, 4), 0.25, colors.black),
]))

f:id:thinkAmi:20170117061007p:plain


セルの内側に格子状の罫線を引く

INNERGRIDを使います。

なお、今までの例と異なり、分かりやすくするためにセルの範囲を中央にしてあります。

table.setStyle(TableStyle([
    ('INNERGRID', (1, 1), (3, 3), 0.25, colors.black),
]))

f:id:thinkAmi:20170117061011p:plain


セルのすべてに罫線を引く

GRIDを使います。

なお、こちらも、分かりやすくするためにセルの範囲を中央にしてあります。

table.setStyle(TableStyle([
    ('GRID', (1, 1), (3, 3), 0.25, colors.black),
]))

f:id:thinkAmi:20170117061015p:plain


セルを結合する

SPANを使います。

下記の例は、

  • 2列2行目から4列4行目までをSAPNで結合
  • 2列2行目から3列3行目までの背景色をlightpink

としています。

なお、SAPNで結合した部分にあるデータは、最初のセルを除いて削除されることに注意します。

table.setStyle(TableStyle([
    # わかりやすくするため、全範囲をグリッドにしておく
    ('GRID', (0, 0), (-1, -1), 0.25, colors.black),
    # 指定した範囲のセルを結合して、背景色を入れる
    # ただし、結合した部分のデータは最初のセルを除いて削除されることに注意
    ('SPAN', (1, 1), (3, 3)),
    ('BACKGROUND', (1, 1), (2, 2), colors.lightpink),
]))

f:id:thinkAmi:20170117061019p:plain


ソースコード

GitHubに上げてあります。table_styleアプリが今回のアプリです。
thinkAmi-sandbox/Django_ReportLab_on_Heroku-sample

Django + ReportLabをHerokuで動かしてpdfを表示する

最近、Pythonでpdfを作成する機会がありました。

Pythonのpdf作成ライブラリには何があるのかを調べたところ、ReportLabが一番有名そうでした。

 
また、DjangoのドキュメントにもReportLabの記載がありました。
Django で PDF を出力する | Django documentation | Django

 
そこで、Django + ReportLabのアプリを作り、Herokuにてpdfを表示してみました。

 
目次


環境


環境の準備

# Python3.5.2でvirtualenv準備
$ eval "$(pyenv init -)"

$ python --version
Python 3.5.2

$ virtualenv env
...
Installing setuptools, pip, wheel...done.

$ source env/bin/activate

# pipでinstall
(env) $ pip install django reportlab uwsgi
...
Successfully installed django-1.10.5 olefile-0.44 pillow-4.0.0 reportlab-3.3.0 uwsgi-2.0.14

# Djangoアプリの生成
(env) $ django-admin startproject myproject .
(env) $ python manage.py startapp myapp


Djangoアプリの内容

以下を参考に、今回は「はろーわーるど」という日本語をpdf出力してみます。
PythonでPDFを生成したい そしてサイコロを作りたい - [[ともっくす alloc] init]

 
Viewのソースコードはこんな感じです。

from django.views import View
from django.http import HttpResponse

from reportlab.lib.pagesizes import A4
from reportlab.lib.pagesizes import portrait
from reportlab.lib.units import mm
from reportlab.pdfbase import pdfmetrics
from reportlab.pdfbase.cidfonts import UnicodeCIDFont
from reportlab.pdfgen import canvas

class PdfView(View):
    def get(self, request, *args, **kwargs):
        # pdf用のContent-TypeやContent-Dispositionをセット
        response = HttpResponse(status=200, content_type='application/pdf')
        response['Content-Disposition'] = 'filename="example.pdf"'
        # 即ダウンロードしたい時は、attachmentをつける
        # response['Content-Disposition'] = 'attachment; filename="example.pdf"'

        self._create_pdf(response)
        return response

    def _create_pdf(self, response):
        # 日本語が使えるゴシック体のフォントを設定する
        font_name = 'HeiseiKakuGo-W5'
        pdfmetrics.registerFont(UnicodeCIDFont(font_name))

        # A4縦書きのpdfを作る
        size = portrait(A4)

        # pdfを描く場所を作成:pdfの原点は左上にする(bottomup=False)
        doc = canvas.Canvas(response, pagesize=size, bottomup=False)

        # フォントとサイズ(9)を指定して、左から20mm・上から18mmの位置に「はろーわーるど」を表示
        doc.setFont(font_name, 9)
        doc.drawString(20*mm, 18*mm, 'はろーわーるど')

        # pdfの書き出し
        doc.save()

 
他には、Herokuで動かすため、

  • Procfile
  • runtime.txt
  • requirements.txt
  • uwsgi.ini

を用意します。

各ファイルの内容は以前記事を参考にします。
DjangoをHeroku + uWSGIで動かしてみた - メモ的な思考的な


ローカルでの動作確認

(env) $ python manage.py runserver

# Adminなどのmodelは使わないため、runserver時のエラーは無視する
You have 13 unapplied migration(s). Your project may not work properly until you apply the migrations for app(s): admin, auth, contenttypes, sessions.
Run 'python manage.py migrate' to apply them.


Herokuへデプロイ

(env) $ heroku login
Enter your Heroku credentials.
Email:<you@example.com>
Password (typing will be hidden): <your password>
Logged in as <you>

(env) $ heroku create
Creating app... done, ⬢ <your app>
https://<your app>.herokuapp.com/ | https://git.heroku.com/<your app>.git

# collectstatic不要なので、環境変数をセット
(env) $ heroku config:set DISABLE_COLLECTSTATIC=1
Setting DISABLE_COLLECTSTATIC and restarting ⬢ <your ap>... done, v3
DISABLE_COLLECTSTATIC: 1

(env) $ git push heroku master
...
 + xxxxxx...xxxxxxx master -> master


動作確認

(env) $ heroku open

ブラウザでpdfが開き、「はろーわーるど」が表示されました。

f:id:thinkAmi:20170114072442p:plain


ソースコード

GitHubに上げました。
thinkAmi-sandbox/Django_ReportLab_on_Heroku-sample

HerokuにDjangoアプリをデプロイするとcollectstaticが自動実行される

HerokuにDjangoアプリをデプロイしたところ、

remote:  !     Error while running '$ python manage.py collectstatic --noinput'.
remote:        See traceback above for details.
remote: 
remote:        You may need to update application code to resolve this error.
remote:        Or, you can disable collectstatic for this application:
remote: 
remote:           $ heroku config:set DISABLE_COLLECTSTATIC=1
remote: 
remote:        https://devcenter.heroku.com/articles/django-assets
remote:  !     Push rejected, failed to compile Python app.
remote: 
remote:  !     Push failed
remote: Verifying deploy...
remote: 
remote: !   Push rejected to <your app>.

というエラーメッセージが表示されてデプロイできなかった時のメモです。

 
その時のDjangoアプリは、

という構成でした。

 
エラーメッセージより、collectstatic不要なら環境変数DISABLE_COLLECTSTATICを設定すれば良さそうでした。たしかに今回のDjangoアプリは静的ファイルがないので、collectstaticは不要です。

 
また、エラーメッセージの中にあったURLを見たところ、

When a Django application is deployed to Heroku, $ python manage.py collectstatic --noinput is run automatically during the build. A build will fail if the collectstatic step is not successful.

Collectstatic during builds | Django and Static Assets | Heroku Dev Center

と、Herokuへのデプロイ時にはcollectstaticが自動実行されるとのことでした。

 
そこで、

$ heroku config:set DISABLE_COLLECTSTATIC=1
Setting DISABLE_COLLECTSTATIC and restarting ⬢ <your app>... done, v3
DISABLE_COLLECTSTATIC: 1

と、Heroku環境変数を設定しました。

その後、再度デプロイしたところ、問題なく完了しました。