Python 3.6.4で、pip install python-memcached==1.58 したところ「tuple index out of range」エラー

python-memcachedの環境構築をする時に

# 仮想環境を作る
$ python -m venv env364

# アクティベート
$ source env364/bin/activate

# Pythonのバージョンを確認
(env364) $ python --version
Python 3.6.4

# pipでインストール
(env364) $ pip install python-memcached==1.58
Collecting python-memcached==1.58
  Using cached https://files.pythonhosted.org/packages/f7/62/14b2448cfb04427366f24104c9da97cf8ea380d7258a3233f066a951a8d8/python-memcached-1.58.tar.gz
    Complete output from command python setup.py egg_info:
    Traceback (most recent call last):
      File "<string>", line 1, in <module>
      File "/private/var/folders/h0/l5plp4zd3517r988jpm481g00000gn/T/pip-build-q026ekfn/python-memcached/setup.py", line 8, in <module>
        version=get_module_constant('memcache', '__version__'),
      File "/path/to/lib/python3.6/site-packages/setuptools/depends.py", line 164, in get_module_constant
        return extract_constant(code, symbol, default)
      File "/path/to/lib/python3.6/site-packages/setuptools/depends.py", line 195, in extract_constant
        const = code.co_consts[arg]
    IndexError: tuple index out of range

とエラーが出てインストールができなかったため、対応した時のメモです。


環境

  • Python 3.6.4
  • setuptools 28.8.0


対応

python-memcachedGitHubにissueがありました。
can't install python-memcached1.58 in Python 3.6.0b2 · Issue #103 · linsomniac/python-memcached

setuptoolsのバージョンが古いために発生しているようでした。

 
そのため、setuptoolsのバージョンを上げてからインストールしたところ成功しました。

# setuptoolsのバージョンを上げる
(env364) $ pip install -U setuptools
Collecting setuptools
  Using cached https://files.pythonhosted.org/packages/37/06/754589caf971b0d2d48f151c2586f62902d93dc908e2fd9b9b9f6aa3c9dd/setuptools-40.6.3-py2.py3-none-any.whl
Installing collected packages: setuptools
  Found existing installation: setuptools 28.8.0
    Uninstalling setuptools-28.8.0:
      Successfully uninstalled setuptools-28.8.0
Successfully installed setuptools-40.6.3

# python-memcachedをインストール
(env364) $ pip install python-memcached==1.58
Collecting python-memcached==1.58
  Using cached https://files.pythonhosted.org/packages/f7/62/14b2448cfb04427366f24104c9da97cf8ea380d7258a3233f066a951a8d8/python-memcached-1.58.tar.gz
Requirement already satisfied: six>=1.4.0 in ./env364/lib/python3.6/site-packages (from python-memcached==1.58)
Installing collected packages: python-memcached
  Running setup.py install for python-memcached ... done
Successfully installed python-memcached-1.58

 
ちなみに、python-memcached 1.59 ではエラーが発生せずにインストールできるようです。

# 仮想環境を作る
$ python -m venv env364_1

# アクティベート
$ source env364_1/bin/activate

# setuptoolsのバージョンを確認
(env364_1) $ pip list
pip (9.0.1)
setuptools (28.8.0)

# インストール
(env364_1) $ pip install python-memcached
Collecting python-memcached
  Using cached https://files.pythonhosted.org/packages/f5/90/19d3908048f70c120ec66a39e61b92c253e834e6e895cd104ce5e46cbe53/python_memcached-1.59-py2.py3-none-any.whl
Collecting six>=1.4.0 (from python-memcached)
  Using cached https://files.pythonhosted.org/packages/73/fb/00a976f728d0d1fecfe898238ce23f502a721c0ac0ecfedb80e0d88c64e9/six-1.12.0-py2.py3-none-any.whl
Installing collected packages: six, python-memcached
Successfully installed python-memcached-1.59 six-1.12.0

Python + msoffcrypto-toolで、Excelの読み取りパスワードを解除する

前回、Python + openpyxlで、ブックやシートの保護・解除を試しました。
Python + openpyxlで、ブックやシートの保護・解除を試してみた - メモ的な思考的な

 
その際、openpyxlではExcelの読み取りパスワードを解除できませんでした。

ただ、読み取りパスワード設定済のExcelファイルを読み込みたいことがあったため、別のライブラリがないかを調べてみました。

なお、今回もパスワードは把握している前提です。パスワードのクラックではありません。

 
目次


環境


調査したライブラリ

xlwings

 
Web上に、xlwings を使って読み取りパスワードを解除する事例がありました。
Load password protected Excel files into Pandas DataFrame - David Hamann

 
ただ、 wb = xw.Book(PATH) にてExcelファイルを開く際に、読み取りパスワード入力ダイアログが表示されました。

f:id:thinkAmi:20181215113543p:plain:w300

 
手動でパスワード入力するのが手間なため、他のライブラリを探すことにしました。


pywin32

 
読み取りパスワードを解除するよう

excel = win32com.client.Dispatch('Excel.Application')
book = excel.Workbooks.Open('対象のファイル', False, False, None, '読み取りパスワード')
book.SaveAs('解除後のファイル', None, '')
book.Close()

と実装したところ、読み取りパスワード入力ダイアログが表示されずに解除できました。

しかし、 pywin32Windows上でしか動作せず、Macでは利用できないため、他のライブラリを探すことにしました。

 
ちなみに、最近の pywin32 は、 pypiwin32 としてPyPIからインストールできるようです。
https://pypi.org/project/pypiwin32/

名前などが怪しいですが、メンテナーが pywin32 とほぼ同じなので、大丈夫な気がします。
https://pypi.org/project/pywin32/


msoffcrypto-tool

 
GitHubのREADMEに従い、Macのターミナルから実行したところ、読み取りパスワード入力ダイアログが表示されずにパスワードが解除されました。

 
README上ではライブラリとして使う方法も記載されていたため、 msoffcrypto-tool を使うことにしました。


msoffcrypto-toolの実装

実装の流れは以下です。

# 対象のExcelを開く
with file.open(mode='rb') as locked:

    # OfficeFileオブジェクトにする
    office_file = msoffcrypto.OfficeFile(locked)

    # パスワードを設定する
    office_file.load_key(password=PASSWORD)

    # 解除する(ファイルは上書き保存される)
    office_file.decrypt(unlocked)

これにより、Excelファイル(xlsx, xlsの両方)とも、読み取りパスワードを解除できました。

 
ただ、読み取りパスワードが設定されていないExcelファイルに対して実行すると、例外が発生しました。

xlsxxls では、例外が発生する箇所が異なりました。

  • xlsx
    • office_file = msoffcrypto.OfficeFile(locked) のタイミング
  • xls
    • office_file.load_key(password=PASSWORD) のタイミング

 
なお、msoffcrypto.OfficeFileには、読み取りパスワードが設定されているかをチェックするメソッド is_encrypted() があります。

ただし、 xlsx 形式では常に True が返ってくる実装になっていることに注意が必要です。
https://github.com/nolze/msoffcrypto-tool/blob/v4.6.3/msoffcrypto/format/ooxml.py#L143

 
以上より、読み取りパスワードが設定されていないファイルでも動作するように修正してみました。

import msoffcrypto
import pathlib


BASE_DIR = pathlib.Path(__file__).resolve().parents[0]
PASSWORD = '12345'
UNLOCKED_FILE = BASE_DIR.joinpath('unlocked.xlsx')


def unlock():
    for file in BASE_DIR.iterdir():
        # Excelファイルだけ対象
        if not file.is_file() or file.suffix not in ['.xlsx', '.xls']:
            continue

        with file.open(mode='rb') as locked:
            # xlsxファイルの場合、読み取りパスワード無しのファイルは例外が発生する
            # is_encrypted()には以下の記載がある
            #
            # https://github.com/nolze/msoffcrypto-tool/blob/v4.6.3/msoffcrypto/format/ooxml.py#L143
            # def is_encrypted(self):
            #     # olefile cannot process non password protected ooxml files.
            #     # Hence if it has reached here it must be password protected.
            #     return True
            try:
                office_file = msoffcrypto.OfficeFile(locked)
            except OSError:
                if file.suffix == '.xlsx':
                    continue
                raise

            # 読み取りパスワードが設定されているかをチェック(xlsxはチェックできないので、xls向け)
            if not office_file.is_encrypted():
                continue

            # パスワードをセット
            # xlsでパスワードが設定されていない場合、load_key()時にエラーが出るため、事前にチェックが必要
            #   File "python3.6/site-packages/msoffcrypto/format/xls97.py", line 479, in load_key
            #     # Skip to FilePass; TODO: Raise exception if not encrypted
            #     num, size = workbook.skip_to(recordNameNum['FilePass'])
            #   File "python3.6/site-packages/msoffcrypto/format/xls97.py", line 428, in skip_to
            #     raise Exception("Record not found")
            # Exception: Record not found
            office_file.load_key(password=PASSWORD)

            # 読み取りパスワード解除後のファイルは、拡張子の前に '_unlocked' を付けて保存する
            unlocked_file = BASE_DIR.joinpath(f'{file.stem}_unlocked{file.suffix}')
            with unlocked_file.open(mode='wb') as unlocked:
                # パスワードを解除
                office_file.decrypt(unlocked)


if __name__ == '__main__':
    unlock()


ソースコード

GitHubに上げました。 msoffcrypto_tool ディレクトリの中が今回のファイルです。
https://github.com/thinkAmi-sandbox/python_excel_libraries-sample

Python + openpyxlで、ブックやシートの保護・解除を試してみた

Excelには、ブックやシートを保護するための機能があります。

  • 読み取りパスワード
  • 書き込みパスワード
  • ブックの保護
  • シートの保護

 
それらをopnepyxlでやるにはどうしたら良いかを試した時のメモです。

なお、パスワードは把握している前提です。パスワードのクラックではありません。

また、公式ドキュメントだとこのあたりのことです。
Protection — openpyxl 2.5.12 documentation

 
目次


環境


読み取りパスワード・書き込みパスワードの設定は不可

openpyxlでは読み取りパスワードと書き込みパスワードは設定できないようです。

issueによると

because it is proprietary MS code not covered by the OOXML specification.

https://bitbucket.org/openpyxl/openpyxl/issues/193/can-i-open-password-protected-excel-files

とのことです。


ブックの保護

パスワード無しでブックの保護を行う

Workbookオブジェクトには security 属性があり、それに対して保護の設定を行うことで実現できます。

ブックの保護なしのファイルを読み込むと、 security 属性は None です。

そのため、 openpyxl.workbook.protection.WorkbookProtection オブジェクトを設定した上で、 lockStructure = True とします。

# ブックを読み込み
wb = _load(NO_PROTECTION_FILE)

# ブックを保護
wb.security = WorkbookProtection()
wb.security.lockStructure = True

# 保存
_save(wb, f'No_1_PROTECT_book_using_{NO_PROTECTION_FILE}')


# _load()と_save()は以下の関数(以降のソースコードも同様)
# ディレクトリ名を付けると一行が長くなって見づらかったので、関数化した
def _load(file_name):
    return openpyxl.load_workbook(BASE_FILE_DIR.joinpath(file_name))

def _save(workbook, file_name):
    workbook.save(RESULT_FILE_DIR.joinpath(file_name))

 
結果です。

f:id:thinkAmi:20181215100903p:plain:w300


パスワードありでブックを保護する

パスワード無しに加え、 wb.security.workbook_password = PASSWORD_FOR_BOOK を追加します。

wb = _load(NO_PROTECTION_FILE)

# ブックを保護
wb.security = WorkbookProtection()
wb.security.lockStructure = True
wb.security.workbook_password = PASSWORD_FOR_BOOK

# 保存
_save(wb, f'No_2_PROTECT_book_using_{NO_PROTECTION_FILE}')

 
結果です。ブックの保護を解除しようとすると、パスワード入力が求められます。

f:id:thinkAmi:20181215101129p:plain:w300


シートの保護

パスワード無しでシートを保護する

シートオブジェクトの protection 属性にある enable() メソッドを使います。

なお、公式ドキュメントではブックオブジェクトに対して設定するよう記載されていましたが、シートオブジェクトが正しそうです。
https://openpyxl.readthedocs.io/en/stable/protection.html#worksheet-protection

wb = _load(NO_PROTECTION_FILE)

# 対象のワークシートオブジェクトを取得する
ws = wb['Sheet1']

# パスワード無しで保護
ws.protection.enable()

# 保存
_save(wb, f'No_3_PROTECT_sheet_without_password_{NO_PROTECTION_FILE}')

 
結果です。

f:id:thinkAmi:20181215101422p:plain:w300


パスワードありでシートを保護する

パスワードなしに加え、 ws.protection.password = PASSWORD_FOR_SHEET を使います。

# 対象のワークシートオブジェクトを取得する
ws = wb['Sheet1']

# パスワードをセット
ws.protection.password = PASSWORD_FOR_SHEET

# シートを保護
ws.protection.enable()


シートの保護時に「このシートのすべてのユーザーに許可する操作」を設定する

Excelでは、シートの保護時に このシートのすべてのユーザーに許可する操作 というチェックボックスがいくつかあります。

openpyxlでそれらを有効化する場合は以下となります。

# 対象のワークシートオブジェクトを取得する
ws = wb['Sheet1']

# このシートのすべてのユーザーに許可する操作
ws.protection.objects = True                # オブジェクトの編集
ws.protection.scenarios = True              # シナリオの編集
ws.protection.formatCells = True            # セルの書式設定
ws.protection.formatColumns = True          # 列の書式設定
ws.protection.formatRows = True             # 行の書式設定
ws.protection.insertColumns = True          # 列の挿入
ws.protection.insertRows = True             # 行の挿入
ws.protection.insertHyperlinks = True       # ハイパーリンクの挿入
ws.protection.deleteColumns = True          # 列の削除
ws.protection.deleteRows = True             # 行の削除
ws.protection.selectLockedCells = True      # ロックされたセルの選択
ws.protection.selectUnlockedCells = True    # ロックされていないセルの選択
ws.protection.sort = True                   # 並べ替え
ws.protection.autoFilter = True             # フィルター
ws.protection.pivotTables = True            # ピボットテーブルレポート

# パスワード無しで保護
ws.protection.enable()


セルをロックしないで、シートを保護する

Excelのデフォルトでは、シートを保護すると全セルにロックがかかり、セルへの入力ができなくなります。

一部のセルのみ入力可能にしてシートを保護したい場合、事前にセルのロックを解除します。

openpyxlでは、以下のようにします。

from openpyxl.styles import Protection

wb = _load(NO_PROTECTION_FILE)
ws = wb['Sheet1']

# ロックを外したい(保護されない)セルを選ぶ
unlock_cells = ws['A1:B3']

# 取得したデータや型を見ると、行ごとにタプルでセルが入っている
print(f'type: ({type(unlock_cells)}), values: {unlock_cells}')
# => type: (<class 'tuple'>), values: ((<Cell 'Sheet1'.A1>, <Cell 'Sheet1'.B1>),
#                                      (<Cell 'Sheet1'.A2>, <Cell 'Sheet1'.B2>),
#                                      (<Cell 'Sheet1'.A3>, <Cell 'Sheet1'.B3>))

# chain.from_iterable()でネストタプルを平坦にしてから処理 (使ってみたかっただけ)
# 普通は for の2重ループで良いのかな
for cell in chain.from_iterable(unlock_cells):

    # 念のための確認
    print(f'type: ({type(cell)}), values: {cell}')
    # => type: (<class 'openpyxl.cell.cell.Cell'>), values: <Cell 'Sheet1'.A1>

    # ロックを解除
    cell.protection = Protection(locked=False)

# シートを保護
ws.protection.enable()

 
結果です。

ロックされたセルの場合、入力しようとすると、以下のようにメッセージが表示されます。

f:id:thinkAmi:20181215102139p:plain:w300

一方、ロックされていないセルの場合、入力が可能です。

f:id:thinkAmi:20181215102154p:plain:w300


ブックの保護を解除

ブックの保護時とは逆で、 wb.security.lockStructure = False とします。

また、パスワード付きブックの保護の場合は、 wb.security.workbook_password = PASSWORD_FOR_BOOK を設定します。

wb = _load(BOOK_PROTECTION_FILE)

# 保護したときのパスワードをセット
wb.security.workbook_password = PASSWORD_FOR_BOOK

# ブックの保護を解除
# wb.security.lock_structureでも良い:Aliasが設定されている
wb.security.lockStructure = False

_save(wb, f'No_6_UNPROTECT_{BOOK_PROTECTION_FILE}')

 
結果です。ブックの保護が解除されています。

f:id:thinkAmi:20181215102630p:plain:w300


シートの保護を解除

シートの保護とは別のメソッド ws.protection.disable() を使います。

また、パスワードで保護している場合は、 ws.protection.password = PASSWORD_FOR_SHEET で設定する必要があります。

wb = _load(SHEET_PROTECTION_WITH_PASSWORD_FILE)
ws = wb['Sheet1']

# シートを保護したときのパスワードをセット
ws.protection.password = PASSWORD_FOR_SHEET

# シートの保護を解除
ws.protection.disable()

_save(wb, f'No_8_UNPROTECT_{SHEET_PROTECTION_WITH_PASSWORD_FILE}')

 
結果です。指定したシート Sheet1 のみシートの保護が解除されています。

f:id:thinkAmi:20181215103043p:plain:w300


ソースコード

GitHubに上げました。openpyxl/protection/ ディレクトリの中が今回のファイルです。
https://github.com/thinkAmi-sandbox/python_excel_libraries-sample

Python + openpyxlで、 0:00 という値を持つセルが正しく保存されない

JSL (日本システム技研) Advent Calendar 2018 - Qiita の5日目の記事です。

 
Excel (*.xlsx) ファイルをPythonで作成するため、openpyxlを使いました。
https://bitbucket.org/openpyxl/openpyxl/src

 
そんな中、 0:00 という値を持つセルが正しく保存されなかったため、原因調査と対応を行ったときのメモです。

 
目次


環境


現象

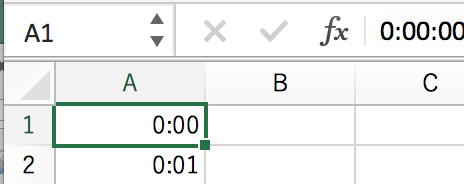
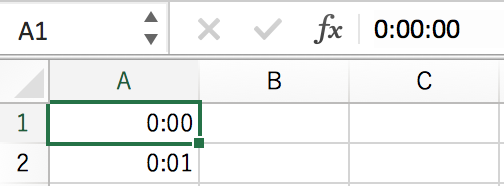
Excel上で A1 セルに 0:00 、A2セルに 0:01 を入力したシートを用意します。

f:id:thinkAmi:20181205212715p:plain:w450

 
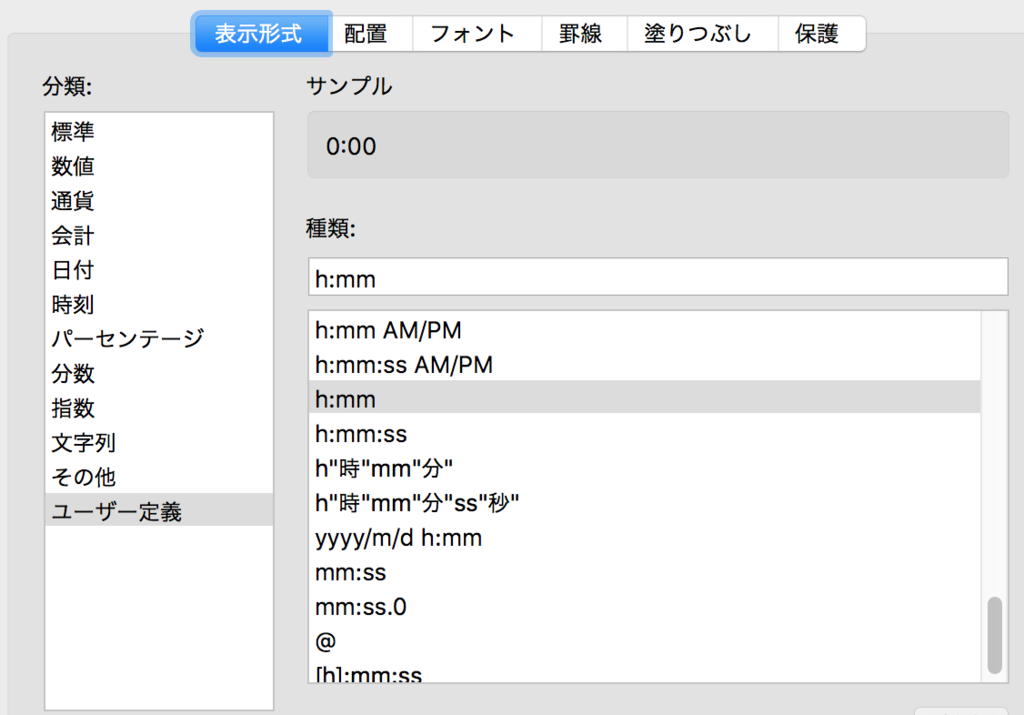
表示形式は以下の通りです。

f:id:thinkAmi:20181205212735p:plain:w450

 
このようなファイルに対し、openpyxlで開いて別名で保存をします。

BEFORE = "zero_time.xlsx"
AFTER = "zero_time_after.xlsx"

wb = openpyxl.load_workbook(BEFORE)
wb.save(AFTER)

 
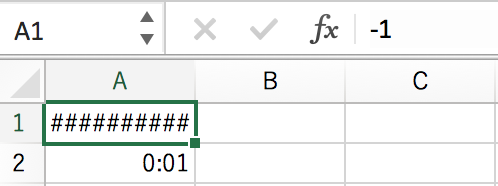
別名で保存したファイルを開くと、 0:00 を設定したセルが変更されてしまっています。

f:id:thinkAmi:20181205212913p:plain


原因

openpyxlのissueを見ると、似たような事例がありました。
openpyxl / openpyxl / issues / #1043 - Time '0:00' is not saved correctly after loading and saving a file — Bitbucket

いわゆる1900年うるう日問題が原因のようです。

 
どこかでこのあたりを見たなと思ったら、過去に書いていました。
C#とAccessにおける、日付型(DateTime)のデフォルト値の差について - メモ的な思考的な

 
では、実際に値を見てみます。

def print_before_and_after(before, after):
    print('--- before ---')
    print_a1_a2(before)

    print('--- after ---')
    print_a1_a2(after)


def print_a1_a2(path):
    wb = openpyxl.load_workbook(path)
    sheet = wb.active
    a1_value = sheet['A1'].value
    a2_value = sheet['A2'].value
    print(f'A1: {a1_value}({type(a1_value)}), A2: {a2_value}({type(a2_value)})')
    wb.close()


print_before_and_after(BEFORE, AFTER)
# =>
# --- before ---
# A1: 1899-12-30 00:00:00(<class 'datetime.datetime'>), A2: 00:01:00(<class 'datetime.time'>)
# --- after ---
# A1: 1899-12-29 00:00:00(<class 'datetime.datetime'>), A2: 00:01:00(<class 'datetime.time'>)

 
気になる点は、

  • 1899/12/30から1899/12/29へと値が変更されていた
  • 0:00は datetime.datetime 型、0:01は datetime.date 型と、違いがある

です。

Excel上でも -1 と数式欄に表示されていたのも、この影響のように見えます。


対応

【NG】iso_dates=True を設定

まずは、issueに記載されていたように、 workbook.iso_dates=True を設定してみます。

wb = openpyxl.load_workbook(BEFORE)
wb.iso_dates = True
wb.save(ISO)

print_before_and_after(BEFORE, ISO)
# =>
# --- before ---
# A1: 1899-12-30 00:00:00(<class 'datetime.datetime'>), A2: 00:01:00(<class 'datetime.time'>)
# --- after ---
# A1: 1899-12-30 00:00:00(<class 'datetime.datetime'>), A2: 00:01:00(<class 'datetime.time'>)

データ上は良さそうです。

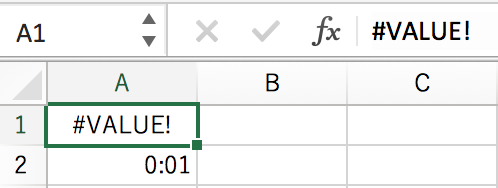
ただ、実際のファイルを開いてみたところ、 #VALUE となっていました。

f:id:thinkAmi:20181205214224p:plain:w450


Excelのゼロ日付 (1899/12/30) の時だけ特別処理

0:00 の時は日付が -1 されてしまうため、ゼロ日付の時は日付を1加算するロジックを追加してみました。

FIXED = "zero_time_fix.xlsx"
EXCEL_ZERO_DATE = datetime(1899, 12, 30, 0, 0, 0)

wb = openpyxl.load_workbook(BEFORE)
wb = fix_default_date(wb, "A1")
wb = fix_default_date(wb, "A2")
wb.save(FIXED)


def fix_default_date(workbook, cell):
    sheet = workbook.active
    value = sheet[cell].value
    if value == EXCEL_DEFAULT_DATE:
        sheet[cell].value = EXCEL_ZERO_DATE + timedelta(days=1)
    return workbook

 
データを確認してみましたが、大丈夫そうです。

print_before_and_after(BEFORE, FIXED)
# =>
# --- before ---
# A1: 1899-12-30 00:00:00(<class 'datetime.datetime'>), A2: 00:01:00(<class 'datetime.time'>)
# --- after ---
# A1: 1899-12-30 00:00:00(<class 'datetime.datetime'>), A2: 00:01:00(<class 'datetime.time'>)

 
表示上も良さそうでした。

f:id:thinkAmi:20181205214746p:plain


ソースコード

GitHubに上げました。 openpyxl/zero_time ディレクトリが今回のものです。
https://github.com/thinkAmi-sandbox/python_excel_libraries-sample

2018年12月時点における、PythonのSOAPライブラリについて

Python その2 Advent Calendar 2018 - QiitaJSL (日本システム技研) Advent Calendar 2018 - Qiita の3日目の記事です。

 
APIというと、最近はRESTやgRPCなどがメジャーですが、場所によってはSOAPがまだまだ使われています。

 
もし、SOAPクライアント/サーバをPythonで実装しようと考えた時には、以下の記事で紹介されているライブラリを候補にあげるかもしれません。

 
ただ、最近はPython3系がメインになったこともあり、2018年12月時点で使えるPythonSOAPライブラリが気になりました。

調べてみると、SOAPライブラリの情報がPython Wikiにありました。
WebServices - Python Wiki

そこで今回は、Python Wikiに記載されているライブラリがPython3.7で動作するか試してみました。

 
目次


環境


また、今回使用するWSDLは以下とします。

returnMessage(<引数の値>) を呼んだら、 Hello, <引数の値> が返ってくる SOAP API となります。

<?xml version="1.0" encoding="UTF-8"?>
<wsdl:definitions
        xmlns:wsdl="http://schemas.xmlsoap.org/wsdl/"
        xmlns:soap11="http://schemas.xmlsoap.org/wsdl/soap/"
        xmlns:http="http://schemas.xmlsoap.org/wsdl/http/"
        xmlns:mime="http://schemas.xmlsoap.org/wsdl/mime/"
        xmlns:xsd="http://www.w3.org/2001/XMLSchema"
        xmlns:ns0="http://example.com/HelloWorld"
        targetNamespace="http://example.com/HelloWorld">

    <wsdl:types>
        <xsd:schema elementFormDefault="qualified" targetNamespace="http://example.com/HelloWorld">
            <xsd:element name="RequestInterface">
                <xsd:complexType>
                    <xsd:sequence>
                        <xsd:element minOccurs="0" name="userName" type="xsd:string" />
                    </xsd:sequence>
                </xsd:complexType>
            </xsd:element>
            <xsd:element name="ResponseInterface">
                <xsd:complexType>
                    <xsd:sequence>
                        <xsd:element minOccurs="0" name="returnMessage" type="xsd:string" />
                    </xsd:sequence>
                </xsd:complexType>
            </xsd:element>
        </xsd:schema>
    </wsdl:types>

    <wsdl:message name="messageIn">
        <wsdl:part name="parameters" element="ns0:RequestInterface" />
    </wsdl:message>
    <wsdl:message name="messageOut">
        <wsdl:part name="parameters" element="ns0:ResponseInterface" />
    </wsdl:message>

    <wsdl:portType name="HelloPort">
        <wsdl:operation name="requestMessage">
            <wsdl:input message="ns0:messageIn"/>
            <wsdl:output message="ns0:messageOut"/>
        </wsdl:operation>
    </wsdl:portType>

    <wsdl:binding name="HelloBindingSoap11" type="ns0:HelloPort">
        <soap11:binding transport="http://schemas.xmlsoap.org/soap/http" style="document"/>
        <wsdl:operation name="requestMessage">
            <soap11:operation soapAction="http://example.com/HelloWorld/requestMessage" />
            <wsdl:input>
                <soap11:body use="literal"/>
            </wsdl:input>
            <wsdl:output>
                <soap11:body use="literal"/>
            </wsdl:output>
        </wsdl:operation>
    </wsdl:binding>

    <wsdl:service name="HelloService">
        <wsdl:port name="HelloServicePort" binding="ns0:HelloBindingSoap11">
            <soap11:address location="http://localhost:9100/hello"/>
        </wsdl:port>
    </wsdl:service>
</wsdl:definitions>


長いのでまとめ

いろいろと書いていたら長くなったため、ひとまずまとめを書いておきます。

2018年12月時点で、新規にSOAPクライアント・サーバを実装する場合は、以下を使うのが良いのかなと感じました。

  • SOAPクライアント
    • Zeep
  • SOAPサーバ
    • Soapfish
    • Pythonライブラリではないが、テスト目的ならSOAP UIを使っても良いのでは


以降、それぞれのライブラリについて書いていきます。


SOAPクライアントライブラリ

Zeep

 
現在も活発にメンテナンスされ続けているライブラリです。Python2/3の両方で動作するとのことです。

また、公式ドキュメントが充実しているのもありがたいです。

 
Zeepですが、WSDLからSOAPクライアントを自動生成する機能はありません。

とはいえ、 -mzeep コマンドを使ってWSDLを解析できるため、実装の手がかりになります。

$ python -mzeep hello.wsdl 

Prefixes:
     xsd: http://www.w3.org/2001/XMLSchema
     ns0: http://example.com/HelloWorld

Global elements:
     ns0:RequestInterface(userName: xsd:string)
     ns0:ResponseInterface(returnMessage: xsd:string)
     

Global types:
     xsd:anyType
... (長いので省略)
     xsd:unsignedShort

Bindings:
     Soap11Binding: {http://example.com/HelloWorld}HelloBindingSoap11

Service: HelloService
     Port: HelloServicePort (Soap11Binding: {http://example.com/HelloWorld}HelloBindingSoap11)
         Operations:
            requestMessage(userName: xsd:string) -> returnMessage: xsd:string

 
Zeepの実装例として、WSDL中の requestMessage() に対する実装は以下の通りです。

import pathlib
from zeep import Client

# Zeepのスクリプトがあるディレクトリの親ディレクトリ上にWSDLを置いてある
WSDL = pathlib.Path(__file__).resolve().parents[1].joinpath('hello.wsdl')

client = Client(str(WSDL))
response = client.service.requestMessage(userName='taro')

print(response)
# => Hello, taro


suds系

2011年や2016年ではメインに使えていたsuds系ですが、元々の suds や、sudsをforkした suds-jurko はすでにメンテナスが停止しているようです。

 
最近メンテナンスされているのは、 suds-jurko をforkした suds-community のようです。
https://github.com/suds-community/suds

また、suds-communityのissueにはsudsのいろいろなforkが紹介されています。 https://github.com/suds-community/suds/issues/1

 
とはいえ、suds系はどのforkを使うのが一番良いのか分からなかったため、今回試すのはあきらめました。


SOAPサーバライブラリ

現時点では、既存のSOAPサーバを使うことはあるものの、ゼロからPythonSOAPサーバを作る機会はほとんどないと思います。

一方、既存のSOAP APIに対するテストサーバ構築のため、SOAPサーバライブラリを使うことがあるかもしれません。

簡単なSOAPテストサーバであれば、WSDLからモックを生成してくれる SOAP UI のCommunity版で十分かもしれません。 https://www.soapui.org/downloads/soapui.html

 
しかし今回は、SOAP UIでは足りない場合に備え、いくつかSOAPサーバライブラリを試していることにしました。


Soapfish

Python3.7系で動作するのに加え、WSDLから各種クラスを生成してくれる機能があるのが Soapfish です。

 
リポジトリが2つありますが、

  • FlightDataServicesからsoapteamがfork
  • 両者のmasterコミットは同じ
  • PyPI https://pypi.org/project/soapfish/ のHomePageからのリンク http://soapfish.org/ が soapteam のリポジトリにリダイレクト

を考えると、今後はsoapteamのほうがメンテナンスされていくのかもしれません(が、よく分かりません)。

 
そのSoapfishですが、ほとんどドキュメントがありません。唯一あるのがチュートリアルです。
https://github.com/soapteam/soapfish/blob/master/docs/tutorial.rst

ただ、今回扱う範囲ではこのチュートリアルで十分ですので、チュートリアルに従って試してみます。

 
インストールですが、PyPIでは提供されていないようです。

$ pip install soapfish
Collecting soapfish
  Could not find a version that satisfies the requirement soapfish (from versions: )
No matching distribution found for soapfish

 
そのため、soapteamのリポジトリからインストールします。

$ pip install git+https://github.com/soapteam/soapfish

 
次に、WSDLからSoapfish用のクラスを生成します。

そのままだとターミナル上に表示されるため、 soapfish_server/soap_server.py として保存します。

$ python -m soapfish.wsdl2py -s hello.wsdl > soapfish_server/soap_server.py

 
雛形ができましたので、これを元に修正を加えます。必要な箇所は3点です。

まずはOperationです。Hello, <引数の値> を返すように修正します。

# Operations

def requestMessage(request, RequestInterface):
    # TODO: Put your implementation here.
    # 自分の設定へと修正
    # return ResponseInterface
    return ResponseInterface(returnMessage=f'Hello, {RequestInterface.userName}')

 
次はSOAP Serviceです。 location の内容を修正します。

ただし、次のサーバ設定でエンドポイントを修正するため、適当な値で良さそうです。

# SOAP Service

HelloServicePort_SERVICE = soap.Service(
    name='HelloServicePort',
    targetNamespace='http://example.com/HelloWorld',

    # 自分の設定へと修正
    location='http://localhost/hello',
    # location='${scheme}://${host}/hello',

    schemas=[Schema_ab251],
    version=soap.SOAPVersion.SOAP11,
    methods=[requestMessage_method],
)

 
最後に、Soapfishを乗せるサーバの設定を行います。

雛形にはDjangoを使って動作させる方法がコメントで記載されています。

しかし、今回は標準モジュールの wsgiref で動かします。実装方法はチュートリアルに記載されています。
https://github.com/soapteam/soapfish/blob/master/docs/tutorial.rst#323-putting-it-all-together

 
ただ、1点注意するところは、チュートリアルのように

app = soap_dispatch.WsgiSoapApplication({'/ChargePoint/services/chargePointService': dispatcher})

とすると、 AttributeError: 'dict' object has no attribute 'dispatch' という例外が出て動作しません。

 
そのため、以下のように実装します。

from wsgiref.simple_server import make_server
from soapfish import soap_dispatch

dispatcher = soap_dispatch.SOAPDispatcher(HelloServicePort_SERVICE)

# 引数をdictからdispatcherへと修正(エラーが出たため)
# AttributeError: 'dict' object has no attribute 'dispatch'
app = soap_dispatch.WsgiSoapApplication(dispatcher)

print('Serving HTTP on port 9100...')
httpd = make_server('', 9100, app)
httpd.serve_forever()

 
あとは、Soapfishサーバを起動します。

$ python soap_server.py 
Serving HTTP on port 9100...

 
先ほど作成したZeepクライアントでアクセスすると、Hello, taro が返されるのが分かります。


Ladon

LadonSOAPサーバ用のPythonライブラリです。

Ladonに関する記事を探すと、過去には http://ladonize.org/ に公式サイトがあったようです。

しかし、現在は別のサービスがこのドメインを使用しているようで、そのURLにアクセスしても何も情報がありません。また、ドキュメントやサンプル類もいくつか失われているようです。

 
LadonによるSOAP APIの実装方法ですが、公式ドキュメントを読んでもどのように作ればよいのか、イマイチ分かりませんでした。そのため、今回はソースコードを読んで実装してみることにしました。

 
Soapfishと異なり、LadonではWSDLからSOAPサーバの雛形を生成する機能はないようです。そのため、自作していく必要があります。

また、Ladonの注意点として、デフォルトでは、SOAP APIの戻り値の名前が result に固定されています。

それは、ladon/src/ladon/interfaces/soap11.py にある SOAP11ResponseHandlerbuild_response() メソッドが原因です。 dict のkeyが result で固定されているためです。WSDLの定義と異なる場合、このままではうまく動作しません。

# https://bitbucket.org/jakobsg/ladon/src/42944fc012a3a48214791c120ee5619434505067/src/ladon/interfaces/soap11.py#lines-636
SOAP11ResponseHandler.value_to_soapxml(
    {'result': res_dict['result']}, method_elem, doc, is_toplevel=True)

 
対応方法ですが、ソースコードを読むと

# ladon/src/ladon/interfaces/__init__.py
# https://bitbucket.org/jakobsg/ladon/src/42944fc012a3a48214791c120ee5619434505067/src/ladon/interfaces/__init__.py#lines-29

This is a decorator for service interfaces. It basically checks that
the interface classes which are exposed meets the requirements for
interface implementations.
It adds the interface to a global interface-cache.
All default ladon interfaces are added using this decorator, if you are
extending Ladon with a new interface use this decorator.
Requirements:
------------
Interfaces must inherit the ladon.interfaces.base.BaseInterface class.

# ladon/src/ladon/interfaces/base.py
# https://bitbucket.org/jakobsg/ladon/src/42944fc012a3a48214791c120ee5619434505067/src/ladon/interfaces/base.py#lines-6

All interface implementations must descend from BaseInterface. The interface
implementation can be thought of as an aggregator that ties the three basic functions
of a web service protocol together:

    1. ServiceDescriptor - A generator class that can provide a description for the service.
       ie. WSDL for soap.
    2. BaseRequestHandler - A handler that can parse the raw request objects from the client and
       convert them into a so-called req_dict (Request dictionary)
    3. BaseResponseHandler - A handler that can process the res_dict (Result Dictionary) of a
       service call and build a response object that fit's the protocol being implemented.
    4. BaseFaultHandler - A handler that can convert a ladon.exceptions.service.ServiceFault object
       to a fault response that fits the interface.

より、

  • BaseResponseHandler を継承し、 build_response() を自分のレスポンス型に差し替えたResponseHandlerクラスを用意
  • @expose デコレータを付けた、BaseInterface を継承したInterfaceクラスを用意し、上記のResponseHandlerクラスに差し替え

とすれば良さそうです。

 
必要な部分を抜粋します(ソースコード全体は、こちら)

 
まずは、ResponseHandlerとなります。

class MySOAP11ResponseHandler(BaseResponseHandler):
    def build_response(self, res_dict, sinfo, encoding):
        ...
        if 'result' in res_dict['result']:
            SOAP11ResponseHandler.value_to_soapxml(
                res_dict['result'], method_elem, doc, is_toplevel=True)
        else:
            SOAP11ResponseHandler.value_to_soapxml(
                # 自分のレスポンス型へと修正
                {'returnMessage': res_dict['result']}, method_elem, doc, is_toplevel=True)
        body_elem.appendChild(method_elem)
        return doc.toxml(encoding=encoding)

 
次にInterfaceを実装します。

@expose
class MySOAP11Interface(BaseInterface):

    def __init__(self, sinfo, **kw):
        def_kw = {
            'service_descriptor': SOAP11ServiceDescriptor,
            'request_handler': SOAP11RequestHandler,
            
            # 自作のResponseHandlerへと修正
            'response_handler': MySOAP11ResponseHandler,
            'fault_handler': SOAP11FaultHandler}
        def_kw.update(kw)
        BaseInterface.__init__(self, sinfo, **def_kw)

    @staticmethod
    def _interface_name():
        # 差し替えたエンドポイントを新規作成する必要があるため、既存とは異なる値へと変更
        return 'mysoap11'
...

 
以上で、差し替えるためのResponseHandlerとInterfaceが完成しました。

 
続いて、SOAP用のサービスクラスを作成します。

サンプルのソースコードを読むと、WSGIアプリケーション化するLadonWSGIApplicationにて、ファイルパスを指定してサービスクラスを読み込んでいました。
https://bitbucket.org/jakobsg/ladon/src/42944fc012a3a48214791c120ee5619434505067/examples/handler.py#lines-16

そのため、今回もサービスクラスは別ファイルとして作成します。

サービスクラスを実装する際、 @ladonize デコレータを使う必要があります。

@ladonizeデコレータでは、

  • 位置引数にクライアントから受け取る引数の型
  • キーワード引数 rtype に、クライアントへ渡す型

をそれぞれ指定します。

class Hello(object):

    # メソッド名は、WSDLの
    # <wsdl:part name="parameters" element="ns0:RequestInterface" />
    # の定義名と合わせる
    @ladonize(str, rtype=str)
    def RequestInterface(self, userName):
        print(userName)
        return f'Hello, {userName}'

 
あとは、wsgirefを使ってサーバを作成します。

サーバは ladon/src/master/examples/runserver.py の書き方をそのまま流用します。
https://bitbucket.org/jakobsg/ladon/src/master/examples/runserver.py

scriptdir = dirname(abspath(__file__))
service_modules = ['hello', ]

# Create the WSGI Application
application = LadonWSGIApplication(
    service_modules,
    [join(scriptdir, 'hello'), ],
    catalog_name='Ladon Service Examples',
    catalog_desc='The services in this catalog serve as examples to how Ladon is used',
    logging=31)


port = 9100
print("\nExample services are running on port %(port)s.\nView browsable API at http://localhost:%(port)s\n" %
      {'port': port})

server = make_server('', port, application)
server.serve_forever()

 
これで実装が終わりました。

次にSOAPサーバを起動します。

$ python hello_server.py 

Example services are running on port 9100.
View browsable API at http://localhost:9100

 
注意点として、Ladon製SOAP APIのエンドポイントは http://localhost:9100/hello/mysoap11 です。そのため、WSDLの値とは異なってしまいます。

 
そのため、SOAPクライアント側でエンドポイントを差し替えることになります。

例えば、Zeepの場合は以下となります。

WSDL = pathlib.Path(__file__).resolve().parents[1].joinpath('hello.wsdl')

client = Client(str(WSDL))

# Clientオブジェクトのcreate_service()を使用し、ServiceProxyを生成
# ServiceProxyの中で、エンドポイントを差し替え
service = client.create_service(
    '{http://example.com/HelloWorld}HelloBindingSoap11',
    'http://localhost:9100/hello/mysoap11'
)

# ServiceProxyでSOAP APIと通信
response = service.requestMessage(userName='taro')

print(type(response))
# => <class 'str'>

print(response)
# => Hello, taro

 
サーバのログにも出力されました。

taro
127.0.0.1 - - "POST /hello/mysoap11 HTTP/1.1" 200 460

 
上記より、Python3.7でもLadonは動作しました。

ただ、Soapfishに比べて実装する部分が多く、またWSDLからの自動生成に対応していないため、手間がかかりました。


Python3.7では使うのが難しいSOAPサーバライブラリ

今回他にも試してみましたが、うまく動かなかったライブラリたちです。

Blogを書く時間の都合でこれらを難しいと判断しましたが、もし、対応方法をご存じの方がいらっしゃいましたら、教えて頂けるとありがたいです。


spyne

試しに、

class HelloWorldService(ServiceBase):
    @rpc(Unicode, _returns=Iterable(Unicode))
    def hello(ctx, name):
        return f'Hello, {name}'


application = Application([HelloWorldService],
                          tns='spyne.examples.hello',
                          in_protocol=Soap11(),
                          out_protocol=Soap11()
                          )


if __name__ == '__main__':
    from wsgiref.simple_server import make_server
    wsgi_app = WsgiApplication(application)
    server = make_server('0.0.0.0', 9100, wsgi_app)
    server.serve_forever()

と実装し、起動させてみたところエラーとなりました。

  File "/path/to/lib/python3.7/site-packages/spyne/server/null.py", line 69
    self.service = _FunctionProxy(self, self.app, async=False)
                                                      ^
SyntaxError: invalid syntax

 
内部で使用しているNull Serverの実装で、Python3.5以降のキーワードとなった async が使われているようで、起動しませんでした。

そのため、Python3.7で使用するのはあきらめました。


pysimplesoap

こちらも試しに実装してみたところ、

Traceback (most recent call last):
File "python_soap_libraries-sample/env370/lib/python3.7/site-packages/pysimplesoap/server.py", line 163, in dispatch
ns = NS_RX.findall(xml)
TypeError: cannot use a string pattern on a bytes-like object

というエラーが発生しました。

WSGISOAPHandler が良くないのかと思い、bytes-like object を渡しているっぽいところを差し替えてみました。

class WSGISOAPPython3Handler(WSGISOAPHandler):
    def do_post(self, environ, start_response):
        length = int(environ['CONTENT_LENGTH'])
        request = environ['wsgi.input'].read(length)
        
        # request変数をstr()で文字列化
        response = self.dispatcher.dispatch(str(request))
        
        start_response('200 OK', [('Content-Type', 'text/xml'), ('Content-Length', str(len(response)))])
        return [response]

 
しかし、別のエラーが発生し、うまく動作しませんでした。

AttributeError: 'str' object has no attribute 'decode'

 
また、こことは関係ないかもしれませんが、pysimplesoapには動かないと報告されている issue も見つけました。

 
そのため、これ以上追いかけるのはあきらめました。

 
なお、pysimplesoapのドキュメントの一部が失われているようです。以下のissueからWebアーカイブをたどれます。
Where is the documentation? · Issue #123 · pysimplesoap/pysimplesoap


まとめ (再掲)

2018年12月時点で、新規にSOAPクライアント・サーバを実装する場合は、以下を使うのが良いのかなと感じました。

  • SOAPクライアント
    • Zeep
  • SOAPサーバ
    • Soapfish
    • Pythonライブラリではないが、テスト目的ならSOAP UIを使っても良いのでは


ソースコード

GitHubに上げました。
https://github.com/thinkAmi-sandbox/python_soap_libraries-sample


その他参考

最近のSOAPライブラリについては、以下でもまとめられていました。

Python + Zeep で、WSDLで定義された SOAP API エンドポイントとは別のエンドポイントにアクセスする

SOAP APIのテストなどでは、

  • WSDLの定義とは別のエンドポイント(テスト用エンドポイント)にアクセスしたい
  • ただし、WSDLは修正したくない

という状況があるかもしれません。

 
そこで、Zeepではどのようにやるのかを調べた時のメモを残します。


目次


環境


方法

公式ドキュメントに記載がありました。 ServiceProxy オブジェクトを使えば良いようです。
Creating new ServiceProxy objects | The Client object — Zeep 3.1.0 documentation


検証

実際に試してみます。


SOAP APIの仕様

以下のようなBindingのWSDLを持つSOAP APIがあるとします。

項目
名前空間 http://example.com/HelloWorld
エンドポイント http://localhost:8088/mockHelloBindingSoap11
メソッド requestMessage()
メソッドの挙動 引数に値を渡してリクエストすると、 Hello, <引数の値> がレスポンスされる

 
実際のWSDL (Hello.wsdl) はこちら。

<?xml version="1.0" encoding="UTF-8"?>
<wsdl:definitions
        xmlns:wsdl="http://schemas.xmlsoap.org/wsdl/"
        xmlns:soap11="http://schemas.xmlsoap.org/wsdl/soap/"
        xmlns:http="http://schemas.xmlsoap.org/wsdl/http/"
        xmlns:mime="http://schemas.xmlsoap.org/wsdl/mime/"
        xmlns:xsd="http://www.w3.org/2001/XMLSchema"
        xmlns:ns0="http://example.com/HelloWorld"
        targetNamespace="http://example.com/HelloWorld">

    <wsdl:types>
        <xsd:schema elementFormDefault="qualified" targetNamespace="http://example.com/HelloWorld">
            <xsd:element name="RequestInterface">
                <xsd:complexType>
                    <xsd:sequence>
                        <xsd:element minOccurs="0" name="userName" type="xsd:string" />
                    </xsd:sequence>
                </xsd:complexType>
            </xsd:element>
            <xsd:element name="ResponseInterface">
                <xsd:complexType>
                    <xsd:sequence>
                        <xsd:element minOccurs="0" name="returnMessage" type="xsd:string" />
                    </xsd:sequence>
                </xsd:complexType>
            </xsd:element>
        </xsd:schema>
    </wsdl:types>

    <wsdl:message name="messageIn">
        <wsdl:part name="parameters" element="ns0:RequestInterface" />
    </wsdl:message>
    <wsdl:message name="messageOut">
        <wsdl:part name="parameters" element="ns0:ResponseInterface" />
    </wsdl:message>

    <wsdl:portType name="HelloPort">
        <wsdl:operation name="requestMessage">
            <wsdl:input message="ns0:messageIn"/>
            <wsdl:output message="ns0:messageOut"/>
        </wsdl:operation>
    </wsdl:portType>

    <wsdl:binding name="HelloBindingSoap11" type="ns0:HelloPort">
        <soap11:binding transport="http://schemas.xmlsoap.org/soap/http" style="document"/>
        <wsdl:operation name="requestMessage">
            <soap11:operation soapAction="http://example.com/HelloWorld/requestMessage" />
            <wsdl:input>
                <soap11:body use="literal"/>
            </wsdl:input>
            <wsdl:output>
                <soap11:body use="literal"/>
            </wsdl:output>
        </wsdl:operation>
    </wsdl:binding>

    <wsdl:service name="HelloService">
        <wsdl:port name="HelloServicePort" binding="ns0:HelloBindingSoap11">
            <soap11:address location="http:/example.com/hello"/>
        </wsdl:port>
    </wsdl:service>
</wsdl:definitions>

 
ただ、本番のエンドポイント http:/example.com/hello が現在稼働していないため、そのままではテストできない状況とします。

 
そこで、 http:/example.com/hello ではなく、ローカルのポートにアクセスさせることにより、テストを実施させるとします。

また、その時のローカルでは、ポート 9100 にてSOAP APIがLISTENしているとします。

$ sudo lsof -i -P | grep "LISTEN"

...
... TCP *:9100 (LISTEN)


実装

ZeepでSOAPクライアントを作るところは、今までと同じです。

import pathlib

from zeep import Client

WSDL = pathlib.Path(__file__).parents[0].joinpath('Hello.wsdl')

client = Client(str(WSDL))

 
次に、Clientオブジェクトの create_service() を使い、Service Proxyを生成します。

create_service() の引数は、それぞれ以下となります。

  • 第一引数は、差し替え元の名前空間付きBinding名
  • 第二引数は、差し替え後のエンドポイント
service = client.create_service(
    '{http://example.com/HelloWorld}HelloBindingSoap11',
    'http://localhost:9100/hello'
)

 
あとは Service Proxyオブジェクトを使い、 requestMessage() を呼び出します。

response = service.requestMessage(userName='taro')

print(type(response))
print(response)

 
このスクリプトを実行すると、

<class 'str'>
Hello, taro

と、エンドポイントが差し替えられたことが分かりました。


ソースコード

GitHubに上げました。 chanbge_endpoint ディレクトリが今回のものです。
https://github.com/thinkAmi-sandbox/python_zeep-sample

Python + Zeep + History pluginで、SOAPのリクエストとレスポンスを確認してみた

前回、Zeep + SOAP UI + 自作WSDLを使ってSOAPのリクエスト・レスポンスを試してみました。
Python + Zeep + SOAP UI + 自作WSDLで、SOAPのリクエストとレスポンスを試してみた - メモ的な思考的な

実際のリクエスト・レスポンスの内容は、SOAP UI のログで確認していました。

ただ、SOAP UIが使えない環境ではどのように確認すればよいか分からなかったため、メモを残します。

 
目次


環境


ZeepのHistory Plugin

最新の送受信履歴を確認

Zeepの公式ドキュメントを読んだところ、その用途のプラグインが記載されていました。
https://python-zeep.readthedocs.io/en/master/plugins.html#historyplugin

 
試してみたところ、リクエスト・レスポンスが確認できました。

ただ、そのままではenvelopeが lxml.etree._Element オブジェクトなため、中身まで見れませんでした。

import pathlib
from zeep import Client
from zeep.plugins import HistoryPlugin

WSDL = pathlib.Path.cwd().joinpath('RequestResponse.wsdl')


history_plugin = HistoryPlugin()
client = Client(str(WSDL), plugins=[history_plugin])
response = client.service.requestMessage(userName='taro')

print(history_plugin.last_sent)
# =>
# {'envelope': <Element {http://schemas.xmlsoap.org/soap/envelope/}Envelope at 0x10929d988>,
#  'http_headers': {
#    'SOAPAction': '"http://example.com/HelloWorld/requestMessage"',
#    'Content-Type': 'text/xml; charset=utf-8'}}

print(type(history_plugin.last_sent['envelope']))
# => <class 'lxml.etree._Element'>

print(history_plugin.last_sent['envelope'])
# => <Element {http://schemas.xmlsoap.org/soap/envelope/}Envelope at 0x102c54a48>


lxml.etreeにより、Envelopeの中身を確認

データ型が history_plugin.last_sent['envelope'] であることから、 lxml.etree を使って解析してみました。

なお、 etree.tounicode()

Deprecated: use tostring(el, encoding='unicode') instead.

https://lxml.de/api/lxml.etree-module.html#tounicode

と書かれていたため、 etree.tostring() を使います。

 
SOAP UIで確認できたものと同一でした。

print(etree.tostring(history_plugin.last_sent['envelope'], pretty_print=True, encoding='unicode'))
# =>
# <soap-env:Envelope xmlns:soap-env="http://schemas.xmlsoap.org/soap/envelope/">
#   <soap-env:Body>
#     <ns0:RequestInterface xmlns:ns0="http://example.com/HelloWorld">
#       <ns0:userName>taro</ns0:userName>
#     </ns0:RequestInterface>
#   </soap-env:Body>
# </soap-env:Envelope>

 
レスポンスも同様に確認できました。

print(response)
# => Hello, taro

print(history_plugin.last_received)
# =>
# {'envelope': <Element {http://schemas.xmlsoap.org/soap/envelope/}Envelope at 0x1092e1ac8>,
#  'http_headers': {
#    'Content-Type': 'text/xml; charset=utf-8',
#    'Content-Encoding': 'gzip',
#    'Content-Length': '198', 'Server': 'Jetty(6.1.26)'}}

print(type(history_plugin.last_received['envelope']))
# => <class 'lxml.etree._Element'>

print(history_plugin.last_received['envelope'])
# => <Element {http://schemas.xmlsoap.org/soap/envelope/}Envelope at 0x102c98b48>

print(etree.tostring(history_plugin.last_received['envelope'], pretty_print=True, encoding='unicode'))
# => (長いので改行あり)
# <soapenv:Envelope
#       xmlns:soapenv="http://schemas.xmlsoap.org/soap/envelope/"
#       xmlns:hel="http://example.com/HelloWorld">
#    <soapenv:Header/>
#    <soapenv:Body>
#       <hel:ResponseInterface>
#
#          <hel:returnMessage>Hello, taro</hel:returnMessage>
#       </hel:ResponseInterface>
#    </soapenv:Body>
# </soapenv:Envelope>


複数件の送受信履歴を確認

複数件の送受信履歴を確認したい場合は、

By default at most one transaction (sent/received) is kept. But this can be changed when you create the plugin by passing the maxlen kwarg.

とのことです。

 
ソースコードを見たところ、collections.deque型のインスタンス変数 _buffer に結果が格納されるようでした。
https://github.com/mvantellingen/python-zeep/blob/3.1.0/src/zeep/plugins.py#L49

そのため、以下のようにして表示できました。

import pathlib

from lxml import etree
from zeep import Client
from zeep.plugins import HistoryPlugin

WSDL = pathlib.Path.cwd().joinpath('RequestResponse.wsdl')

# インスタンスを生成する時に、引数maxlenを指定
history_plugin = HistoryPlugin(maxlen=3)
client = Client(str(WSDL), plugins=[history_plugin])

# taro > jiro > saburo の順番にデータを送信
client.service.requestMessage(userName='taro')
client.service.requestMessage(userName='jiro')
client.service.requestMessage(userName='saburo')

print(history_plugin._buffer)
# =>
# deque([
#   {'received': {
#       'envelope': <Element {http://schemas.xmlsoap.org/soap/envelope/}Envelope at 0x10ae37a08>,
#       'http_headers': {
#           'Content-Type': 'text/xml; charset=utf-8', 'Content-Encoding': 'gzip',
#           'Content-Length': '198', 'Server': 'Jetty(6.1.26)'}},
#    'sent': {
#       'envelope': <Element {http://schemas.xmlsoap.org/soap/envelope/}Envelope at 0x10adf28c8>,
#       'http_headers': {
#           'SOAPAction': '"http://example.com/HelloWorld/requestMessage"',
#           'Content-Type': 'text/xml; charset=utf-8'}}},
#   {'received': {
#       'envelope': <Element {http://schemas.xmlsoap.org/soap/envelope/}Envelope at 0x10ae43648>,
#       'http_headers': {
#           'Content-Type': 'text/xml; charset=utf-8', 'Content-Encoding': 'gzip',
#           'Content-Length': '199', 'Server': 'Jetty(6.1.26)'}},
#    'sent': {
#       'envelope': <Element {http://schemas.xmlsoap.org/soap/envelope/}Envelope at 0x10ae28e88>,
#       'http_headers': {
#           'SOAPAction': '"http://example.com/HelloWorld/requestMessage"',
#           'Content-Type': 'text/xml; charset=utf-8'}}},
#   {'received': {
#       'envelope': <Element {http://schemas.xmlsoap.org/soap/envelope/}Envelope at 0x10ae43dc8>,
#       'http_headers': {
#           'Content-Type': 'text/xml; charset=utf-8', 'Content-Encoding': 'gzip',
#           'Content-Length': '199', 'Server': 'Jetty(6.1.26)'}},
#    'sent': {
#       'envelope': <Element {http://schemas.xmlsoap.org/soap/envelope/}Envelope at 0x10ae43088>,
#       'http_headers': {
#           'SOAPAction': '"http://example.com/HelloWorld/requestMessage"',
#           'Content-Type': 'text/xml; charset=utf-8'}}}],
#   maxlen=3)


# 3件目に saburo を送っていることを確認
buf = history_plugin._buffer[2]
print(type(buf))
# => <class 'dict'>

print(etree.tostring(buf['sent']['envelope'], pretty_print=True, encoding='unicode'))
# =>
# <soap-env:Envelope xmlns:soap-env="http://schemas.xmlsoap.org/soap/envelope/">
# <soap-env:Body>
# <ns0:RequestInterface xmlns:ns0="http://example.com/HelloWorld">
# <ns0:userName>saburo</ns0:userName>
# </ns0:RequestInterface>
# </soap-env:Body>
# </soap-env:Envelope>


ソースコード

GitHubに上げました。 history_plugin ディレクトリが今回のファイルです。
https://github.com/thinkAmi-sandbox/python_zeep-sample