IntelliJ Platform Pluginの開発にて、開発環境にある公開したくない情報を local.properties に定義してビルドする

IntelliJ Platform Pluginの開発をする中で、ローカルマシンのファイルパスなど、開発環境にある公開したくない情報を定義したくなりました。

ただ、どのようにすればよいのか分からなかったため、調べたときのメモを残します。

 
目次


環境


調査

IntelliJ Platform Pluginのビルドでは Gradle を使っています。 Gradle IntelliJ Plugin | IntelliJ Platform Plugin SDK

ただ、IntelliJ Platform Pluginの公式ドキュメントでは、どのようにすればよいか記載が見当たりませんでした。

そのため、他にもGradleを使っているものがないかを調べたところ、AndroidのビルドでもGradleを使っていることが分かりました。

 
では、Androidではどのように設定しているかを調べたところ、多くの記事で local.properties を使っていました。

そこで、以下の記事を参考に、IntelliJ Platform Plugin開発でも local.properties を使ってみます。
android - Read value from local.properties via Kotlin DSL - Stack Overflow


実装

今回は runIdeideDir に対して、 local.properties で定義した値を設定してみます。


build.gradle.kts の修正

まずはファイルの先頭あたりで、 local.properties をロードします。

なお、 local.properties ファイルが無くてもエラーにならないよう、ファイルの存在チェックも行っています。

import java.io.FileInputStream
import java.util.*

// load local.properties
val localPropertiesFileExists = File(rootProject.rootDir, "local.properties").exists()
val prop = if (localPropertiesFileExists) Properties().apply {
    load(FileInputStream(File(rootProject.rootDir, "local.properties")))
} else null

 
続いて、runIde の設定を変更します。

ちなみに、 ideDir は設定する値に Property<File> な型を要求することから、 file() を使っています。

runIde {
    // executable other IDE
    if (prop != null) {
        val d = prop.getProperty("ideDir")
        if (d.isNotEmpty()) {
            // written by Kotlin
            ideDir.set(file(prop.getProperty("ideDir")))

            // written by Groovy
            // ideDir = file(file(prop.getProperty("ideDir")))
        }
    }


local.propertiesの作成

続いて、 local.properties ファイルを作成します。

今回定義する ideDir には、起動対象のIDEが存在するファイルパスを指定します。

今のところWindowsで開発しているため、 \エスケープした以下のような値を設定します。

ideDir = C:\\Users\\<UserName>\\AppData\\Local\\JetBrains\\Toolbox\\apps\\RubyMine\\<ch-n>\\232.10300.41

 
以上で設定は完了です。


動作確認

Run Plugin したところ、NotificationToolWindow を含む自作のプラグインがRubyMine 2023.2.6 で起動しました。

local.properties の値が読み込めているようです。


ソースコード

Githubにあげました。
https://github.com/thinkAmi-sandbox/hello_jetbrains_plugin

今回のプルリクはこちら。
https://github.com/thinkAmi-sandbox/hello_jetbrains_plugin/pull/19

なお、今までのプルリクではGithub Actionsがエラーになっていましたが、今回のプルリクからは成功しています。

IntelliJ Platform Pluginの開発にて、ToolWindow上で、Dialog・Balloon・StatusBarなどを使って改行ありのメッセージを表示してみた

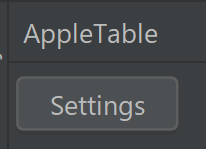
IntelliJ Platform Pluginを作っている際、何らかの方法でメッセージをUI上に表示したくなりました。

実現方法を調べたところ、公式ドキュメントに Notification として記載がありました。
Notifications | IntelliJ Platform Plugin SDK

そこで、各Notificationにて「改行ありのメッセージ」の表示をためしてみたときのメモを残します。

なお、今回は「ボタンをクリックしたらメッセージを表示する」形で実装します。

また、記事で説明に使う部分のみソースコードを記載しています。ToolWindowの登録方法など、ソースコード全体を知りたい場合は、後述のGithubソースコードを参照してください。

 
目次


環境


Messages.showMessageDialog()を使う

OKボタンだけあるダイアログを表示したい場合は、 Messages.showMessageDialog() を使うのが便利です。
Messages | Miscellaneous Swing Components | IntelliJ Platform Plugin SDK

 
では実装してみます。

最初に、イベントハンドラを持つボタンを用意します。

row {
    button("Message Dialog") { event -> handleMessageDialog(event)}
}

 
次に、イベントハンドラにて Messages.showMessageDialog() を使います。

private fun handleMessageDialog(event: ActionEvent) {
    // showMessageDialogの場合、改行文字を使えば改行される
    Messages.showMessageDialog("Message with Message Dialog. \n Hello world", "Dialog Title", Messages.getInformationIcon())
}

 
動作確認します。ボタンをクリックすると、画面中央にメッセージが表示されました。


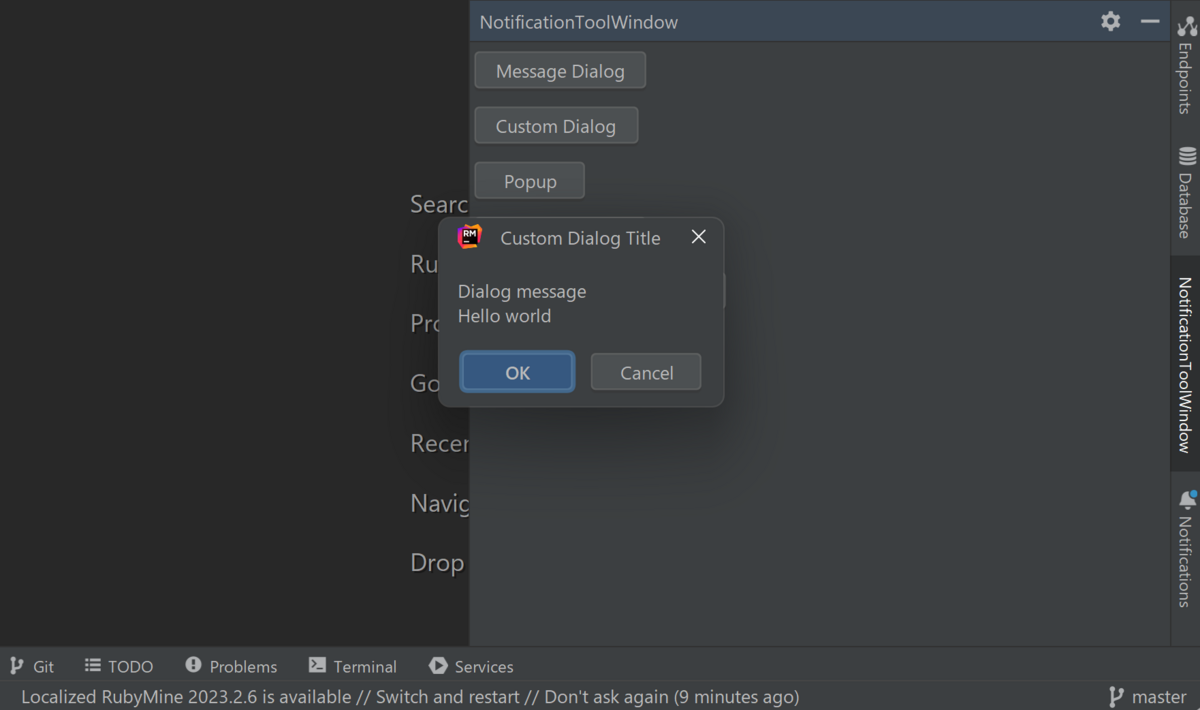
DialogWrapperによる独自ダイアログを使う

Messages.showMessageDialog() のダイアログではない、独自ダイアログにメッセージを表示したい場合は DialogWrapper を継承した独自ダイアログが使えます。

DialogWrapper については、公式ドキュメントの以下に記載があります。
Dialogs | IntelliJ Platform Plugin SDK

 
では実装してみます。

まずは、DialogWrapper を継承した独自ダイアログを用意します。

このときの独自ダイアログの実装方針は以下とします。

実際のコードです。

class CustomNotificationDialog: DialogWrapper(true) {
    init {
        title = "Custom Dialog Title"

        init()
    }

    override fun createCenterPanel(): JComponent {
        return panel {
            row {
                // https://stackoverflow.com/a/1090112
                label("<html>Dialog message <br> Hello world</html>")
            }
        }
    }
}

 
続いて、ToolWindowのcontentにボタンを用意します。

row {
    button("Custom Dialog") { event -> handleCustomDialog(event) }
}

 
あとは、イベントハンドラで独自ダイアログを使って表示します。

private fun handleCustomDialog(event: ActionEvent) {
    CustomNotificationDialog().show()
}

 
動作確認します。ボタンをクリックすると、画面中央にメッセージが表示されました。


JBPopupFactoryによるポップアップを使う

ToolWindowでは、Popupを表示することもできます。
Popups | IntelliJ Platform Plugin SDK

 
では実装してみます。

まず、 JBPopupFactory による表示では、ToolWindowManagerのインスタンスが必要です。

ただ、ボタンのイベントハンドラのうち ActionEvent を受け取る実装では ToolWindowManager のインスタンス取得に必要な project という値が取得できません。

そこで、以前の記事で見た通り、project を取得するためにイベントハンドラにActionを指定する形で実装します。

Actionの実装方針は以下です。

  • ToolWindowManagerのインスタンスを取得
  • JBPopupFactoryの createConfirmation + showInCenterOf を使って、ToolWindowの中央にPopupを表示
    • createConfirmationの引数には Runnable インタフェースを実装したクラスが必要なので、 MyRunnable を別途用意
class ShowPopupAction : AnAction() {
    override fun actionPerformed(e: AnActionEvent) {
        val project = e.project ?: return
        val manager = ToolWindowManager.getInstance(project)
        val toolWindow = manager.getToolWindow("NotificationToolWindow")
        val factory = JBPopupFactory.getInstance()

        // createConfirmation() では、改行を設定できないっぽい
        factory.createConfirmation(
            "Message with popup <br> Hello world",
            "Yes\nclick",
            "No <br> click",
            MyRun(), 0)
            .showInCenterOf(toolWindow!!.component)
    }
}

class MyRun: Runnable {
    override fun run() {
        println("hello")
    }
}

 
あとはボタンを用意して、Actionを指定します。

row {
    button("Popup", ShowPopupAction())
}

 
動作確認します。ボタンをクリックすると、ToolWindowの中央にPopupが表示されました。

 
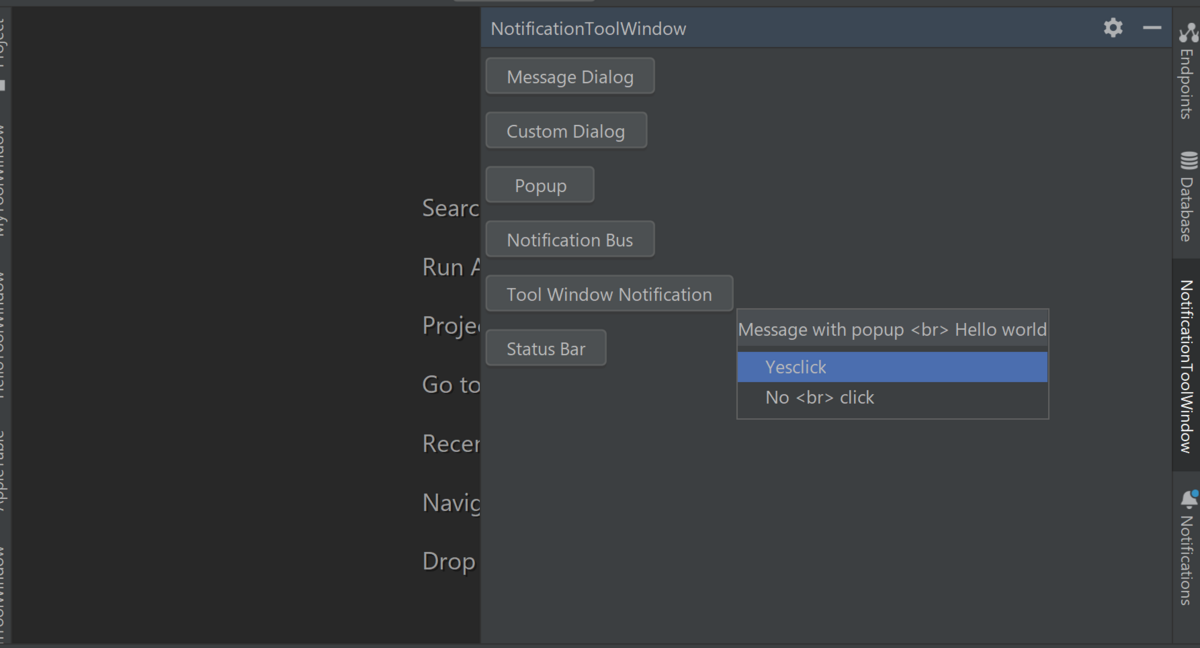
Dialogとの挙動の違いとしては、Popupの領域外をクリックするとPopupが自動的に閉じます。

また、今回 JBPopupFactorycreateConfirmation() によるPopupの場合、メッセージの改行はできませんでした。


Notification.Busによるバルーンを使う

ここまではダイアログによる表示を見てきましたが、IntelliJ Platformでは他にも通知する方法はあります。

まずは Notification.Bus を使ったバルーン表示です。

公式ドキュメントによると、ダイアログに比べて以下の利点があるとのことです。

  • The user can control the way each notification type is displayed under Settings | Appearance & Behavior | Notifications

  • All displayed notifications are gathered in the Event Log tool window and can be reviewed later

 
https://plugins.jetbrains.com/docs/intellij/notifications.html#top-level-notifications-balloons

 
では実装してみます。

まずはボタンを用意します。

row {
    button("Notification Bus") { event -> handleNotificationBus(event) }
}

 
続いて、イベントハンドラの中でバルーン表示を行います。

private fun handleNotificationBus(event: ActionEvent) {
    val notification = Notification(
        "notificationGroupId",
        "Notification Bus Title",
        "Message with Notification Bus <br> Hello world", // \n ではなく <br> タグで改行できる
        NotificationType.INFORMATION)
    Notifications.Bus.notify(notification)
}

 
最後に、バルーンのIDを plugin.xml に登録します。

id 属性には、 Notification のコンストラクタの第1引数の値を設定します。

<extensions defaultExtensionNs="com.intellij">
    ...
    <notificationGroup displayType="BALLOON" id="notificationGroupId" />
</extensions>

 
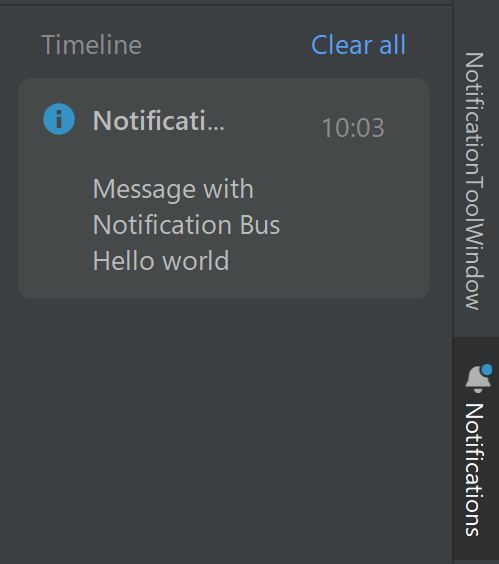
動作確認します。ボタンをクリックすると、バルーンが右下に表示されました。

 
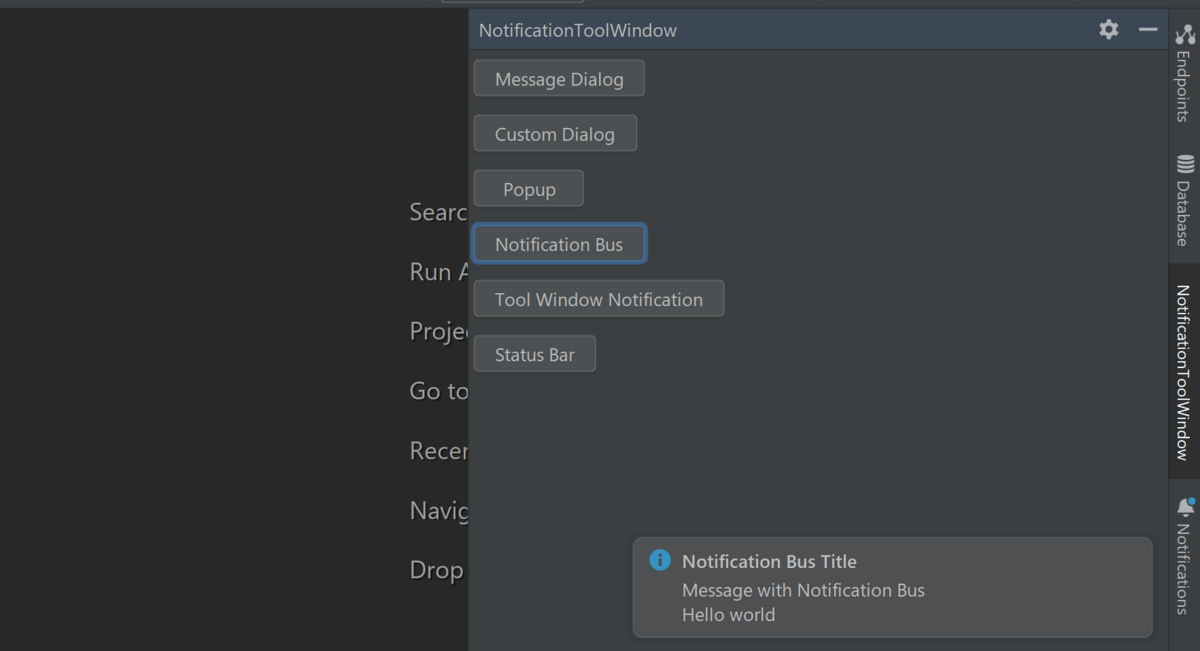
また、Notifications を開くと、バルーン表示した内容が記録されていました。


ToolWindowManagerのnotifyByBalloon()によるバルーンを使う

ToolWindowでは、 ToolWindowManagerのnotifyByBalloon() でもメッセージのバルーン表示ができるようです。
Tool Window Notification | Tool Windows | IntelliJ Platform Plugin SDK

 
では実装してみます。

ToolWindowManagerを取得するためには project が必要なことから、Actions を作成します。

class ToolWindowNotificationAction: AnAction() {
    override fun actionPerformed(e: AnActionEvent) {
        val project = e.project ?: return
        ToolWindowManager.getInstance(project).notifyByBalloon(
            "NotificationToolWindow",
            MessageType.INFO,
            "Tool Window Notify <br> Hello world"
        )
    }
}

 
次に、Actionを実行するボタンを用意します。

row {
    button("Tool Window Notification", ToolWindowNotificationAction())
}

 
動作確認します。ボタンをクリックすると、ToolWindowタブにバルーンが表示されました。

 
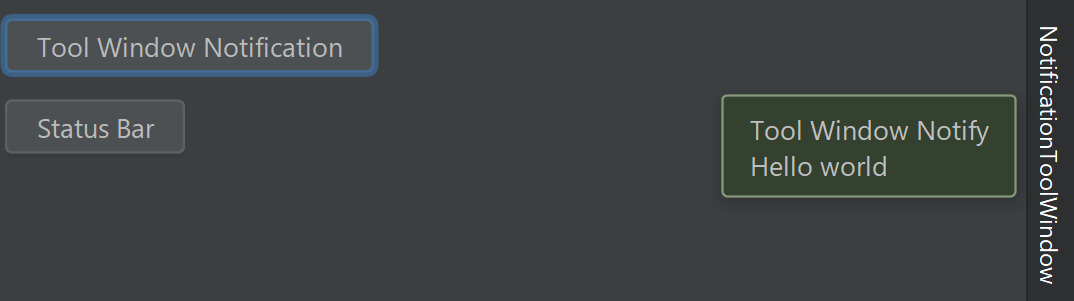
ただ、 Notification.Bus とは異なり、 Notifications には登録されないようです。


StatusBarを使う

公式ドキュメントには記載を見つけられなかったのですが、WindowManager インスタンスgetStatusBar() メソッドを使うことで StatusBar にもメッセージを表示できます。

では実装してみます。

まずは Action を用意します。

class StatusBarMessageAction: AnAction() {
    override fun actionPerformed(e: AnActionEvent) {
        val project = e.project ?: return

        val statusBar = WindowManager.getInstance().getStatusBar(project)
        statusBar.let {
            it.info = "Message with Status Bar. \n Hello world" // 改行は効かない
        }
    }
}

 
次に、Actionを実行するボタンを用意します。

row {
    button("Status Bar", StatusBarMessageAction())
}

 
動作確認します。

最初、StatusBarには何も表示されません。

 
次に、ボタンをクリックするとStatusBarにメッセージが表示されました。

 
なお、Notificationsには何も登録されていません。


ソースコード

Githubにあげました。
https://github.com/thinkAmi-sandbox/hello_jetbrains_plugin

今回のプルリクはこちら。
https://github.com/thinkAmi-sandbox/hello_jetbrains_plugin/pull/18

IntelliJ Platform Pluginの開発にて、ToolWindow上で、テーブルの絞り込み条件入力で使うコンポーネントを SearchTextField にしてみた

以前の記事では、テーブルの絞り込み条件を入力する項目として TextField を使っていました。
IntelliJ Platform Pluginの開発にて、ToolWindow上で、TextFieldの入力値に従って絞り込み可能なテーブル(JBTable)を表示してみた - メモ的な思考的な

そんな中、JetBrains の Platform UI Guidelines を見ていたところ、 SearchTextField という項目がありました。
Search field | IntelliJ Platform UI Guidelines

公式ドキュメント User Interfrace Components には記載がなかったものの、「ガイドラインに記載があるならライブラリとして用意されているかもしれない」と思い調べてみたところ、 com.intellij.ui パッケージに SearchTextField コンポーネントがありました。
https://github.com/JetBrains/intellij-community/blob/89df267e41664d91b114af8d1c57a78abe2c8456/platform/platform-api/src/com/intellij/ui/SearchTextField.java

 
そこで、今回 SearchTextField をためしてみたことから、メモを残します。

 
目次


環境

 
なお、前回の記事ソースコードをもとに、今回の実装を加えています。


TextField を SearchTextField に置き換える

Contentで定義していたTextFieldをSearchTextFieldに差し替えます。

もともとのTextField版はこちらです。

searchText = textField()
searchText.component.document.addDocumentListener(object: DocumentListener { /* 略 */ })

 
続いて、SearchTextFieldに差し替えた版はこちらです。

SearchTextFieldの場合、 component プロパティに対して addDocumentListener を設定できるようです。

searchText = cell(SearchTextField())
searchText.component.addDocumentListener(object: DocumentListener { /* 略 */ })

 
以上で実装は完了です。


動作確認

TextFieldのときはこのような表示でした。

 
SearchTextFieldに差し替えるとこのような感じになります。

入力欄の右側にある x をクリックすると、入力値をクリアできます。

 
また、何回かSearchTextFieldに入力後に虫めがねアイコンをクリックすると、入力履歴が表示されます。

 
その履歴の中で適用したい値をクリックすると、SearchTextField に値が入力されます。

 
これらの機能を自分で実装すると大変なので、検索用の入力項目を作るときは SearchTextField を使っていけばよさそうです。


ソースコード

Githubにあげました。
https://github.com/thinkAmi-sandbox/hello_jetbrains_plugin

今回のプルリクはこちら。
https://github.com/thinkAmi-sandbox/hello_jetbrains_plugin/pull/17

IntelliJ Platform Pluginの開発にて、ToolWindow上で、DialogWrapperとPropertiesComponentを使って、設定の保存と読み込みを行ってみた

以前、TextFieldの入力値により、テーブルの値を絞り込むことをためしてみました。
IntelliJ Platform Pluginの開発にて、ToolWindow上で、TextFieldの入力値に従って絞り込み可能なテーブル(JBTable)を表示してみた - メモ的な思考的な

以前は部分一致のみの絞り込みを実装しました。

ただ、設定により

  • 部分一致
  • 前方一致

を切り替えたくなったため、ためしてみたときのメモを残します。

 
目次


環境

 
なお、ソースコードは前回の記事の続きに実装していきます。
IntelliJ Platform Pluginの開発にて、ToolWindow上で、CellRendererを使ってテーブル(JBTable)の列に画像を表示してみた - メモ的な思考的な


仕様について

今回は以下の仕様としました。

  • ToolWindow上のボタンをクリックすると、設定ダイアログが開き、絞り込み方法をコンボボックスで選択する
  • OKボタンを押すと、コンボボックスの選択値が保存される
  • その状態でTextFieldに入力すると、テーブルの絞り込み方法がコンボボックスの選択値により変化する

 
上記の仕様を実現するため、1つずつ段階を追って実装していきます。


ToolWindow上のボタンをクリックすると、設定ダイアログを開くようにする

IntelliJ Platform Pluginでは、 DialogWrapper を使うことでダイアログを表示できます。
Dialogs | IntelliJ Platform Plugin SDK


DialogWrapperを継承したダイアログクラスを用意する

設定用のダイアログを用意します。

まずは Hello とだけ表示するダイアログにします。

package com.github.thinkami.hellojetbrainsplugin.ui

import com.intellij.openapi.ui.DialogWrapper
import com.intellij.ui.dsl.builder.panel
import javax.swing.JComponent

class SettingsDialog: DialogWrapper(true) {
    init {
        title = "My Settings"
        init()
    }

    override fun createCenterPanel(): JComponent {
        return panel {
            row {
                label("Hello")
            }
        }
    }
}


ダイアログを開くActionを用意する

ダイアログを開くためのActionを用意します。
Actions | IntelliJ Platform Plugin SDK

dialog.showAndGet() でダイアログでOKを押したときの挙動も定義できます。

今回はコンソールへHelloと出力してみます。

package com.github.thinkami.hellojetbrainsplugin.actions

import com.github.thinkami.hellojetbrainsplugin.ui.SettingsDialog
import com.intellij.openapi.actionSystem.AnAction
import com.intellij.openapi.actionSystem.AnActionEvent

class SettingsAction: AnAction() {
    override fun actionPerformed(e: AnActionEvent) {
        val dialog = SettingsDialog()
        if (dialog.showAndGet()) {
            // OKボタンをクリックした場合に、コンソールへHelloを出力する
            println("Hello")
        }
    }
}


ToolWindow上にボタンを用意し、クリックするとActionを起動する

今までの記事で作ってきているので、説明は省略します。

row {
    button("Settings", SettingsAction())
}


動作確認

ToolWindowを開くと、設定ダイアログを開くボタンが表示されます。

 
クリックすると、ダイアログが表示されます。


ここでの実装

以下のコミットです。
https://github.com/thinkAmi-sandbox/hello_jetbrains_plugin/pull/16/commits/7b616431a27f632f1a31fd39ac27242ae73fccf0


ダイアログにコンボボックスを表示する

続いて、ダイアログにコンボボックスを表示してみます。


Swingでコンボボックスを表示する方法を調査

調べてみたところ、以下の記事がありました。
コンボボックス JComboBox の使い方 - Swing のコンポーネント - Java 入門

IntelliJ Platform PluginのToolWindowでも使えそうです。


ダイアログにコンボボックスを表示する

Swingの実装とほぼ同じです。

プロパパティ comboBox を用意し、ダイアログを利用する側でも参照できるようにします。

また、 init の中でコンボボックスの選択肢などの設定を行い、 createContentPanel の中でコンボボックスを定義します。

class SettingsDialog: DialogWrapper(true) {
    val comboBox: JComboBox<String>

    init {
        title = "My Settings"

        // 追加
        comboBox = JComboBox<String>()
        comboBox.addItem("Preamble match") // 前方一致
        comboBox.addItem("Partial match")  // 部分一致
        comboBox.name = "matchType"

        init()
    }

    override fun createCenterPanel(): JComponent {
        return panel {
            row {
                label("Hello")
            }
            // 追加
            row {
                cell(comboBox)
            }
        }
    }
}


Actionでコンボボックスの選択値を確認する

actionPerformed メソッドの中で、OKボタンをクリックしたときにコンソールへコンボボックスの選択値を出力してみます。

なお、コンボボックスの getItemsAtselectedIndex を組み合わせることで、コンボボックスの選択値を取得できます。

override fun actionPerformed(e: AnActionEvent) {
    val dialog = SettingsDialog()
    if (dialog.showAndGet()) {
        // OKボタンをクリックしたときに、コンソールへコンボボックスの選択値を出力する
        val combo = dialog.comboBox
        val selectedType = combo.getItemAt(combo.selectedIndex)
        println(selectedType)
    }
}


動作確認

ダイアログにコンボボックスが表示されました。

 
OKボタンをクリックすると、コンソールへ選択値が出力されました。


ここでの実装

以下のコミットです。
https://github.com/thinkAmi-sandbox/hello_jetbrains_plugin/pull/16/commits/626379719771a00324ac457e6ccc9efcbe2cb170


コンボボックスの選択肢を PropertiesComponent で永続化する

永続化する方法を調査

公式ドキュメントでは、以下のページに値の永続化について記載されていました。
Persisting State of Components | IntelliJ Platform Plugin SDK

今回はお手軽に値を永続化したかったため、 PropertiesComponent を使うことにしました。
Using PropertiesComponent for Simple Non-Roamable Persistence | Persisting State of Components | IntelliJ Platform Plugin SDK


ダイアログでOKボタンをクリック後、PropertiesComponent で永続化する

actionPerformed の中で PropertiesComponent を使ってコンボボックスの選択値を永続化します。

なお、必要かどうかは分かりませんが、UIコンポーネントを操作しているため、今回は ApplicationManager.getApplication().invokeLater で囲っておきました。

override fun actionPerformed(e: AnActionEvent) {
    ApplicationManager.getApplication().invokeLater {
        val dialog = SettingsDialog()
        if (dialog.showAndGet()) {
            // OKボタンをクリックしたときに、コンソールへコンボボックスの選択値を出力する
            val combo = dialog.comboBox
            val selectedType = combo.getItemAt(combo.selectedIndex)
            println(selectedType)

            // コンボボックスの選択値を永続化する
            val properties = PropertiesComponent.getInstance()
            properties.setValue("matchType", selectedType)
        }
    }
}


永続化した設定をコンボボックスのデフォルト選択値にする

init の中で PropertiesComponent を使い、永続化情報を取り出してコンボボックスのデフォルト選択値にします。

init {
    // ...
    val properties = PropertiesComponent.getInstance()
    val matchType = properties.getValue("matchType")
    if (!matchType.isNullOrBlank()) {
        comboBox.selectedItem = matchType
    }
}


動作確認

ダイアログのコンボボックスで、初期値から Partial match へと選択値を変更します。

 
再度ダイアログを開くと、初期値が Partial match へと変更となっています。


ここでの実装

以下のコミットです。
https://github.com/thinkAmi-sandbox/hello_jetbrains_plugin/pull/16/commits/b04092157dd3d4faef12696d929acab65fb5888f


コンボボックスの選択肢により、テーブルの絞り込み方法を変更する

最後の仕上げです。


実装

filterChanged メソッドにてテーブルの絞り込みを行う際、 PropertiesComponent から値を取り出して使用します。

fun filterChanged() {
    tableData = allData.filter {
        val name = it[1] // Nameで絞り込むため、列番号を指定

        // 絞り込み条件を設定から取得して使用する
        val matchType = PropertiesComponent.getInstance().getValue("matchType")
        if (matchType == "Partial match") {
            name.contains(this.tableFilter.filterText)
        } else {
            name.startsWith(this.tableFilter.filterText)
        }
    }.toList() // allDataとは別オブジェクトにするため toList する

    // filterが更新されたことを通知する
    this.fireTableDataChanged()
}


動作確認

絞り込みを行わない場合のテーブル状態です。

 
ダイアログで Preamble match を選択した場合の絞り込みです。

という文字を入力しても、前方一致で検索するため、該当行はありません。

 
続いて、ダイアログで Partial match を選択した場合です。

この場合は部分一致であるため、 を入力すると該当行が表示されます。


ここでの実装

以下のコミットです。
https://github.com/thinkAmi-sandbox/hello_jetbrains_plugin/pull/16/commits/99a4988dd4ba8f26b193accdd85de2a2a9a56042


ソースコード

Githubにあげました。
https://github.com/thinkAmi-sandbox/hello_jetbrains_plugin

今回のプルリクはこちら。
https://github.com/thinkAmi-sandbox/hello_jetbrains_plugin/pull/16

IntelliJ Platform Pluginの開発にて、ToolWindow上で、CellRendererを使ってテーブル(JBTable)の列に画像を表示してみた

前回、ToolWindow上にテーブル(JBTable)を表示してみました。
IntelliJ Platform Pluginの開発にて、ToolWindow上で、TextFieldの入力値に従って絞り込み可能なテーブル(JBTable)を表示してみた - メモ的な思考的な

今回は、テーブルの列に画像を表示できるかためしてみたので、メモを残します。

 
目次


環境

 
なお、ソースコードは前回の記事のものを引き続き使います。


表示する方法を調査

SwingのJTableにおける列の表示方法を調べたところ、以下の記事がありました。
JTable でのデータの表示方法を決める セルレンダラー - Swing の JTable の使い方 - Java の Swing を用いた GUI - Java 入門

上記記事では、セルレンダラーにより列の表示方法を決めていました。

そこで、IntelliJ Platform Plugin の場合も同じ方法で実現できるかもしれないと考え、ためしてみます。


実装

画像ファイルを resources/icons ディレクトリの中に置く

まずは描画する画像ファイルを配置します。

 
画像ファイルをどこに置くのが適切なのか、公式ドキュメントには見つかりませんでした。

そこで今回は、リソースっぽいファイルの置き場である resources/icons の中に shinanogold.png ファイルを置くことにしました。


ImageIcon で画像ファイルを参照するobjectの作成

続いて、画像ファイルを参照するobjectを作成します。

画像ファイルを参照できるようにする場合、kotlinでは ImageIcon クラスを使うのが良さそうでした。

そこで、 ui ディレクトリの中に AppleTableCellIcon objectを用意し、リソースディレクトリの中に置いたファイルを参照します。

package com.github.thinkami.hellojetbrainsplugin.ui

import javax.swing.ImageIcon

object AppleTableCellIcon {
    val ShinanoGold = ImageIcon(requireNotNull(javaClass.getResource("/icons/shinanogold.png")))
}


DefaultTableCellRenderer を継承したセルレンダラーを作成

今回は、3列目が の場合のみ、画像ファイルを表示してみます。

package com.github.thinkami.hellojetbrainsplugin.ui

import javax.swing.table.DefaultTableCellRenderer

class AppleTableCellRenderer: DefaultTableCellRenderer() {
    override fun setValue(value: Any?) {
        if (value == "黄") {
            // 黄色の場合だけ、シナノゴールドのアイコンに差し替える
            icon = AppleTableCellIcon.ShinanoGold
            text = ""
            return
        }

        icon = null
        text = value.toString()
    }
}


JBTableのcellRendererに、セルレンダラーを指定

今回は3列目に上記で作成したセルレンダラーを設定します。

row {
    val table = JBTable()
    table.model = appleTableModel
    table.columnModel.getColumn(2).cellRenderer = AppleTableCellRenderer()
    myTableModel = scrollCell(table)
}

 
以上で実装は完了です。


動作確認

Run Pluginしてみると、3列目が の値になっている場合のみ、画像が表示されました。

 
前回作成した絞り込み機能を使った場合でも、正しく動作しました。


ソースコード

Githubにあげました。
https://github.com/thinkAmi-sandbox/hello_jetbrains_plugin

今回のプルリクはこちら。
https://github.com/thinkAmi-sandbox/hello_jetbrains_plugin/pull/15

IntelliJ Platform Pluginの開発にて、ToolWindow上で、TextFieldの入力値に従って絞り込み可能なテーブル(JBTable)を表示してみた

以前、「ToolWindow上に色々なコンポーネントを表示してみる」ことを試してみました。
IntelliJ Platform Pluginの開発にて、Kotlin UI DSL Version 2 や Swing を使って、ToolWindow上にコンポーネントを表示してみた - メモ的な思考的な

そんな中、「TextFieldの入力値に従って絞り込み可能なテーブル」を実現できるか気になったことから、試してみたときのメモを残します。

 
目次


環境


IntelliJ Platform PluginのToolWindowにテーブルを表示するには

どのようにすればテーブルを表示できるか分からなかったため、まずはそこから調べてみます。

 
IntelliJ Platform Pluginの公式ページには、テーブルをどのように表示すればよいかは記載されていませんでした。

一方、IntelliJ Platform PluginのToolWindow上にはJavaのSwingコンポーネントを表示できることは分かっています。

そのため、Swingのテーブル(JTable)と同じような感じで作っていけるのではと考えました。

 
次に、ToolWindowsで使えるコンポーネントIDE上でながめていると、 com.intellij.ui.table.JBTable がありました。

Github上の実装を見たところ、 JTable を継承していることが分かりました。
https://github.com/JetBrains/intellij-community/blob/master/platform/platform-api/src/com/intellij/ui/table/JBTable.java

 
そこで今回は、 JBTable コンポーネントを使ってテーブルを表示してみることにしました。


絞り込み機能がないテーブルを実装

まずは、単純にテーブルを表示してみます。

JTableはどのようにしてデータを表示しているのか調べたところ、以下の記事に詳しく書かれていました。
JTable でデータとビューをつなぐテーブルモデル - Swing の JTable の使い方 - Java の Swing を用いた GUI - Java 入門

 
そこで、

  • データ置き場として、TableModel インタフェースを実装した AbstractModel」を継承したクラスを定義
  • Contentに JBTable を定義
  • ContentFactoryを定義
  • plugin.xmlを定義

の順に実装していきます。


AbstractModelを継承したクラスを定義

まず、テーブルに関する値を AbstractModel を継承したクラスに定義します。

今回は以下を定義しています。

  • allData に、テーブルに表示するためのデータを2次元のリストで定義する
    • 今回はデータを3行用意
  • colkumns に、テーブルの列を定義する
  • テーブルを表示するために必要最低限のメソッドをオーバーライドする
    • getRowCount
    • getColumnCount
    • getValueAt
package com.github.thinkami.hellojetbrainsplugin.ui

import javax.swing.table.AbstractTableModel

class AppleTableModel: AbstractTableModel() {
    val allData: List<List<String>> = listOf(
        listOf("1", "シナノゴールド", "黄"),
        listOf("2", "シナノホッペ", "赤"),
        listOf("3", "ジョナゴールド", "赤"),
    )

    val columns: List<String> = listOf("No", "Name", "Color")

    override fun getRowCount(): Int {
        return allData.size
    }

    override fun getColumnCount(): Int {
        return columns.size
    }

    override fun getValueAt(rowIndex: Int, columnIndex: Int): Any {
        return allData[rowIndex][columnIndex]
    }
}


Contentを定義

続いて、テーブルを表示するための Contentを定義します。

ここでのポイントは以下でした。

package com.github.thinkami.hellojetbrainsplugin.ui

import com.intellij.openapi.ui.DialogPanel
import com.intellij.ui.dsl.builder.Cell
import com.intellij.ui.dsl.builder.panel
import com.intellij.ui.table.JBTable

class AppleTableContent {
    var contentPanel : DialogPanel
    lateinit var myTableModel: Cell<JBTable>

    init {
        contentPanel = panel {
            row {
                val table = JBTable()
                val model = AppleTableModel()
                table.model = model
                myTableModel = cell(table)
            }
        }
    }
}


ToolWindowFactoryを定義

上記で作った Content を ToolWindowFactoryを使って ToolWindow へ表示します。

package com.github.thinkami.hellojetbrainsplugin.toolWindow

import com.github.thinkami.hellojetbrainsplugin.ui.AppleTableContent
import com.intellij.openapi.project.Project
import com.intellij.openapi.wm.ToolWindow
import com.intellij.openapi.wm.ToolWindowFactory
import com.intellij.ui.content.ContentFactory

class AppleTableToolWindowFactory: ToolWindowFactory {
    override fun createToolWindowContent(project: Project, toolWindow: ToolWindow) {
        val content = ContentFactory.getInstance().createContent(AppleTableContent().contentPanel, null, false)
        toolWindow.contentManager.addContent(content)
    }
}


plugin.xmlに、ToolWindowを追加

ToolWindowとして表示できるよう、 plugin.xml に定義を追加します。

<extensions defaultExtensionNs="com.intellij">
    <toolWindow factoryClass="com.github.thinkami.hellojetbrainsplugin.toolWindow.AppleTableToolWindowFactory" id="AppleTable"/>
<extensions />


動作確認

ToolWindowを表示してみると、想定した通りのデータが表示されました。


ここでの実装

以下のコミットです。
https://github.com/thinkAmi-sandbox/hello_jetbrains_plugin/commit/b292c08a124df79a642b334008574d39dbc1c94f


データを固定で絞り込んだテーブルを実装

次に、データを絞り込んだテーブルを表示してみます。


AbstractModelを継承したクラスを修正

まずは絞り込み後のデータを入れておくプロパティ tableData を用意します。

lateinit var tableData: List<List<String>>

 
次に

  • getRowCount()
  • getValueAt()

が参照するプロパティを tableData へと変更します。

override fun getRowCount(): Int {
    return tableData.size
}

override fun getValueAt(rowIndex: Int, columnIndex: Int): Any {
    return tableData[rowIndex][columnIndex]
}

 
続いて、実際に絞り込みを行うメソッド filterChanged() を追加し、以下を行います。


fun filterChanged() {
    tableData = allData.filter {
        val name = it[1] // Nameで絞り込むため、列番号を指定
        val regex = Regex("シナノ")
        regex.containsMatchIn(name)
    }.toList() // allDataとは別オブジェクトにするため toList する

    // filterが更新されたことを通知する
    this.fireTableDataChanged()
}

 
最後に、 init の処理の中で filterChanged() メソッドを呼び出します。

init {
    // 初期段階で絞り込みを実行する
    filterChanged()
}


動作確認

再度 ToolWindow を表示してみると、シナノ が含まれるデータのみテーブルに表示されました。


ここでの実装

以下のコミットになります。
https://github.com/thinkAmi-sandbox/hello_jetbrains_plugin/commit/3dabe5194dde2c265af98ce75ab2ba25246b9d7e


テーブルのヘッダ行があるテーブルを実装

ここまでのスクリーンショットをよく見ると、テーブルにヘッダ行が表示されていません。

そこで、ヘッダ行を表示するよう修正します。


Content で JBScrollPane (scrollCell) を使う

Swingとは異なり、IntelliJ Platform Plugin でテーブルのヘッダ行を表示するには JBScrollPane (もしくは scrollCell) を使う必要があります。
https://plugins.jetbrains.com/docs/intellij/kotlin-ui-dsl-version-2.html#rowscrollcell-component

ここでは JBScrollPane を使うように修正します。

lateinit var myTableModel: Cell<JBScrollPane>

init {
    contentPanel = panel {
        row {
            // ...
            myTableModel = cell(JBScrollPane(table))
        }
    }
}


AbstractModelを継承したクラスで getColumnName をオーバーライド

ヘッダ行を表示するため、 getColumnName メソッドをオーバーライドします。

override fun getColumnName(column: Int): String {
    return columns[column]
}


動作確認

再度 ToolWindow を表示すると、ヘッダ行が表示されました。


ここでの実装

以下のコミットになります。
https://github.com/thinkAmi-sandbox/hello_jetbrains_plugin/commit/91df3491d049d07b003f5383eac88924d6e6a486


TextFieldの入力値で絞り込めるテーブルを実装

今回は以下の流れになるよう実装します。

  1. 画面で絞り込み文字列を入力すると、絞り込み文字列を管理するクラスへ通知
  2. 絞り込み文字列を管理するクラスが、AbstractModel を継承したクラスへ絞り込み条件が変更になったことを通知
  3. AbstractModel を継承したクラスが、データを絞り込んだ結果を画面のJBTableへ通知
  4. 画面が再描画


画面で絞り込み文字列を入力すると、絞り込み文字列を管理するクラスへ通知

AppleTableContent クラスを修正します。

なお、「絞り込み文字列を入力する」というイベントを捕捉するため、今回は addDocumentListener を使っています。

class AppleTableContent {
    var contentPanel : DialogPanel
    lateinit var myTableModel: Cell<JBScrollPane>
    lateinit var searchText: Cell<JBTextField>

    // Modelオブジェクトを保持できるようプロパティを追加
    val appleTableModel: AppleTableModel

    init {
        // 追加したプロパティに初期値を設定
        appleTableModel = AppleTableModel()

        contentPanel = panel {
            // 絞り込み条件を入力するTextFieldを追加するとともに、イベントリスナーも追加
            row {
                label("Search text")
                searchText = textField()
                searchText.component.document.addDocumentListener(object: DocumentListener {
                    override fun insertUpdate(e: DocumentEvent?) {
                        handleChange()
                    }

                    override fun removeUpdate(e: DocumentEvent?) {
                        handleChange()
                    }

                    override fun changedUpdate(e: DocumentEvent?) {
                        handleChange()
                    }
                })
            }
            row {
                val table = JBTable()
                table.model = appleTableModel
                myTableModel = cell(JBScrollPane(table))
            }
        }
    }

    private fun handleChange() {
        appleTableModel.tableFilter.filterText = searchText.component.text
    }
}


絞り込み文字列を管理するクラスが、AbstractModel を継承したクラスへ絞り込み条件が変更になったことを通知

絞り込み文字列を管理するクラス AppleTableFilter を追加します。

なお、

AbstractModel を継承したクラスへ絞り込み条件が変更になったことを通知

を実現するため、コンストラクタで AbstractModel を継承したクラスを受け取っています。

package com.github.thinkami.hellojetbrainsplugin.ui

// modelをコンストラクタで受け取りつつプロパティとして定義
class AppleTableFilter(val model: AppleTableModel){
    var filterText: String = ""
    set(value) {
        if (value != filterText) {
            // 絞り込み文字列に変更があった場合のみ、プロパティを更新してモデルに変更があったことを通知する
            field = value
            this.model.filterChanged()
        }
    }
}


AbstractModel を継承したクラスが、データを絞り込んだ結果を画面のJBTableへ通知

画面の JBTable へ通知する処理はすでに実装しているため、データを絞り込むところのみ実装します。

クラスのプロパティとして、絞り込み文字列を管理するクラスを追加します。

val tableFilter: AppleTableFilter

 
続いて、 init の中で、各種初期値を反映します。

init {
    // 初期条件による絞り込みを実行するため、初期値を設定しておく
    tableData = allData.toList()

    tableFilter = AppleTableFilter(this)
    filterChanged()
}

 
あとは、絞り込み文字列を tableFilter から取得するようにします。

fun filterChanged() {
    tableData = allData.filter {
        val name = it[1] // Nameで絞り込むため、列番号を指定
        name.contains(this.tableFilter.filterText)
    }.toList() // allDataとは別オブジェクトにするため toList する

    // ...
}


動作確認

絞り込み文字列を何も入力していないときは、全件表示されます。

 
絞り込み文字列を入力すると、それに応じた内容へと表示が変わります。

 
もし、絞り込み文字列に該当する行が存在しない場合、テーブルの枠だけが表示されます。

 
以上でやりたいことが実現できました。


ここでの実装

以下のコミットになります。
https://github.com/thinkAmi-sandbox/hello_jetbrains_plugin/commit/a9d699048c1ad626be487de52ff3615aa401d184


ソースコード

Githubにあげました。
https://github.com/thinkAmi-sandbox/hello_jetbrains_plugin

今回のプルリクはこちら。
https://github.com/thinkAmi-sandbox/hello_jetbrains_plugin/pull/14

IntelliJ Platform Pluginの開発にて、ApplicationManagerやToolWindowManagerを使って、Actionの中でToolWindow上のlabelを更新してみた

IntelliJ Platform Pluginの開発にて、「ToolWindow上のボタンをクリックすると、ラベルの値が更新される」みたいなことを実装したくなりました。

ボタンとラベルを定義したのと同じファイル内であれば、 actionListener を使って以下のように実装できます。

class UpdateInActionContent {
    var contentPanel : DialogPanel
    lateinit var myLabel: Cell<JLabel>

    init {
        contentPanel = panel {
            row {
                // ラベルの定義
                myLabel = label("Initial content")
                myLabel.component.name = "myLabel"

                // ボタンを定義し、actionListenerにクリックしたときに handleClick メソッドを実行
                button("Run Function") { event -> handleClick(event) }
            }
        }
    }

    private fun handleClick(event: ActionEvent) {
        myLabel.component.text = "handle click"
    }
}

 
ただ、 button()オーバーロードとして、 AnAction を受け取ることもできます。

この場合、AnActionは別クラスとして定義することになるため、 actionListener と同じように実装することができません。

 
そこで、どのようにすれば実現できるか試してみたときのメモを残します。

なお、動作するようにはなったもののこれで正しいのかは自信がないため、詳しい方がいれば教えていただけるとありがたいです。

 
目次


環境


調査

UIスレッドにあるコンポーネントへの書き込む方法について

公式ドキュメントによると、ToolWindow上のコンポーネントの更新を行う場合、 ApplicationManager.getApplication().invokeLater を使う必要がありそうでした。

 
なお、Pluginのスレッドモデルは 2023.3 の前後で変わったようです。

2023.3 Threading Model Changes Threading model has changed in 2023.3, please make sure to choose the correct version in the tabs below

https://plugins.jetbrains.com/docs/intellij/general-threading-rules.html#read-access


ToolWindow上にあるラベルコンポーネントを取得する方法について

公式ドキュメントによると、 ToolWindowManager.getToolWindow() を使うことで、ToolWindowにアクセスできそうでした。
Accessing Tool Window | Tool Windows | IntelliJ Platform Plugin SDK


ToolWindowManagerを使うため、ActionEvent ではなく AnActionEvent から project をもらう

ToolWindowManagerインスタンスを取得する getInstance() では project の値が必要です。
Project | IntelliJ Platform Plugin SDK

 
今回、ボタンを押したときにToolWindow上のlabelの値を更新する際、

button("Run Function") { event -> handleClick(event) }

と定義した場合、 handleClick のシグネチャ

private fun handleClick(event: ActionEvent) {}

となります。

ただ、ActionEventクラスには project の値が含まれません。

 
一方、Actionを使うときにオーバーライドが必要な actionPerformed の引数は AnActionEvent 型になることから、 project の値が含まれます。

そのため、以下のような実装で project の値が取得できます。

override fun actionPerformed(e: AnActionEvent) {
    val project = e.project ?: return
}

 
ちなみに e.project でprojectを取得する場合、 null が返ってくることもあります。

nullを回避するためには AnActionEvent にある getRequiredData を使うこともできます。

ただ、ソースコードコメントにある通り、 update メソッドで null ではないかのチェックをする前提で使えます。

Returns not null data by a data key. This method assumes that data has been checked for {@code null} in {@code AnAction#update} method.


https://github.com/JetBrains/intellij-community/blob/e3561dcaf64652cafb7ebca270d4a2cb536e5558/platform/editor-ui-api/src/com/intellij/openapi/actionSystem/AnActionEvent.java#L189


実装

ToolWindow上のコンテンツ

まずは、ToolWindow上に表示するコンテンツを用意します。

今回は

  • myLabel という name を持つラベル
  • actionListener を定義した Run Function ボタン
  • AnAction を定義した Run Action ボタン

を用意します。

kage com.github.thinkami.hellojetbrainsplugin.ui

import com.github.thinkami.hellojetbrainsplugin.actions.UpdateLabelAction
import com.intellij.openapi.ui.DialogPanel
import com.intellij.ui.dsl.builder.Cell
import com.intellij.ui.dsl.builder.panel
import java.awt.event.ActionEvent
import javax.swing.JLabel

class UpdateInActionContent {
    var contentPanel : DialogPanel
    lateinit var myLabel: Cell<JLabel>

    init {
        contentPanel = panel {
            row {
                myLabel = label("Initial content")
                myLabel.component.name = "myLabel"

                button("Run Function") { event -> handleClick(event) }
                button("Run Action", UpdateLabelAction())
            }
        }
    }

    private fun handleClick(event: ActionEvent) {
        myLabel.component.text = "handle click"
    }
}


ToolWindowFactory

続いて、用意したコンテンツを表示するToolWindowFactoryを用意します。

package com.github.thinkami.hellojetbrainsplugin.toolWindow

import com.github.thinkami.hellojetbrainsplugin.ui.UpdateInActionContent
import com.intellij.openapi.project.Project
import com.intellij.openapi.wm.ToolWindow
import com.intellij.openapi.wm.ToolWindowFactory
import com.intellij.ui.content.ContentFactory

class UpdateInActionToolWindowFactory : ToolWindowFactory {
    override fun createToolWindowContent(project: Project, toolWindow: ToolWindow) {
        val content = ContentFactory.getInstance().createContent(UpdateInActionContent().contentPanel, null, false)
        toolWindow.contentManager.addContent(content)
    }
}


Action

Actionでは、ToolWindow上にある myLabel コンポーネントにアクセスし、そのラベルのテキストを更新します。

流れとしては

  • ToolWindowへアクセスするところは ApplicationManager.getApplication().invokeLater で囲む
  • toolWindow.component.components でルートのDialogPanel を取得
  • DialogPanel の components の中に一階層下の labelbutton があるため、 namemyLabel のものに絞り込み、 text を更新

となります。

package com.github.thinkami.hellojetbrainsplugin.actions

import com.intellij.openapi.actionSystem.AnAction
import com.intellij.openapi.actionSystem.AnActionEvent
import com.intellij.openapi.actionSystem.CommonDataKeys
import com.intellij.openapi.application.ApplicationManager
import com.intellij.openapi.ui.DialogPanel
import com.intellij.openapi.wm.ToolWindowManager
import com.intellij.testFramework.requireIs
import javax.swing.JLabel

class UpdateLabelAction : AnAction() {
    override fun actionPerformed(e: AnActionEvent) {
        // AnActionEventに含まれる project の値を取得する
        val project = e.project ?: return

        // UIスレッドで非同期に処理を実行する
        ApplicationManager.getApplication().invokeLater {
            // project を元に ToolWindowを取得する
            val toolWindow = ToolWindowManager.getInstance(project).getToolWindow("UpdateInActionToolWindow")
                // ToolWindowが存在しない場合は何も処理しない
                ?: return@invokeLater

            // DialogPanelは1つしかないはず
            val panelComponent = toolWindow.component.components.filterIsInstance<DialogPanel>().first()

            // myLabelというnameを持ったlabelは1つしかないはず
            val labelComponent = panelComponent.components.filterIsInstance<JLabel>().find {
                it.name == "myLabel"
            }

            if (labelComponent != null) {
                labelComponent.text = "updated"
            }
        }
    }
}


plugin.xml

extensions に、今回追加した ToolWindow を登録します。

<extensions defaultExtensionNs="com.intellij">
    <toolWindow factoryClass="com.github.thinkami.hellojetbrainsplugin.toolWindow.UpdateInActionToolWindowFactory" id="UpdateInActionToolWindow"/>
</extensions>


動作確認

初期表示

initial content が表示されてます。


Run Function ボタンをクリック

ラベルが handle click に更新されました。


Run Action ボタンをクリック

ラベルが updated に更新されました。


その他参考資料


ソースコード

Githubにあげました。
https://github.com/thinkAmi-sandbox/hello_jetbrains_plugin

今回のプルリクはこちら。
https://github.com/thinkAmi-sandbox/hello_jetbrains_plugin/pull/12