これは「react-jsonschema-formのカレンダー | Advent Calendar 2023 - Qiita」の2日目の記事です。
この記事では、JSON Schemaのtypeごとの react-jsonschema-form (RJSF) の表示を確認してみます。
目次
環境
- react-jsonschema-form 5.15.0
- React 18.2.0
- React Router 6.20.1
今回、実際にRJSFのコードを書いてみます。
ただ、RJSFのデフォルトのテーマは
By default, this library renders form fields and widgets leveraging the Bootstrap semantics, meaning that you must load the Bootstrap stylesheet on the page to view the form properly.
https://rjsf-team.github.io/react-jsonschema-form/docs/usage/themes
と、Bootstrap 3 のようでした。
手元の環境には Bootstrap 3 がないため、今回は MUI (Material-UI) の5系も合わせてセットアップしておきます。
GithubのREADMEにより、 @rjsf/mui を追加でインストールしておきます。
https://github.com/rjsf-team/react-jsonschema-form/tree/main/packages/mui
$ npm install @rjsf/mui
JSON Schemaのtypeとは
JSON Schemaの type とは、項目のデータ型を定義するためのキーワードになります。
type キーワードの値として指定できる値は、以下のJSON Schemaのドキュメントに記載されています。
JSON Schema - Type-specific keywords
一方、RJSFのドキュメントを読んだところ、JSON Schemaで定義されている type はいずれもサポートされているようでした。
- https://rjsf-team.github.io/react-jsonschema-form/docs/json-schema/single/#field-types
- https://rjsf-team.github.io/react-jsonschema-form/docs/json-schema/arrays/
そこで、 type ごとにRJSFで表示した時の結果を確認してみます。
typeごとの表示を確認する
表示を確認するための実装として、以下を用意します。
今回は properties に各型の項目を追加していき、どのように表示されるかを確認します。
import {RJSFSchema} from "@rjsf/utils";
import Form from "@rjsf/mui";
import validator from "@rjsf/validator-ajv8";

export const TypeOnly = () => {
  const schema: RJSFSchema = {
    title: "Type Only",
    type: "object",
    required: [],
    properties: {
      // ここに各型の項目を追加していく
    }
  }

  const onSubmit = ({formData}, _event) => {
    console.log(formData)
  }

  return (
    <div style={{width: '400px'}}>
      <Form
        schema={schema}
        validator={validator}
        onSubmit={onSubmit}
      />
    </div>
  )
}
なお、submitボタンをしたときにどのような値が送信されるかを確認するため、 onSubmit propsに関数を設定しています。
設定した関数の引数については、RJSFの以下のドキュメントに記載があります。
https://rjsf-team.github.io/react-jsonschema-form/docs/api-reference/form-props#onsubmit
以上で準備ができたため、見ていくことにします。
string型
string型の項目です。
stringInput: {
  type: "string",
},
表示すると、 type="text" な項目になりました。

submitすると、 {stringInput: 'foo'} がconsoleに表示されました。
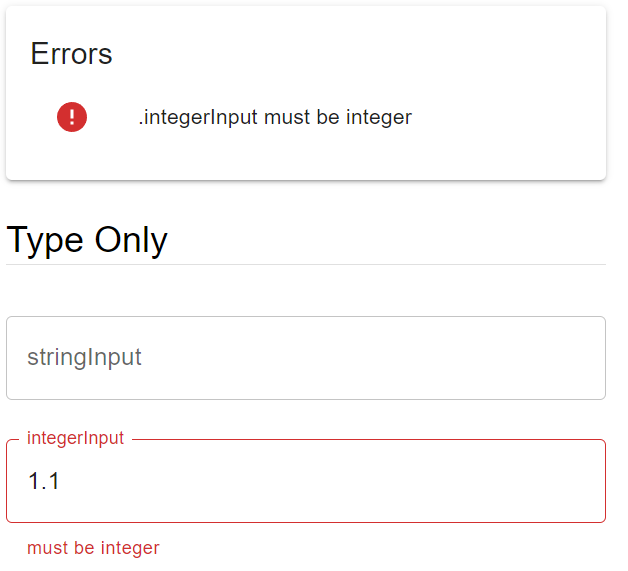
integer型
integer型の項目です。
integerInput: {
  type: "integer"
},
表示すると、 type="number" な項目になりました。

なお、integer型は整数値しか許可していないため、 1.1 などの小数を入力するとエラーとなります。
submitすると、 {integerInput: 1} がconsoleに表示されました。
number型
integer型と同じ数値を扱う型です。こちらは小数も扱えます。
numberInput: {
  type: "number"
},
表示すると、integer型同様、 type="number" な項目になります。

小数の値 1.2 をsubmitすると、 {numberInput: 1.2} がconsoleに表示されました。
boolean型
真偽値を扱う型です。
booleanInput: {
  type: "boolean"
},
表示すると、 type="checkbox" な項目になります。

submitすると、 {booleanInput: false} や {booleanInput: true} がconsoleに表示されました。
null型
JSON Schemaにはnull型もあるため、試してみます。
nullInput: {
  type: "null"
},
表示すると何も見えません。

ちなみに、MUIではなくデフォルトのテーマを使うと label だけが表示されました。

submitすると、 {nullInput: null} が表示されました。
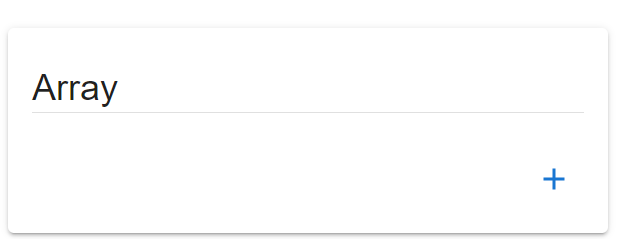
array型
JSON Schemaには配列を表すarray型もあるため、試してみます。
以下は stringInput と integerInput を持つオブジェクトを要素とした配列のJSON Schemaです。
Array: {
  type: "array",
  items: {
    type: "object",
    properties: {
      stringInput: {
        type: "string"
      },
      integerInput: {
        type: "integer"
      }
    }
  }
}
表示すると、 + ボタンだけが見えます。
+ ボタンをクリックすると、要素の入力欄が表示されました。

Array-0とArray-1の各項目に入力してsubmitすると、以下のようにconsoleへ表示されました。

string型のformatを指定する
ここまでJSON Schemaの各typeを見てきました。
それらのtypeの中でも string については、 format というキーワードでデータ型のフォーマットを指定できます。
https://json-schema.org/understanding-json-schema/reference/string#format
また、RJSFでは、JSON Schemaの定義のうち以下に記載されたフォーマットだと描画できるようです。
https://rjsf-team.github.io/react-jsonschema-form/docs/usage/widgets/#string-formats
そこで、それぞれ試してみます
format: email
メールアドレスのフォーマットです。
emailFormat: {
  type: "string",
  format: "email"
},
表示すると、 input="email" になりました。

format: uri
Uriのフォーマットです。
uriFormat: {
  type: "string",
  format: "uri"
},
表示すると、 input="url" になりました。

format: data-url
dataUrlFormat: {
  type: "string",
  format: "data-url"
},
表示すると、 input="file" になりました。

format: date
dateFormat: {
  type: "string",
  format: "date"
},
表示すると、 input="date" になりました。

format: date-tme
datetimeFormat: {
  type: "string",
  format: "date-time"
},
表示すると、 input="datetime-local" になりました。

format: time
timeFormat: {
  type: "string",
  format: "time"
},
表示すると、 input="time" になりました。

format: alt-datetime
JSON Schemaの format には定義されていませんが、RJSFの format には用意されていましたので、試してみます。
https://rjsf-team.github.io/react-jsonschema-form/docs/usage/widgets/#string-formats
altDatetimeFormat: {
  type: "string",
  format: "alt-datetime"
},
表示すると、MUIテーマではうまくいかないようです。いちおう、コンボボックスを開くと年などが選べました。
format: alt-date
これも、JSON Schemaの format には定義されていませんが、RJSFの format には用意されていました。
https://rjsf-team.github.io/react-jsonschema-form/docs/usage/widgets/#string-formats
altDateFormat: {
  type: "string",
  format: "alt-date"
},
こちらもMUIテーマではうまく表示されませんでした。コンボボックスを開くと年などが選べました。

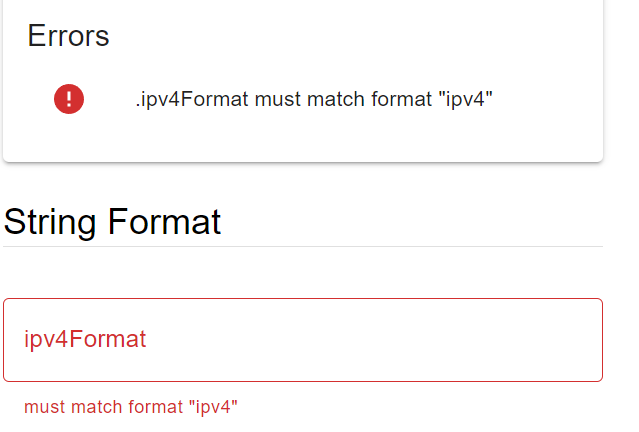
format: ipv4
こちらはJSON Schemaの format としては定義されていますが、RJSFでは定義されていない format です。
ipv4Format: {
  type: "string",
  format: "ipv4"
}
表示すると、 type="text" でした。

しかし、バリデーションは含まれているようで、IPv4アドレス以外を入力してsubmitするとエラーになりました。
Enum的な値を扱う
プログラミング言語のEnum的なものは、JSON Schemaにも Enum として定義されています。
https://json-schema.org/understanding-json-schema/reference/enum
そこで、 Enum的な値をRJSFで表示してみます。
ラベルと値を同じにする場合
ラベルと値を同じにする場合は、JSON Schemaの enum だけを使います。
stringEnum: {
  type: "string",
  enum: ["foo", "bar", "baz"]
},
動作確認すると、selectで各値が表示されました。
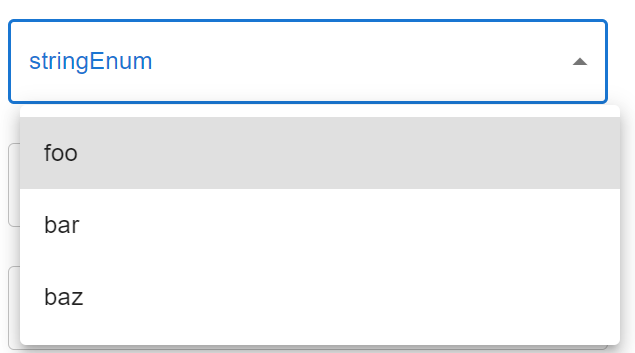
submitすると、 {stringEnum: 'foo'} が出力されました。
ラベルと値を別にする場合
RJSFでラベルと値を別にする方法は2つあります。また、deprecatedな方法も1つあります。
https://rjsf-team.github.io/react-jsonschema-form/docs/json-schema/single/#enumerated-values
それぞれ見ていきます。
anyOf + enumを使う方法
enumLabelWithAnyOf: {
  type: "string",
  anyOf: [
    { type: "string", title: "foo label", enum: ["foo"] },
    { type: "string", title: "bar label", enum: ["bar"] },
    { type: "string", title: "baz label", enum: ["baz"] },
  ]
},
表示です。
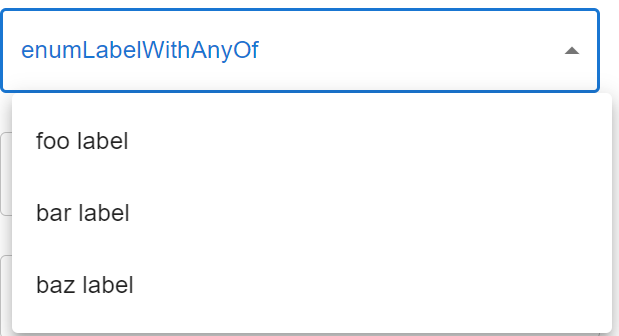
submitすると、{enumLabelWithAnyOf: 'foo'} が出力されました。
oneOf + constを使う方法
enumLabelWithOneOf: {
  type: "string",
  oneOf: [
    { "const": "foo", title: "foo label" },
    { "const": "bar", title: "bar label" },
    { "const": "baz", title: "baz label" },
  ]
},
表示です。
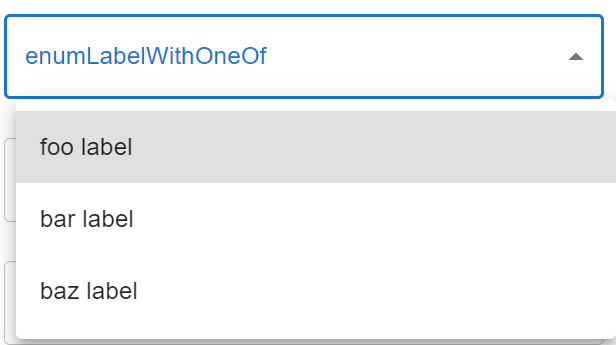
submitすると、{enumLabelWithOneOf: 'foo'} が出力されました。
【deprecated】 enum + enumNamesを使う方法
RJSFのバージョン5系でdeprecatedになったこともあり、以下を定義すると型エラーになります。
https://rjsf-team.github.io/react-jsonschema-form/docs/migration-guides/v5.x%20upgrade%20guide/#non-standard-enumnames-property
deprecatedEnumNames: {
  type: "string",
  enum: ["foo", "bar", "baz"],
  enumNames: ["foo label", "bar label", "baz label"]
}
また、動作はするもののコンソールへ以下が表示されるため、この書き方は使わないほうが良いでしょう。
The enumNames property is deprecated and may be removed in a future major release.
enumにnullを含める場合
RJSFのenumにnullを含める場合は、 type に null も指定します。
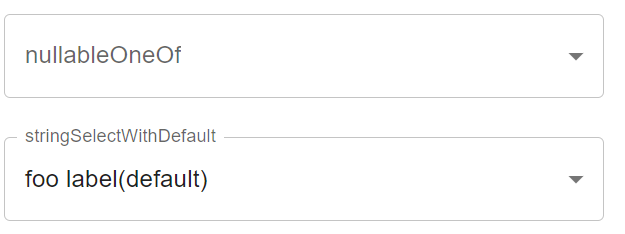
nullableOneOf: {
  type: ["string", "null"],
  oneOf: [
    { "const": "foo", title: "foo label" },
    { "const": "bar", title: "bar label" },
    { "const": null, title: "null label" },
  ]
},
表示です。
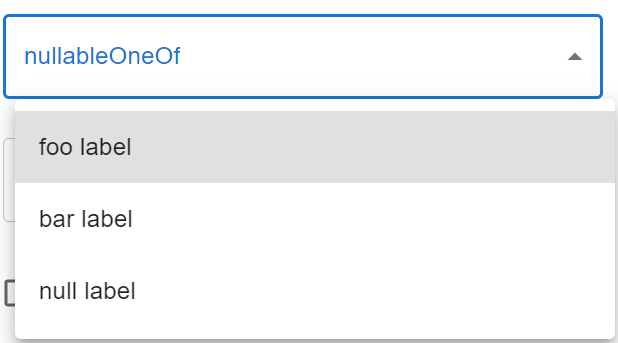
null を選んでsubmitとすると、 {nullableOneOf: null} が出力されました。
enumのうち、デフォルトで選択済にする場合
enumのうちデフォルトで選択済とする場合は、JSON Schemaの default キーワードを使います。
https://json-schema.org/understanding-json-schema/reference/annotations
stringSelectWithDefault: {
  type: "string",
  oneOf: [
    { "const": "foo", title: "foo label(default)" },
    { "const": "bar", title: "bar label" },
    { "const": "baz", title: "baz label" },
  ],
  default: "foo"
},
表示すると、他のenumとは異なり default キーワードで指定した値が選択済の状態で表示されます。
ソースコード
Githubに上げました。
https://github.com/thinkAmi-sandbox/rjsf_advent_calendar_2023
今回のプルリクはこちら。
https://github.com/thinkAmi-sandbox/rjsf_advent_calendar_2023/pull/1