Rubyのオブジェクト配列にて、各要素の同一属性で同じ値が何個あるかを数える

Rubyのオブジェクト配列にて、各要素の同一属性で同じ値が何個あるかを数えたくなる機会がありました。

例えば

class Apple
  attr_reader :name, :grower

  def initialize(name, grower)
    @name = name
    @grower = grower
  end
end

apples = [
  Apple.new('シナノゴールド', 'Aさん'),
  Apple.new('秋映', 'Aさん'),
  Apple.new('シナノゴールド', 'Bさん'),
  Apple.new('秋映', 'Cさん'),
  Apple.new('奥州ロマン', 'Cさん'),
  Apple.new('シナノゴールド', 'Dさん'),
]

というオブジェクト配列があったときに、りんごの名前 (name) ごとの生産者(grower) の人数の取得方法を知りたくなったのでした。

そこで、調べたときのメモを残します。

 
目次


環境


gropu_by + transform_values を使う

調べてみたところ、以下の記事を参考になりました。ありがとうございました。
配列に同じ要素が何個あるかを数える - patorashのブログ

 
そこで、記事に記載のあった通り、 gropu_by 後に transform_values を使って実装してみました。

 
すると、欲しい結果が得られました。

apples = [
  Apple.new('シナノゴールド', 'Aさん'),
  Apple.new('秋映', 'Aさん'),
  Apple.new('シナノゴールド', 'Bさん'),
  Apple.new('秋映', 'Cさん'),
  Apple.new('奥州ロマン', 'Cさん'),
  Apple.new('シナノゴールド', 'Dさん'),
]

p apples.map(&:name).group_by(&:itself).transform_values(&:size)
# => {"シナノゴールド"=>3, "秋映"=>2, "奥州ロマン"=>1}

 
ただ、これだけだとメソッドチェーンの途中でどのような形になっているか、まだ理解できていませんでした。

そこで、途中結果を表示してみた上で、自分向けのメモも残してみます。


途中経過のメモ

まずは map を使い、オブジェクトの name 属性の配列にします。

r1 = apples.map(&:name)
p r1
# => ["シナノゴールド", "秋映", "シナノゴールド", "秋映", "奥州ロマン", "シナノゴールド"]

 
続いて、group_by(&:itself) にて

  • キー
    • ブロックの中で、オブジェクトの itself メソッドを使うことで得られた、 シナノゴールド秋映奥州ロマン
    • itself の結果を、キーごとに配列化

という形のハッシュにします。

r2 = r1.group_by(&:itself)
p r2
# => {"シナノゴールド"=>["シナノゴールド", "シナノゴールド", "シナノゴールド"], "秋映"=>["秋映", "秋映"], "奥州ロマン"=>["奥州ロマン"]}

 
最後に、 transform_values(&:size) で、ハッシュの値をブロックの結果 (&:size による配列の要素数) へと差し替えます。

p r2.transform_values(&:size)
# => {"シナノゴールド"=>3, "秋映"=>2, "奥州ロマン"=>1}


ソースコード全体

以下のソースコードmain.rb で保存し、ruby main.rb と実行することで、同じ結果が得られます。

class Apple
  attr_reader :name, :grower

  def initialize(name, grower)
    @name = name
    @grower = grower
  end
end

apples = [
  Apple.new('シナノゴールド', 'Aさん'),
  Apple.new('秋映', 'Aさん'),
  Apple.new('シナノゴールド', 'Bさん'),
  Apple.new('秋映', 'Cさん'),
  Apple.new('奥州ロマン', 'Cさん'),
  Apple.new('シナノゴールド', 'Dさん'),
]

# 途中経過版
r1 = apples.map(&:name)
p r1
# => ["シナノゴールド", "秋映", "シナノゴールド", "秋映", "奥州ロマン", "シナノゴールド"]

r2 = r1.group_by(&:itself)
p r2
# => {"シナノゴールド"=>["シナノゴールド", "シナノゴールド", "シナノゴールド"], "秋映"=>["秋映", "秋映"], "奥州ロマン"=>["奥州ロマン"]}

p r2.transform_values(&:size)
# => {"シナノゴールド"=>3, "秋映"=>2, "奥州ロマン"=>1}

# チェーン版
puts '=' * 30
p apples.map(&:name).group_by(&:itself).transform_values(&:size)

 
実行結果は以下です。

% ruby --version   
ruby 3.3.0 (2023-12-25 revision 5124f9ac75) [x86_64-darwin21]

% ruby main.rb     
["シナノゴールド", "秋映", "シナノゴールド", "秋映", "奥州ロマン", "シナノゴールド"]
{"シナノゴールド"=>["シナノゴールド", "シナノゴールド", "シナノゴールド"], "秋映"=>["秋映", "秋映"], "奥州ロマン"=>["奥州ロマン"]}
{"シナノゴールド"=>3, "秋映"=>2, "奥州ロマン"=>1}
==============================
{"シナノゴールド"=>3, "秋映"=>2, "奥州ロマン"=>1}

Python + Flask + pysaml2 でSP、KeycloakでIdPを構築し、SAML2 の SP-initiated フローでSAML認証してみた

以前、OpenID Connect によるシングルサインオン環境を構築しました。
Railsとdoorkeeper-openid_connectやOmniAuth を使って、OpenID Connectの OpenID Provider と Relying Party を作ってみた - メモ的な思考的な

OpenID Connect以外でシングルサインオン環境を構築する方法として SAML がありますが、今までさわってきませんでした。

 
そんな中、書籍「SAML入門」を読む機会がありました。

書籍では

  • SAMLの認証フロー
  • 認証フローのリクエスト・レスポンスの中身を掲載
  • Dockerを使って実際にSAML認証を試す
  • SAMLの仕様へのリンクやお役立ちツール

などが分かりやすく記載されており、とてもためになりました。ありがとうございました。

 
本を読んでみて気持ちが盛り上がり、自分でもSPとIdPの環境を構築してみたくなりました。

そこで、Python + Flask + pysaml2 でSP、KeycloakでIdPを構築し、SAML2 の SP-initiated フローでSAML認証してみたので、メモを残します。

 
目次


環境

  • WSL2
  • SP
    • Python 3.11.7
    • Flask 3.0.2
    • pysaml2 7.5.0
  • IdP
    • Keycloak 23.0.6

 
なお、ソースコードは必要に応じて記載しているものの、全部は記載していません。

詳細はGithubリポジトリを確認してください。
https://github.com/thinkAmi-sandbox/flask_with_pysaml2_and_keycloak-example


やらないこと

あくまで「SAMLの認証フローを体験する」がメインなので、以下は行いません。

  • 本番運用に即した、Keycloakやpysaml2の設定
  • セキュリティまわりを真剣に考えること

 
また、SPとIdPの両方を自作すると完成が遅くなりそうでした。

そのため、SAML入門同様、今回はIdPにKeycloakを使うことにして、IdPの自作は行いません。


SP向けのライブラリについて検討

今回はPythonで書いてみようと考え、SAML2関連のライブラリを探したところ、以下の2つがありました。

両方とも同じくらいのstarだったため、どんな違いがあるのか調べたところ、2016年のstackoverflowに情報がありました。
single sign on - Python SSO: pysaml2 and python3-saml - Stack Overflow

python3-saml のauthorのコメントだったものの、python3-saml が良さそうに感じました。

ただ、

ということから、今回は pysaml2 でSPを作ることにしました。

 
ライブラリは決まったものの、 pysaml2 を使ってゼロから作るのは大変そうです。

サンプルコードを探したところ、oktaにてサンプルコードが公開されていました。

そこで、これをベースに作っていくことにしました。

 
なお、上記oktaのサンプルだと Flask-Login を使うことでログインまわりをきちんと作っています。

ただ、今回は必要最低限の実装にするので、ログインまわりについては

  • Flask-Login は使用しない
  • その代わり、SAML認証成功時にセッションへデータをセットする
    • セッションにデータがあればログイン成功とみなす

とします。


SAML用のChrome拡張について調査

SAMLのリクエスト・レスポンスをChromeで確認できると便利です。

調べた見たところ、SAML-tracer がありました。
SAML-tracer

この拡張ですが、

ということから、今回使ってみることにしました。

この拡張を使うことで、SAMLのパラメータを見たり、

 
実際のリクエストで使われるSAMLを見れたりと、開発をする上で便利になりました。


Keycloakのセットアップ

Keycloakは、公式のDockerイメージが quay.io で提供されています。
https://quay.io/repository/keycloak/keycloak?tab=tags

今回は、最新バージョンの docker compose で Keycloak をたてることにしました。

そこで、以下の compose.yaml を用意しました。

ちなみに、ポート 8080 はよく見かけるため、 18080 へと変更しています。

services:
  keycloak:
    image: quay.io/keycloak/keycloak:23.0.6
    # dockerコマンドのitオプションと同様にするため、 ttyとstdin_openを付けておく
    tty: true
    stdin_open: true
    ports:
        - 18080:8080
    environment:
      KEYCLOAK_ADMIN: admin
      KEYCLOAK_ADMIN_PASSWORD: admin
    command:
      - start-dev

 
準備ができたので、起動します。

$ docker compose up -d

 
続いて、公式ドキュメントの手順に従い、Keycloakの設定を行います。
Docker - Keycloak

  • ポートを変更しているので、以下のURLにアクセス
  • realmを作る
    • nameを myrealm とする
    • それ以外はデフォルト
  • ユーザー作る
    • myrealm に切り替える
    • 以下を入力
      • Username: myuser
      • First Name: Foo
      • Last Name: Bar
  • ユーザーにパスワードを設定する
    • Credentials タブを開く
    • 以下を入力
      • Password: baz
      • Password confirmation: baz
      • Temporary: Off
  • 作成したユーザー myuser でKeycloakへログインしてみる
  • Realm settings の Endpoints をクリックし、エンドポイント情報を確認しておく


pysaml2を使って、SPを作る

各ライブラリのインストール

今回、WSL2上にSPをたてます。

はじめに、pysaml2のREADMEにある通り、 xmlsec1 をインストールします。

$ sudo apt install xmlsec1

続いて、Flaskとpysaml2をインストールします。

$ pip install pysaml2 flask


Flaskアプリの作成

ミニマムな saml_client_for メソッドへと変更

oktaのサンプルコードを一部改変し、ミニマムな実装にします。

まず、今回はHTTP通信だけ使うので、変数 asc_urlSAML Requestのみの

acs_url = url_for(
    'saml_request',
    _external=True)

とします。

変数 settings については、

  • endpoint は以下の2つ分を定義
    • SAML Requestのときの HTTP Redirect Binding
    • SAML Responseのときの HTTP POST Binding
  • 各種 signed は False
  • allow_unsolicitedTrue
    • 未設定だと saml2.response.UnsolicitedResponse: Unsolicited response: id-*** エラーが発生する
      • Keycloak側の設定不足かもしれない
  • metadata には remote を追加
    • これがないと、 saml2.client_base.SignOnError: {'message': 'No supported bindings available for authentication', 'bindings_to_try': ['urn:oasis:names:tc:SAML:2.0:bindings:HTTP-Redirect'], 'unsupported_bindings': ['urn:oasis:names:tc:SAML:2.0:bindings:HTTP-Redirect']} エラーが発生する

とします。

関数全体は以下の通りです。

def saml_client_for():
    acs_url = url_for(
        'saml_request',
        _external=True)
    
    settings = {
        'entityid': 'flask',
        'metadata': {
            'remote': [
                {'url': 'http://localhost:18080/realms/myrealm/protocol/saml/descriptor'},
            ],
        },
        'service': {
            'sp': {
                'endpoint': {
                    'assertion_consumer_service': [
                        (acs_url, BINDING_HTTP_REDIRECT),
                        (acs_url, BINDING_HTTP_POST),
                    ]
                },
                'allow_unsolicited': True,
                'authn_requests_signed': False,
                'want_assertions_signed': False,
                'want_response_signed': False,

            }
        }
    }

    spConfig = Saml2Config()
    spConfig.load(settings)
    spConfig.allow_unknown_attributes = True
    saml_client = Saml2Client(config=spConfig)
    return saml_client


SAML Requestを送信する関数を作成

今回のSAML Request は HTTP Redirect Binding とするため、oktaのサンプルコードとほぼ同じです。

なお、今回は SP-initiated フローでの認証のみ動作確認することから、メソッド名を sp_initiated から saml_request へと変更しています。

def saml_request():
    # SAMLクライアントを生成する
    saml_client = saml_client_for()
    
    # 認証準備をする
    _reqid, info = saml_client.prepare_for_authenticate()

    # HTTP Redirect Binding のリダイレクト先はLocationヘッダに保存されているため、
    # その値を redirect 関数に渡す
    redirect_url = None
    # Select the IdP URL to send the AuthN request to
    for key, value in info['headers']:
        if key == 'Location':
            redirect_url = value
    response = redirect(redirect_url, code=302)
    # NOTE:
    #   I realize I _technically_ don't need to set Cache-Control or Pragma:
    #     http://stackoverflow.com/a/5494469
    #   However, Section 3.2.3.2 of the SAML spec suggests they are set:
    #     http://docs.oasis-open.org/security/saml/v2.0/saml-bindings-2.0-os.pdf
    #   We set those headers here as a 'belt and suspenders' approach,
    #   since enterprise environments don't always conform to RFCs
    response.headers['Cache-Control'] = 'no-cache, no-store'
    response.headers['Pragma'] = 'no-cache'
    return response


SAML ResponseをPOSTで受け付ける関数を作成

元々のサンプルコードでは idp_initiated 関数でしたが、 IdP-initiated フロー向けと誤解しそうなので、関数名を saml_response へと変更しました。

また、 authn_response.parse_assertion() をしないと、 get_identity()get_subject() で値が取得できなかったことから、修正を加えています。

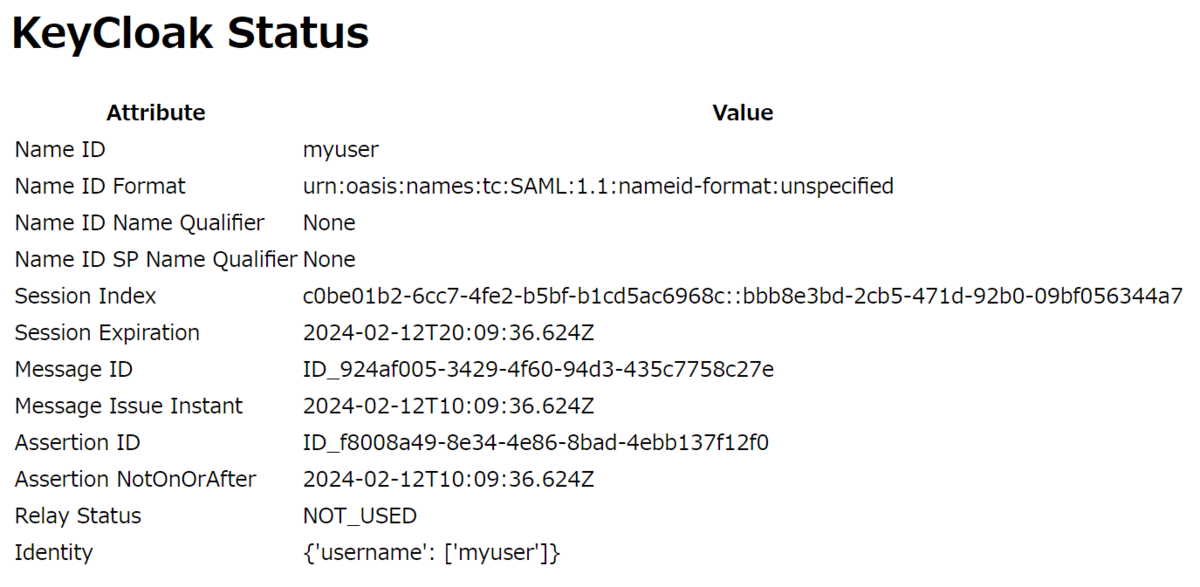
他に、セッションの中にSAML入門で確認していた各値を設定し、ブラウザ上で表示できるようにしておきます。

なお、セッションの各値についてはpysaml2のドキュメントでは示されていなかったため、デバッガを使って一つ一つどこにあるかを確認しました。

@app.route('/saml/response/keycloak', methods=['POST'])
def saml_response():
    saml_client = saml_client_for()
    authn_response = saml_client.parse_authn_request_response(
        request.form['SAMLResponse'],
        entity.BINDING_HTTP_POST)

    # parse_assertion()してからでないと、get_identity()やget_subject()で値が取れない
    authn_response.parse_assertion()
    user_info = authn_response.get_subject()

    session['saml_attributes'] = {
        'name_id': user_info.text,
        'name_id_format': user_info.format,
        'name_id_name_qualifier': user_info.name_qualifier,
        'name_id_sp_name_qualifier': user_info.sp_name_qualifier,
        'session_index': authn_response.assertion.authn_statement[0].session_index,
        'session_expiration': authn_response.assertion.authn_statement[0].session_not_on_or_after,
        'message_id': authn_response.response.id,
        'message_issue_instant': authn_response.response.issue_instant,
        'assertion_id': authn_response.assertion.id,
        'assertion_not_on_or_after': authn_response.assertion.issue_instant,
        'relay_status': 'NOT_USED',
        'identity': authn_response.get_identity()
    }

    return redirect('/')


SAML Requestを送信するためのリンクやセッションの中身を表示するindexを用意

テンプレートを描画するだけです。

@app.route('/')
def index():
    return render_template('index.html')

 
テンプレートはこんな感じで、セッションの値の有無により表示を分岐しています。

{% if session['saml_attributes'] %}
    {% set s = session['saml_attributes'] %}

    <h1>KeyCloak Status</h1>
    <table>
        <thead>
            <tr>
                <th>Attribute</th>
                <th>Value</th>
            </tr>
        </thead>
        <tbody>
            <tr>
                <td>Name ID</td>
                <td>{{ s['name_id'] }}</td>
            </tr>
            <tr>
                <td>Name ID Format</td>
                <td>{{ s['name_id_format'] }}</td>
            </tr>
            <tr>
                <td>Name ID Name Qualifier</td>
                <td>{{ s['name_id_name_qualifier'] }}</td>
            </tr>
            <tr>
                <td>Name ID SP Name Qualifier</td>
                <td>{{ s['name_id_sp_name_qualifier'] }}</td>
            </tr>
            <tr>
                <td>Session Index</td>
                <td>{{ s['session_index'] }}</td>
            </tr>
            <tr>
                <td>Session Expiration</td>
                <td>{{ s['session_expiration'] }}</td>
            </tr>
            <tr>
                <td>Message ID</td>
                <td>{{ s['message_id'] }}</td>
            </tr>
            <tr>
                <td>Message Issue Instant</td>
                <td>{{ s['message_issue_instant'] }}</td>
            </tr>
            <tr>
                <td>Assertion ID</td>
                <td>{{ s['assertion_id'] }}</td>
            </tr>
            <tr>
                <td>Assertion NotOnOrAfter</td>
                <td>{{ s['assertion_not_on_or_after'] }}</td>
            </tr>
            <tr>
                <td>Relay Status</td>
                <td>{{ s['relay_status'] }}</td>
            </tr>
            <tr>
                <td>Identity</td>
                <td>{{ s['identity'] }}</td>
            </tr>
        </tbody>
    </table>

{% else %}
    <h1>Login</h1>
    <ul>
      <li><a href="/saml/login/keycloak">KeyCloak</a></li>
    </ul>
{% endif %}

 
以上で、SP側の実装は完了です。


Keycloakへ設定を追加

続いて、公式ドキュメントを参考にしつつ、SPの情報をKeycloakへ設定します。
Creating a SAML client | Server Administration Guide

  • Create Client でクライアントを作成
    • Client Typeは SAML
    • Client IDは任意の値
      • 今回は flask
      • ただし、本番運用の場合は重複しないような値のほうが良さそう
    • Valid Redirect URIsは http://localhost:15000/saml/response/keycloak
    • NameID Formatは username
    • Force POST bindingは On
  • clientから flask を選択
  • Keyタブを選択
    • Client signature requiredOff にする
  • Client scopes タブから、 flask-dedicated を選択
    • デフォルトで作成されている
  • Scopeタブを選択
    • Full scope allowed を Off にする
  • Mappersタブを選択
    • Configure a new mapper をクリック
    • Nameで User Attribute をクリック
      • Name, User Attribute, Friendly Name, SAML Attribute Name のいずれも username
      • SAML Attribute NameFormatは Basic (デフォルト)
      • Aggregate attribute valuesは Off (デフォルト)
  • Advancedタブを選択
    • Assertion Consumer Service POST Binding URL に http://localhost:15000/saml/response/keycloak を設定
      • SAML Response の送信先
      • これがないと、Keycloak上で Invalid Request エラーが表示されてしまう


動作確認

ここまでで環境構築が完了したので、実際に動作を確認してみます。

http://localhost:15000/ にアクセスすると、Keycloakでログインするためのリンクが表示されます。

 
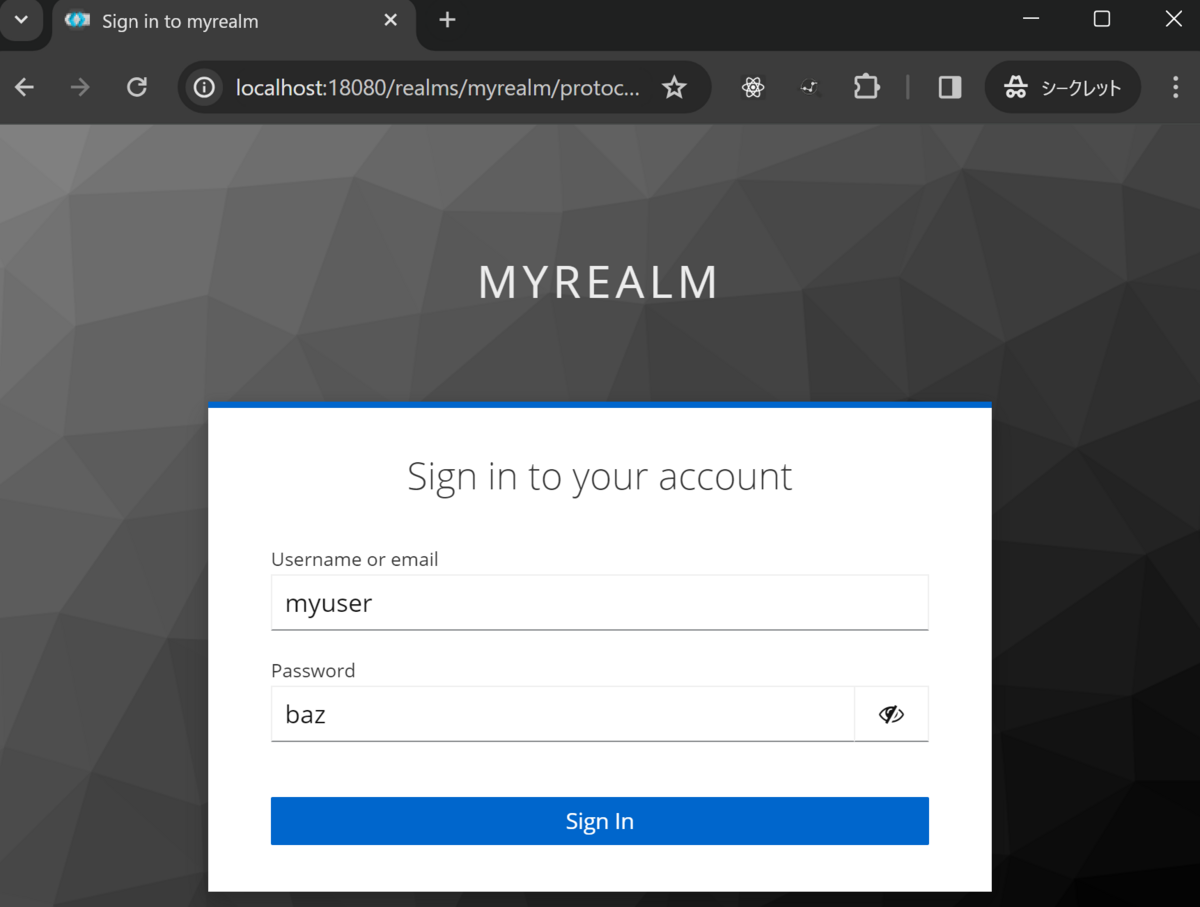
リンクをクリックすると、Keycloak上のログイン画面が表示されるので、ログインユーザーとパスワードを入力します。

 
ログインに成功するとSPに戻り、SAML Responseの内容が表示されます。

 
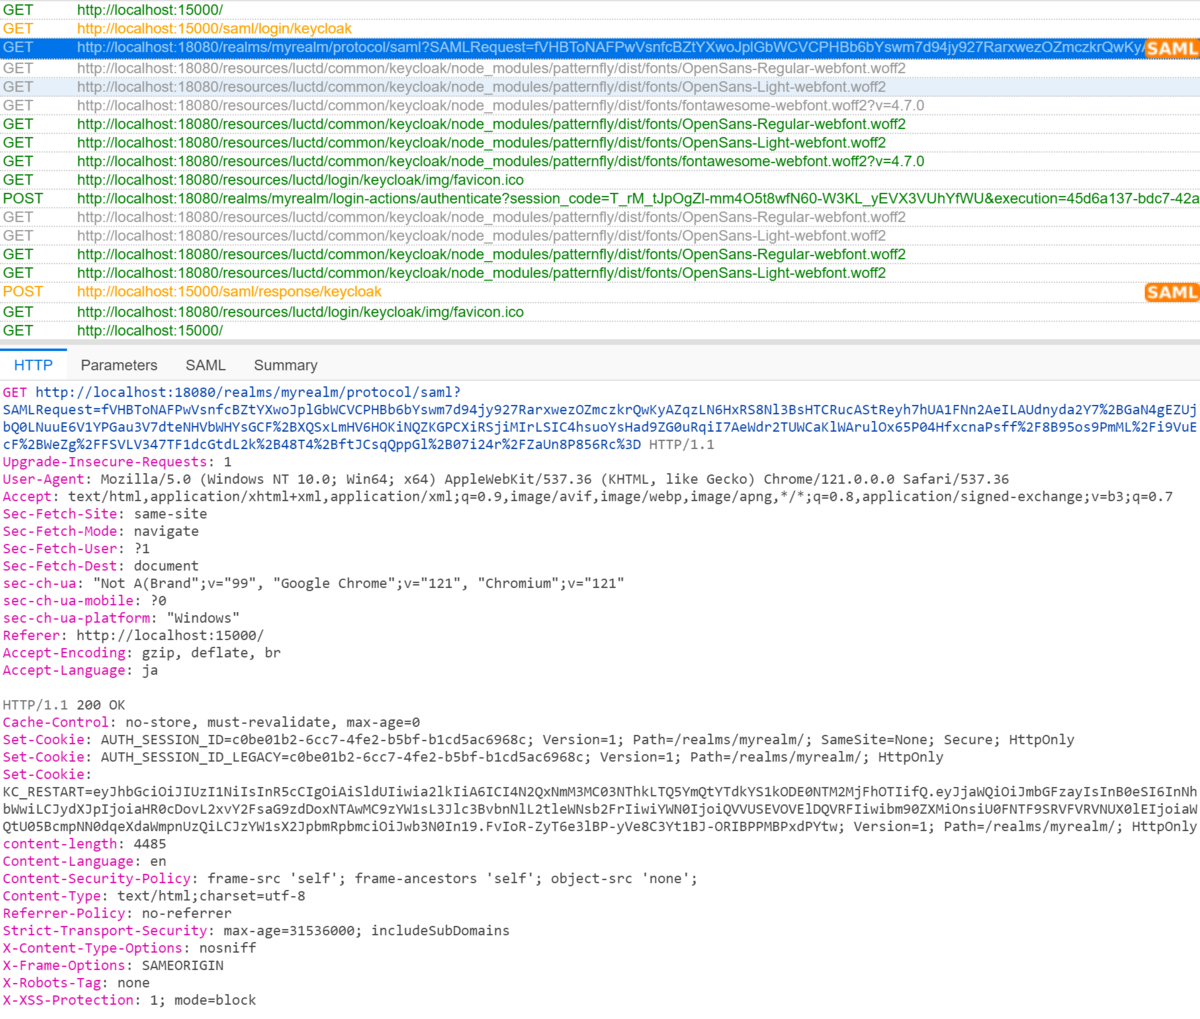
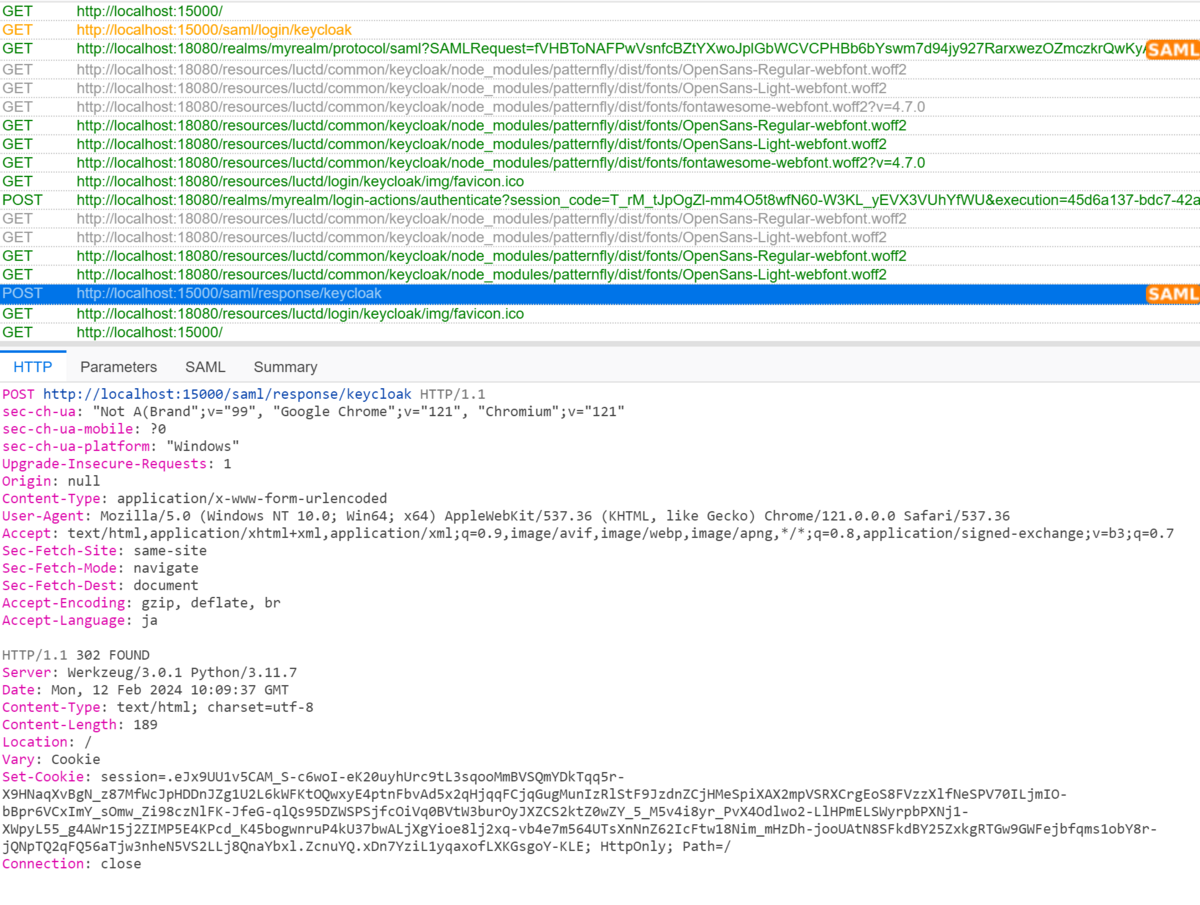
SAML-tracerの状態も確認します。

SAML Request の時はこんな感じでした。

 
2回目のSAML Response の場合はこんな感じです。

 
以上で、Python + Flask + pysaml2 でSP、KeycloakでIdPを構築し、SAML2 の SP-initiated フローでSAML認証ができるようになりました。


その他の参考資料

ソースコード

Githubにあげました。
https://github.com/thinkAmi-sandbox/flask_with_pysaml2_and_keycloak-example

今回のプルリクはこちら。
https://github.com/thinkAmi-sandbox/flask_with_pysaml2_and_keycloak-example/pull/1

Python + playsound の動作環境を整備して、macからmp3ファイルの音を鳴らしてみた

mac + Pythonな環境で、mp3ファイルの音を鳴らしたいことがありました。

調べてみたところ、いくつかパッケージがあるようでした。

 
今回の場合は単に鳴らせればよかったので、一番手軽に扱えそうな playsound を使うことにしました。
TaylorSMarks/playsound: Pure Python, cross platform, single function module with no dependencies for playing sounds.

 
ただ、Githubリポジトリを見たところ、最新バージョン 1.3.0 のリリースが3年くらい前でした。

そこで試してみたところ、最近のPythonバージョンでは動作しないと分かったので、メモを残します。

 
目次


環境

  • mac
  • playsound 1.3.0
  • Python 3.10.13
    • Python 3.11系ではインストールできず
  • 追加で必要なパッケージ


用意したPythonスクリプト

playsoundのREADMEを参考に、Pythonスクリプトを書きました。

また、Pythonスクリプトと同じ階層に、 mysound.mp3 というmp3ファイルを置きました。

from playsound import playsound


def main():
  playsound('mysound.mp3')

  print('終了します')


if __name__ == "__main__":
  main()


動作するPythonバージョンの確認

上記スクリプトが動くかどうか、新しいバージョンから試していきます。


Python 3.12系でインストールできない

Python 3.12系へインストールしようとしたところ、エラーになりました。

% python --version
Python 3.12.1

% pip install playsound
Collecting playsound
  Using cached playsound-1.3.0.tar.gz (7.7 kB)
  Installing build dependencies ... done
  Getting requirements to build wheel ... error
  error: subprocess-exited-with-error
  
  × Getting requirements to build wheel did not run successfully.
  │ exit code: 1
  ╰─> [28 lines of output]
      Traceback (most recent call last):
        File "/path/to/project/env/lib/python3.12/site-packages/pip/_vendor/pyproject_hooks/_in_process/_in_process.py", line 353, in <module>
          main()
        File "/path/to/project/env/lib/python3.12/site-packages/pip/_vendor/pyproject_hooks/_in_process/_in_process.py", line 335, in main
          json_out['return_val'] = hook(**hook_input['kwargs'])
                                   ^^^^^^^^^^^^^^^^^^^^^^^^^^^^
        File "/path/to/project/env/lib/python3.12/site-packages/pip/_vendor/pyproject_hooks/_in_process/_in_process.py", line 118, in get_requires_for_build_wheel
          return hook(config_settings)
                 ^^^^^^^^^^^^^^^^^^^^^
        File "/private/var/folders/9j/rhvj56hj4zl6kbkc0zxswj400000gn/T/pip-build-env-qmcer5n9/overlay/lib/python3.12/site-packages/setuptools/build_meta.py", line 325, in get_requires_for_build_wheel
          return self._get_build_requires(config_settings, requirements=['wheel'])
                 ^^^^^^^^^^^^^^^^^^^^^^^^^^^^^^^^^^^^^^^^^^^^^^^^^^^^^^^^^^^^^^^^^
        File "/private/var/folders/9j/rhvj56hj4zl6kbkc0zxswj400000gn/T/pip-build-env-qmcer5n9/overlay/lib/python3.12/site-packages/setuptools/build_meta.py", line 295, in _get_build_requires
          self.run_setup()
        File "/private/var/folders/9j/rhvj56hj4zl6kbkc0zxswj400000gn/T/pip-build-env-qmcer5n9/overlay/lib/python3.12/site-packages/setuptools/build_meta.py", line 480, in run_setup
          super(_BuildMetaLegacyBackend, self).run_setup(setup_script=setup_script)
        File "/private/var/folders/9j/rhvj56hj4zl6kbkc0zxswj400000gn/T/pip-build-env-qmcer5n9/overlay/lib/python3.12/site-packages/setuptools/build_meta.py", line 311, in run_setup
          exec(code, locals())
        File "<string>", line 6, in <module>
        File "/path/to/.anyenv/envs/pyenv/versions/3.12.1/lib/python3.12/inspect.py", line 1282, in getsource
          lines, lnum = getsourcelines(object)
                        ^^^^^^^^^^^^^^^^^^^^^^
        File "/path/to/.anyenv/envs/pyenv/versions/3.12.1/lib/python3.12/inspect.py", line 1264, in getsourcelines
          lines, lnum = findsource(object)
                        ^^^^^^^^^^^^^^^^^^
        File "/path/to/.anyenv/envs/pyenv/versions/3.12.1/lib/python3.12/inspect.py", line 1093, in findsource
          raise OSError('could not get source code')
      OSError: could not get source code
      [end of output]
  
  note: This error originates from a subprocess, and is likely not a problem with pip.
error: subprocess-exited-with-error

× Getting requirements to build wheel did not run successfully.
│ exit code: 1
╰─> See above for output.

note: This error originates from a subprocess, and is likely not a problem with pip.


Python 3.11系でもインストールできない

続いて、Python 3.11系に切り替えてインストールしようとしましたが、同じエラーになりました。

% python --version
Python 3.11.7

% pip install playsound
Collecting playsound
  Using cached playsound-1.3.0.tar.gz (7.7 kB)
  Installing build dependencies ... done
  Getting requirements to build wheel ... error
  error: subprocess-exited-with-error
  
  × Getting requirements to build wheel did not run successfully.
  │ exit code: 1
  ╰─> [28 lines of output]
      Traceback (most recent call last):
        File "/path/to/project/env/lib/python3.11/site-packages/pip/_vendor/pyproject_hooks/_in_process/_in_process.py", line 353, in <module>
          main()
        File "/path/to/project/env/lib/python3.11/site-packages/pip/_vendor/pyproject_hooks/_in_process/_in_process.py", line 335, in main
          json_out['return_val'] = hook(**hook_input['kwargs'])
                                   ^^^^^^^^^^^^^^^^^^^^^^^^^^^^
...
        File "/path/to/.anyenv/envs/pyenv/versions/3.11.7/lib/python3.11/inspect.py", line 1081, in findsource
          raise OSError('could not get source code')
      OSError: could not get source code
      [end of output]
  
  note: This error originates from a subprocess, and is likely not a problem with pip.
error: subprocess-exited-with-error

× Getting requirements to build wheel did not run successfully.
│ exit code: 1
╰─> See above for output.

note: This error originates from a subprocess, and is likely not a problem with pip.


Python 3.10系ではインストールできたが、PyObjC が必要

続いて、Python3.10系で試してみたところ、インストールはできました。

% python --version
Python 3.10.13

% pip install playsound
Collecting playsound
  Using cached playsound-1.3.0.tar.gz (7.7 kB)
  Preparing metadata (setup.py) ... done
Installing collected packages: playsound
  DEPRECATION: playsound is being installed using the legacy 'setup.py install' method, because it does not have a 'pyproject.toml' and the 'wheel' package is not installed. pip 23.1 will enforce this behaviour change. A possible replacement is to enable the '--use-pep517' option. Discussion can be found at https://github.com/pypa/pip/issues/8559
  Running setup.py install for playsound ... done
Successfully installed playsound-1.3.0

 
ただ、Pythonスクリプトを動かしてみたところ、エラーになりました。

% python main.py
playsound is relying on a python 2 subprocess. Please use `pip3 install PyObjC` if you want playsound to run more efficiently.
Traceback (most recent call last):
  File "/path/to/playsound_pyobj/main.py", line 9, in <module>
    main()
  File "/path/to/playsound_pyobj/main.py", line 5, in main
    playsound('clock_in.mp3')
  File "/path/to/playsound_pyobj/env/lib/python3.10/site-packages/playsound.py", line 244, in <lambda>
    playsound = lambda sound, block = True: _playsoundAnotherPython('/System/Library/Frameworks/Python.framework/Versions/2.7/bin/python', sound, block, macOS = True)
  File "/path/to/playsound_pyobj/env/lib/python3.10/site-packages/playsound.py", line 229, in _playsoundAnotherPython
    t.join()
  File "/path/to/playsound_pyobj/env/lib/python3.10/site-packages/playsound.py", line 218, in join
    raise self.exc
  File "/path/to/playsound_pyobj/env/lib/python3.10/site-packages/playsound.py", line 211, in run
    self.ret = self._target(*self._args, **self._kwargs)
  File "/path/to/playsound_pyobj/env/lib/python3.10/site-packages/playsound.py", line 226, in <lambda>
    t = PropogatingThread(target = lambda: check_call([otherPython, playsoundPath, _handlePathOSX(sound) if macOS else sound]))
  File "/path/to/.anyenv/envs/pyenv/versions/3.10.13/lib/python3.10/subprocess.py", line 364, in check_call
    retcode = call(*popenargs, **kwargs)
  File "/path/to/.anyenv/envs/pyenv/versions/3.10.13/lib/python3.10/subprocess.py", line 345, in call
    with Popen(*popenargs, **kwargs) as p:
  File "/path/to/.anyenv/envs/pyenv/versions/3.10.13/lib/python3.10/subprocess.py", line 971, in __init__
    self._execute_child(args, executable, preexec_fn, close_fds,
  File "/path/to/.anyenv/envs/pyenv/versions/3.10.13/lib/python3.10/subprocess.py", line 1863, in _execute_child
    raise child_exception_type(errno_num, err_msg, err_filename)

 
エラーメッセージの中で、気になった内容は

_playsoundAnotherPython('/System/Library/Frameworks/Python.framework/Versions/2.7/bin/python', sound, block, macOS = True)

playsound is relying on a python 2 subprocess. Please use pip3 install PyObjC if you want playsound to run more efficiently.

でした。

また、Githubのissueにも似たような記載がありました。
https://github.com/TaylorSMarks/playsound/issues/132#issuecomment-1820177142

 
そこで、エラーメッセージに従い、 PyObjC をインストールしてみました。
https://github.com/ronaldoussoren/pyobjc

すると、PyObjCに関するパッケージが大量にインストールされましたが、エラーにはなりませんでした。

% pip install -U PyObjC 
Collecting PyObjC
  Using cached pyobjc-10.1-py3-none-any.whl (4.0 kB)
...
Installing collected packages: pyobjc-core,
...
pyobjc-framework-libxpc-10.1

 
再度、Pythonスクリプトを実行すると、macでmp3の音声が再生できました。

Python + nfcpy + PaSoRi RC-S380 + launchdで、macにログイン後「FeliCaのIDmを通知センターへ出力する」処理を自動起動してみた

以前、Raspberry Pi 2 + PaSoRi RC-S380 + nfcpyにて、FeliCaを読み込んでみました。
Raspberry Pi 2 + PaSoRi RC-S380 + nfcpyにて、FeliCa読み取り時にPowerOffし、Slackへ通知してみた - メモ的な思考的な

そんな中、「RC-380はmacには対応していないけど、nfcpyを使えばmacFeliCaを読み込める」と知りました。

 
そこで、macにログイン後に "FeliCaIDmを通知センターへ出力する" 処理を自動起動してみたので、メモを残します。

 
目次


環境

  • mac
  • Python 3.9.5
    • anyenv + pyenv でインストール
  • nfcpy 1.0.3
  • PaSoRi RC-S380

 
なお、以前のRaspberry Pi 2 向けに作った環境・ソースコードを流用しているため、各種バージョンが古いです。

とはいえ、最新の各ライブラリの最新バージョンでも動作すると思います。

 
また、「launchdでPythonの仮想環境を有効化(activate)して実行する」方法が分からなかったため、今回はPython3.9.5の環境に直接 nfcpy まわりをインストールしています。


RC-S380で読んだFeliCaIDmを取得する

これはnfcpyの機能で実現できます。

なお、 usb:054c:06c3 という値は、nfcpyのドキュメント

For example, usb:054c:06c3 would open the first Sony RC-S380 reader while usb:054c would open the first Sony reader found on USB.

 
nfc.clf — nfcpy 1.0.4 documentation

にある通り、PaSoRi RC-S380のIDになります。

IDmを取得するソースコードはこちら。

# main.py
def on_connect(tag):
    idm = binascii.hexlify(tag._nfcid).decode('utf-8')

def main():
    with nfc.ContactlessFrontend('usb:054c:06c3') as cf:
        cf.connect(rdwr={'on-connect': on_connect})


if __name__ == "__main__":
    main()


通知センターへの出力

今回の最終形ではPythonスクリプトを自動実行します。

そこで、 print() で標準出力するのではなく、目に見えるような別の方法でログを出力したいと考えました。

調べてみたところ、macには通知センターという機能がありました。
Macで通知センターを使用する - Apple サポート (日本)

また、Pythonを使って通知センターへのメッセージ出力もできそうでした。
Macのデスクトップ通知をPythonから表示する #Python - Qiita

 
そこで、 notify 関数を用意し、メッセージとFeliCaIDmを出力するよう修正してみました。

# main.py
import binascii
import datetime
import os

import nfc


def notify(message):
    os.system(f"osascript -e 'display notification \"{datetime.datetime.now()} - {message}\"'")

def on_connect(tag):
    idm = binascii.hexlify(tag._nfcid).decode('utf-8')
    notify(f'FeliCa IDm: {idm}')

def main():
    notify('開始します')
    with nfc.ContactlessFrontend('usb:054c:06c3') as cf:
        cf.connect(rdwr={'on-connect': on_connect})
      
    notify('終わります')


if __name__ == "__main__":
    main()

 
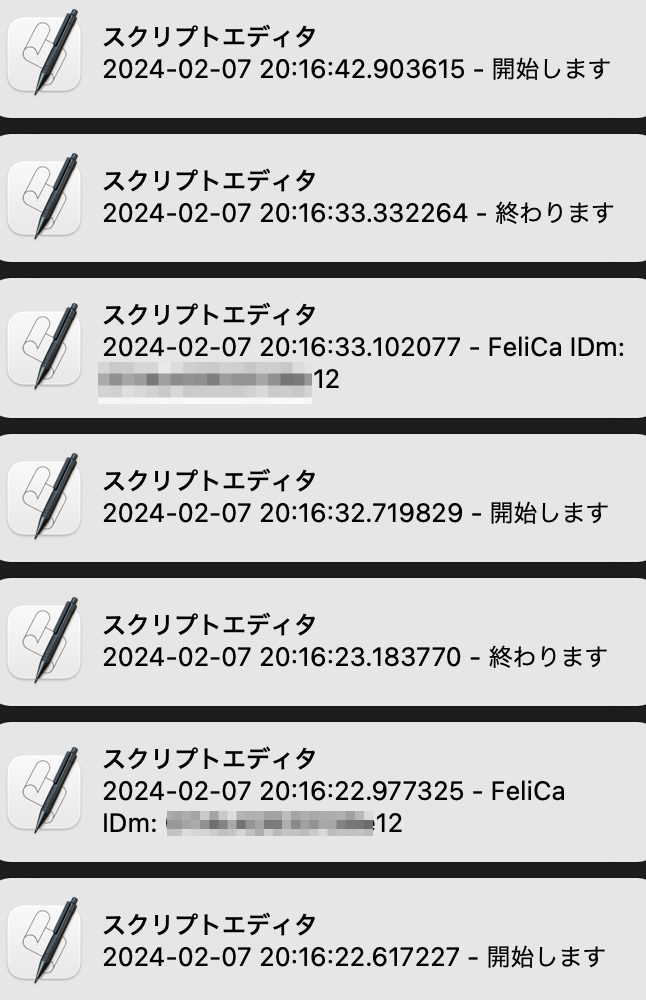
このPythonスクリプトを実行後にFeliCaを読ませたころ、macの通知センターへと出力されました。


macのlaunchdを使って、mac起動後にFeliCaの読み込みを待機する

以前のRaspberry Pi 2では、systemd を使って起動後にFeliCaの読み込みを待機していました。

それと同じことができないか調べたところ、macの場合は launchd を使えば良さそうでした。

 
そこで今回は

という仕様で plist ファイルを作ってみます。

ちなみに、 plist ファイルの各設定については、以下のページが詳しいです。
A launchd Tutorial

 
今回は ~/Library/LaunchAgents/main_py.plist として、以下のファイルを作成しました。

なお、ファイル内の /Users/<Users>/path/to は、ログインユーザのディレクトリの下にある main.py ファイルが存在するディレクトリを指しています。

<?xml version="1.0" encoding="UTF-8"?>
<!DOCTYPE plist PUBLIC "-//Apple//DTD PLIST 1.0//EN" "http://www.apple.com/DTDs/PropertyList-1.0.dtd">
<plist version="1.0">
<dict>
    <key>Label</key>
    <string>NfcReader</string>
    <key>ProgramArguments</key>
    <array>
        <string>/Users/<Users>/.anyenv/envs/pyenv/shims/python</string>
        <string>/Users/<Users>/path/to/main.py</string>
    </array>
    
    <key>KeepAlive</key>
    <true />

    <key>WorkingDirectory</key>
    <string>/Users/<Users>/path/to</string>
</dict>
</plist>

 
続いて、 plist ファイルをロードします。

% launchctl load ~/Library/LaunchAgents/main_py.plist

 
準備ができたので動作確認です。

macと接続したPaSoRi RC-S380の上にFeliCaを置き続けたところ、通知センターへ複数回通知されました。


資料:launchd の設定例

Pythonを使って、BOOTHで販売している英辞郎のテキストデータをMDict化し、BOOX Leaf2 の辞書に登録してみた

去年くらいから、 E-Inkディスプレイ搭載のAndroid端末 BOOX Leaf2 で、KindleO’Reillyアプリの電子書籍を読んでいます*1
BOOX Leaf2 – SKT株式会社

普通のAndroidタブレット電子書籍を読むのに比べたら、 Leaf2 は目はあまり疲れない感じです。

また、KindleO’Reillyアプリは起動時がややもっさりしますが、一度起動してしまえばそこまでのストレスはありません。

 
ところで、O’Reillyアプリでは洋書も読んでいるものの、「この単語は何だっけ...?」となることがよくあります。

Leaf2 に辞書機能はあるものの、その中には英和辞書がありません。

辞書を追加する方法がないか調べたところ、BOOXのヘルプページに以下の記載がありました。

To add a dictionary to your device, do the following:

  1. Search and download the dictionary files on your computer.
  2. Unzip the downloaded files and put them in a folder.
  3. Sideload the folder to the "dicts" folder in the root directory of your device.
  4. In Home Screen, go to Apps and open the Dictionary app.
  5. Tap the hamburger menu in the upper right corner.
  6. Choose Preferred Dictionary Setting and tick to add the dictionary.

 
https://help.boox.com/hc/en-us/articles/10701464167316-Translation-and-Dictionary

 
また、Leaf2の辞書アプリにも、辞書を追加できそうな記載がありました。

Tips


  1. StarDict、MDict、Deep Blue Dictionary、Babylonおよび他の辞書ファイル形式をサポートします
  2. デフォルトの保存場所: storage/dicts/、または外部ストレージ/dicts/
  3. 各辞書ファイルは、zipやサブフォルダを含まないフォルダに保存する必要があります

 
さらにWebを調べてみると、BOOXの別の端末に英和辞書を追加している記事がありました。
boox noteのPDFリーダに英和辞書を追加する - 工学おじさんのブログ

また、同じ著者で、Pythonを使って英辞郎のテキストデータをMDict形式にして、BOOXの端末に入れている記事もありました(以降、 参考記事 と表記します)。
英辞郎をMDict形式へ変換する - 工学おじさんのブログ

「参考記事に従えば英和辞書を追加できるかも」と感じたため、次に英辞郎のデータが販売されていないか調べたところ、BOOTHにありました。
英辞郎 Ver.144.9(2024年1月10日版)のテキストデータ - EDP - BOOTH

このBOOTHサイトへは英辞郎公式サイトからもリンクがあり、公式で提供しているデータのようでした。
英辞郎(えいじろう・EIJIRO)の最新情報

 
そこで、英辞郎のテキストデータからBOOX Leaf2向けの和英辞書を作ってみたので、メモを残します。

 
目次


環境

  • Python 3.12.1
  • WSL2
  • 英辞郎 Ver.144.9(2024年1月10日版)のテキストデータ


英辞郎のテキストデータを購入

以下のBOOTHページより、テキストデータを購入しました。
英辞郎 Ver.144.9(2024年1月10日版)のテキストデータ - EDP - BOOTH

購入後、zipファイルをダウンロードしておきます。

ちなみに、BOOTHに書かれていたファイル情報は以下の通りです。

●この圧縮ファイル(EIJIRO-1449.ZIP)(サイズ=48,595,404 バイト)をダウンロードして、ZIPを用いて展開すると、以下のテキストファイルが復元されます。

 
ファイル名: EIJIRO-1449.TXT

サイズ: 152,940,714バイト

論理行数: 2,575,101

改行コード: CR+LF

日本語文字コード: Shift JIS


ツール類の調査

テキストファイルをMDict化するライブラリ writemdict を確認

参考記事では、以下のライブラリを使って英辞郎のテキストデータをMDict化していました。
zhansliu/writemdict: A library for writing dictionary files in the MDict (.mdx) format

 
リポジトリを見たところ

という状態でした。

 
また、参考記事では

Clone or download→Download ZIPでダウンロード&解凍をお願いします。

と書かれていました。手動で使うことを前提にしたライブラリのようです。

そのため、変換処理を自動化するPythonスクリプトwritemdict を import して使うのは厳しそうでした。


MDictフォーマットに変換できるライブラリを調査

続いて、MDictをフォーマットに変換できるライブラリを調査してみました。

 
まずは mdict-utils です。
liuyug/mdict-utils: MDict pack/unpack/list/info tool

starがそこそこあり、「MDict pack/unpack tool」と書かれていることから期待が持てました。

ただ、実際に使ってみると

  • MDictへの変換については、writemdict.py を取り込んでいる
  • ただ、 writemdict.py は拡張されており、単に差し替えただけでは動作しなかった
  • READMEのUsageを見ると、ライブラリというよりはツールの雰囲気
    • mdict コマンドの実行例しか記載されていないため

と、使いこなすのには時間がかかりそうでした。

 
次は pyglossary を見てみます。
ilius/pyglossary: A tool for converting dictionary files aka glossaries. Mainly to help use our offline glossaries in any Open Source dictionary we like on any modern operating system / device.

ただ、READMEによると、MDictファイルへの書き込みには対応していないようでした。

 
他にはPythonでMDictを扱えるようなライブラリは見当たりませんでした。


MDictフォーマットについて調査

そもそもMDictフォーマットとは何か分かってなかったので調べたところ、2016年時点の記事がありました。辞書のフォーマットは非公開のようです。
EBWin EBPocket のMDict対応検討 - hishidaの開発blog

次に、MDictの公式サイトを見に行きました。
https://www.mdict.cn/wp/?page_id=5325&lang=en

ただ、アプリはあるものの、ソースコードやファイルフォーマットが公開されていませんでした。

 
これらより、MDictのライブラリを自作するのも容易ではなさそうと感じました。


StarDictについて調査

ところで、Leaf2 がサポートしている辞書は、前述の通り

  • StarDict
  • MDict
  • Deep Blue Dictionary
  • Babylon
  • その他

のようです。

このうち、 Deep Blue DictionaryBabylon は調べてみても出てきませんでした。

一方、 StarDict については、いくつかの記事でふれられていたので、少し調べてみることにしました。

 
まず、以下のサイトでは、英辞郎をStarDict形式に変換するスクリプトが公開されていました。
英辞郎をStarDict形式に直接変換するスクリプト「eiji2sd」 - 実録コンピュータ物語

ただ、言語が PowerShellPerl のようで、そのまま使うのは難しそうでした。

 
次に、Pythonpenelope パッケージを使うことで StarDict 形式にも対応できそうな記事がありました。
フリーの辞書をKindle用辞書に変換: ドイツ語の本読んでみ・・

そこで、 penelope を見に行くと 2018年にアーカイブされていました。
pettarin/penelope: Penelope is a multi-tool for creating, editing and converting dictionaries, especially for eReader devices

READMEにはImportant Updateが記載されており、「メンテナンスされていないこと」や「PyGlossaryが使えるかもしれないこと」が記載されていました。

そのため、 penelope を使うのは厳しそうでした。

 
最後に、StarDict形式については規格の行方が厳しそうな話もありました。
StarDict 計画 進捗(2) - hishidaの開発blog

そのため、StarDictでなんとかする方向はやめておきました。


英辞郎のテキストファイルをMDict化するライブラリ eiji_to_mdict.py を確認

ありがたいことに、参考記事ではMDict化するライブラリ eiji_to_mdict.pyソースコードがGistで公開されていました。
英辞郎をMDict形式に変換します。

ただ、参考記事にもあるように、 writemdictディレクトリの中に入れて使う想定で作られています。

そのため、importした時に処理が走ってしまうことから、これも別のPythonスクリプトimport して使うのは厳しそうでした。


実装方針:両ライブラリをfork・修正する

ここまでの調査で

  • 参考記事にある両ライブラリを import して、そのまま使うのは厳しい
  • 容易な代替案もない

ということが分かりました。

 
そのため、方針案としては

  • 参考記事にあるように、Python 3系の古いバージョンをインストールし、手動で実行
  • 両ライブラリをforkして修正を加え、ある程度自動で変換できるようにする

あたりを考えました。

ただ、辞書の更新を考えると、なるべく自動でMDict化したくなりました。

 
そこで、後者の案をもとにした

  • writemdict をforkし、pip installできるように修正
  • eiji_to_mdict をforkし、英辞郎をMDict化するコマンド eiji_to_mdict を用意

という方針で進めることにしました。

 
ちなみに、英辞郎のデータ仕様は公開されているため、多少修正を加えても仕様を満たしていれば問題なく動作しそうです。
英辞郎の紹介:データ仕様

 
以降では、修正作業を行っていきます。


writemdict をforkして修正

writemdict に対しては

  • 自分のGithubアカウントへforkする
  • ブランチ feature/python_package にて、必要な修正を実施する

という流れで作業します。

なお、fork元がアクティブでないことから、自分のリポジトリでは、ブランチ feature/python_packagemaster へマージせずに置いておきます。


廃止される cgi.escape を html.escape へ差し替える

cgi.escape の代わりになるモジュールを探したところ、PythonWikiに以下の記載がありました。

The cgi module that comes with Python has an escape() function:

However, it doesn't escape characters beyond &, <, and >. If it is used as cgi.escape(string_to_escape, quote=True), it also escapes ".

Recent Python 3.2 have html module with html.escape() and html.unescape() functions. html.escape() differs from cgi.escape() by its defaults to quote=True:


https://wiki.python.org/moin/EscapingHtml

 
両者ではエスケープするときの挙動がほんの少しだけ異なるようです。

ただ、PyCQA/banditのプルリクでもそのまま置き換えている感じだったので、今回の用途でもそのまま置き換えてしまっても良さそうでした。
Use html.escape() instead of cgi.escape() by ericwb · Pull Request #339 · PyCQA/bandit


pip installできるよう、writemdictディレクトリの作成とpyproject.tomlを用意

pip installを可能にするため、最低限の定義を pyproject.toml に記載します。

また、Pythonのパッケージとして扱えるよう

とします。

 
ただ、 writemdictリポジトリでは、ルートディレクトリに example_output というディレクトリがありました。

このままだと

  • writemdict
  • example_output

の2つのディレクトリがルートディレクトリに並んでしまい、pip installする時に失敗してしまいます。

そこで、

you can explicitly list the packages in modules:

[tool.setuptools]
packages = ["my_package"]


Configuring setuptools using pyproject.toml files - setuptools 69.0.3.post20240124 documentation

とあるように、 [tool.setuptools] テーブルの packages を利用して、 writemdict がパッケージ向けであることを明示化します。

 
上記を踏まえた pyproject.toml は以下となりました。

[project]
name = "writemdict"
version = "0.1"
requires-python = ">=3.12"
license = {file = "LICENSE"}

[tool.setuptools]
packages = ["writemdict"]


writemdict.pyでのimportを相対importにする

writemdict.py の冒頭で ripemd128pureSalsa20

from ripemd128 import ripemd128
from pureSalsa20 import Salsa20

としてimportされているため、パッケージ化したときにこのままではうまく動きませんでした。

 
そこで、 . をつけて相対importできるようにしました。

from .ripemd128 import ripemd128
from .pureSalsa20 import Salsa20


eiji_to_mdict をforkして修正

eiji_to_mdict.py はGistにあるので、fork後、Githubリポジトリを作成しました。

今回の修正方針は以下としました。

 
以降では、やったことを簡単なメモに残しておきます。

実装の詳細は、リポジトリにあるソースコードを参照してください。
https://github.com/thinkAmi/eiji_to_mdict


pyproject.tomlの作成

ここでも pyproject.toml は必要最低限の定義とします。


依存ライブラリを dependencies に指定する

今回作成する eiji_to_mdict を実行する場合、forkした writemdict が必要になります。

そこで、 pyproject.toml の dependencies に、forkした writemdict をパッケージ化したブランチを指定しておきます。
Install dependencies from GitHub with pyproject.toml or requirements.txt — Chris Holdgraf

これにより pip install eiji_to_mdict した際に、合わせて writemdict もインストールされるようになります。


eiji_to_mdict コマンドを使えるよう、project.scripts テーブルを定義する

前回の記事に書いた通り、 [project.scripts] テーブルを用意することで、コマンドを使えるようにします。
Pythonで、実行時のmオプションやpyproject.toml の project.scripts の指定による、実行可能なライブラリを作ってみた - メモ的な思考的な


pyproject.toml の全体像

[project]
name = "eiji_to_mdict"
version = "0.1"
requires-python = ">=3.12"
dependencies = [
  "writemdict@git+https://github.com/thinkAmi/writemdict@feature/python_package",
]


[project.scripts]
eiji_to_mdict = "eiji_to_mdict:main"


元々のソースコードの修正

作業としては

  • 変換ロジックまわりは eiji_to_mdict.py ファイルに移動する
  • その他の処理は main.py ファイルに書く

となります。


変換ロジックまわり

元々のソースコードでは、ファイルを1行ずつ読み込み変換していました。

そこで、関数 update_dicts を用意して、その部分を移植しました。

なお、副作用には目をつぶり、引数の dict を更新するようにしています。


その他の処理の実装

コマンドの引数としてzipファイル名を受け取る方法について

元々は sys.argv を使っていましたが、今回は argparser を使いました。

 
最近だと click が便利なようですが、今回は標準ライブラリだけにしたかったので、使いませんでした。
Welcome to Click — Click Documentation (8.2.x)


ファイルの存在チェックについて

いちおうバリデーションしておこうということで、 pathlib を使ってファイルの存在チェックを行いました。
https://docs.python.org/ja/3/library/pathlib.html#pathlib.Path.exists


zipファイルの扱いについて

標準ライブラリの zipfile ではzipアーカイブをいい感じに処理できます。
https://docs.python.org/ja/3/library/zipfile.html

今回はここらへんを使いました。

 
また、 ZipFile.open() のコンテキストマネージャで取得したファイルライクオブジェクトは、 io.TextIOWrapper でいい感じに扱えます。

そのため、zipファイルまわりはこんな感じになります。

with zipfile.ZipFile(path) as zf:
    originalFileName = zf.namelist()[0]
    
    with zf.open(originalFileName) as tf:
        for line in io.TextIOWrapper(tf, encoding='Shift-JIS', errors='ignore'):
            update_dicts(line, d, idiom)


動作確認

ここまでで実装が終わったので、WSL2上で動作確認します。


英辞郎のテキストデータをMDict形式に変換するところまで

eiji_to_mdict コマンドにてMDictファイルが作成されているかを確認します。

$ python --version
Python 3.12.1

$ python -m venv env
$ source env/bin/activate

(env) $ python -m pip install -e .

# Windowsのダウンロードディレクトリにあったので、コピーする
(env) $ cp /mnt/c/Users/<UserName>/Downloads/EIJIRO-1449.zip .


# 実行
## デバッグ用のコードが入っているので、それも出力される
$ eiji_to_mdict EIJIRO-1449.zip
<副> 内部で、内側は
...
処理を終了します


# mdxファイル化できたことを確認
$ ls
EIJIRO-1449.zip  eijidiom.mdx  eijiro.mdx ...


BOOX Leaf2 で辞書を設定して確認

今回作成した単語辞書(eijiro.mdx)と熟語辞書(eijidiom.mdx)を、Leaf2の辞書に設定し、O’Reillyアプリで使ってみます。

 
まずは、Windows側に両ファイルをコピーします。

$ cp eijiro.mdx /mnt/c/Users/<UserName>/Downloads/
$ cp eijidiom.mdx /mnt/c/Users/<UserName>/Downloads/

 
続いて、Leaf2に辞書ファイルを転送するため、Leaf2の BooxDrop アプリを使います。
Transfer with Your Computer – BOOX Help Center

転送先として Internal Storage > dicts を開きます。

次に

の2つのディレクトリを作成し、その中に各ファイルを転送します。

 
転送が終わったら辞書アプリを起動し、優先する辞書を設定します。
Translation and Dictionary – BOOX Help Center

  1. 右上のハンバーガーメニューをタップ
  2. 優先辞書設定をタップ
  3. EijiroEijideom チェックを入れる
  4. 辞書アプリを閉じる

 
最後に、O’Reillyアプリを起動して動作確認します。

単語を選択、 辞書 をタップすると翻訳が表示されました。

やや表示が崩れてそうな気もしますが、実用上は問題なさそうです。


ソースコード

Githubに上げました。
https://github.com/thinkAmi/eiji_to_mdict

今回のプルリクはこちら。
https://github.com/thinkAmi/eiji_to_mdict/pull/1

*1:現在では後継のBOOX Pageが販売中のようです: https://sktgroup.co.jp/boox-page/

Pythonで、実行時のmオプションやpyproject.toml の project.scripts の指定による、実行可能なライブラリを作ってみた

Pythonで自作ライブラリを作った時に

  • python -m <パッケージ名>
    • 例: $ python -m hello
  • <ライブラリで指定したコマンド名>
    • 例: $ hello

のような形でライブラリを実行したくなりました。

そこで、どんなふうにすればよいか試してみたので、メモを残します。

 
目次


環境

 
なお、今回は pyproject.toml を利用して、 pip install 可能なライブラリを作成します。


自作ライブラリの作成

実装

今回のライブラリはこんな感じの構造とします。

.
├── pyproject.toml
└── runnable_script
    ├── __init__.py
    └── myscript.py

 
まず最初に、 pyproject.toml を用意します。

今回は pip install さえできれば良いので、最低限の定義にしておきます。

[project]
name = "runnable_script"
version = "1.0"


次に、 runnable_script ディレクトリの中に、各ファイルを用意します。

__init__.py は、現時点では空ファイルにします。

また、 myscript.pyhello 関数を定義しておきます。

def hello():
  print('hello')

 
以上で、ライブラリが完成しました。


動作確認

まず、自作ライブラリを -e オプションによる開発モードで pip install します。
ローカルのソースツリーからインストールする | パッケージをインストールする - Python Packaging User Guide

$ python -m pip install -e .
...
Successfully built runnable_script
Installing collected packages: runnable_script
Successfully installed runnable_script-1.0

 
続いて、インストール状況を確認します。良さそうです。

$ python -m pip list
Package         Version Editable project location
--------------- ------- ------------------------------------------------------------
pip             23.2.1
runnable_script 1.0     path/to/runnable_script

 
最後に、自作ライブラリをimportして使ってみたところ、問題なく動きました。

$ python -c "from runnable_script import myscript; myscript.hello()"
hello


実行時の mオプションで実行可能なライブラリにする

現時点では python -m runnable_script で実行できないため、これに対応していきます。

$ python -m runnable_script
path/to/runnable_script/env/bin/python: No module named runnable_script.__main__; 'runnable_script' is a package and cannot be directly executed

 
m オプションで実行可能にするため、runnable_script ディレクトリの中に __main__.py を用意します。

 
今回は、 hello 関数を import して使うだけとします。

# runnable_script/__main__.py
from .myscript import hello

if __name__ == '__main__':
  hello()

 
以上で、 m オプションへの対応は完了です。

再度実行してみると、 hello 関数の結果が表示されました。

$ python -m runnable_script
hello


pyproject.toml の project.scripts に指定したコマンドで実行可能にする

続いて、「パッケージをインストールすれば、指定したコマンドが利用可能になる」を実現します。

今回、 hello コマンドを使いたいのですが、現時点ではエラーになります。

$ hello
Traceback (most recent call last):
  File "path/to/runnable_script/env/bin/hello", line 5, in <module>
    from runnable_script import hello
ImportError: cannot import name 'hello' from 'runnable_script' (path/to/runnable_script/env/lib/python3.12/site-packages/runnable_script/__init__.py)

 
では、 hello コマンドを利用可能にしていきます。

まずは、 pyproject.toml[project.scripts] テーブルを追加します。

 
今回必要な定義は

  • 左辺はコマンド名
    • 今回は hello
  • 右辺はコマンドが実行された時に起動する関数など
    • 今回は runnable_script パッケージの hello 関数

なことから、 hello = "runnable_script:hello" を設定します。

[project]
name = "runnable_script"
version = "1.0"

# 以下を追加
[project.scripts]
hello = "runnable_script:hello"

 
次に、runnable_scripthello 関数が使えるよう、 __init__.pyimport を追加します。
Python の __init__.py とは何なのか #Python - Qiita

from .myscript import hello

 
以上で対応は完了です。

 
続いて動作確認です。

再度 hello コマンドを実行したところ、import した hello 関数が実行されました。

$ hello
hello


ソースコード

Githubに上げました。
https://github.com/thinkAmi-sandbox/runnable_script_with_python_package

プルリクはこちら。
https://github.com/thinkAmi-sandbox/runnable_script_with_python_package/pull/1

Railsにて、ActiveSupport::TaggedLoggingやActiveSupport::ErrorReporterを使って、Request-IDをログへ出力してみた

Railsをproductionモードで動かしている時、ログに

I, [*** #237177]  INFO -- : [95c95a65-608b-45d3-aa02-bcf61950e7c2] Completed 204 No Content in 1ms

と、 [95c95a65-608b-45d3-aa02-bcf61950e7c2] のようなHTTPリクエストを識別できるようなタグがついていることに気づきました。

一方、developmentモードで動かしている時はそのようなタグが見当たりません。

この違いがどこにあるのか気になったので、調べてみた時のメモを残します。

 
目次


環境

 
なお、今回は

$ bundle exec rails new rails_request_id --minimal --skip-bundle
$ cd rails_request_id/
$ bundle install

にて作成したRailsアプリを元に調査・実装していきます。


development環境でも、Request-IDをログへ出力する

調査

developmentとproductionの設定をファイルを見比べたところ、 config/environments/production.rb に以下の設定がありました。

# Log to STDOUT by default
config.logger = ActiveSupport::Logger.new(STDOUT)
  .tap  { |logger| logger.formatter = ::Logger::Formatter.new }
  .then { |logger| ActiveSupport::TaggedLogging.new(logger) }

# Prepend all log lines with the following tags.
config.log_tags = [ :request_id ]

 
Railsガイドには、それぞれ以下の説明がありました。

config.log_tags について

3.2.44 config.log_tags

「requestオブジェクトが応答するメソッド」「requestオブジェクトを受け取るProc」または「to_sに応答できるオブジェクト」のリストを引数に取ります。これは、ログの行にデバッグ情報をタグ付けする場合に便利です。たとえばサブドメインやリクエストidを指定可能で、これらはマルチユーザーのproductionアプリケーションのデバッグで非常に有用です。

 
3.2.44 config.log_tags | Rails アプリケーションの設定項目 - Railsガイド

 
config.logger について

3.2.45 config.logger

タグ付きログをサポートする場合は、そのログのインスタンスActiveSupport::TaggedLoggingでラップしなければなりません。

 
3.2.45 config.logger | Rails アプリケーションの設定項目 - Railsガイド

 
これらより、productionモードでは

  • config.log_tags
  • config.logger

の2つが設定されているために、Request-IDが出力されたと考えました。


実装

それでは実際にためしてみます。

まずは、 config/environments/development.rb の末尾に、productionの設定を移植します。

# from production
# Log to STDOUT by default
config.logger = ActiveSupport::Logger.new(STDOUT)
  .tap  { |logger| logger.formatter = ::Logger::Formatter.new }
  .then { |logger| ActiveSupport::TaggedLogging.new(logger) }

# Prepend all log lines with the following tags.
config.log_tags = [ :request_id ]

 
続いて、コントローラーを作成します。

class PollsController < ApplicationController
  def index
  end
end

 
最後に config/routes.rb にルーティングを定義します。

今回は単に動作確認したいだけなので、リソースベースルーティングにはしません。
(なお、以降で掲載する実装では、routes.rbの実装は省略しています)

Rails.application.routes.draw do
  get "polls" => "polls#index"
end

 
以上で実装は完了です。


動作確認

今回は curl を使って動作確認します。


HTTPリクエストヘッダにX-Request-IDがない場合

Railsを起動し、

$ curl http://localhost:3000/polls

を実行すると、以下のログが出力されました。

RailsがRequest-IDを生成し、ログへ出力したようです。

I, [2024-01-04T14:55:00.279164 #237177]  INFO -- : [657269a2-2de5-4cdb-a861-cde782e0b09d] Started GET "/polls" for 127.0.0.1 at 2024-01-04 14:55:00 +0900
...
I, [2024-01-04T14:55:00.346282 #237177]  INFO -- : [657269a2-2de5-4cdb-a861-cde782e0b09d] Completed 200 OK in 63ms (Views: 61.4ms | ActiveRecord: 0.0ms | Allocations: 3977)


HTTPリクエストヘッダにX-Request-IDがある場合

続いて、curlでHTTPリクエストヘッダに X-Request-ID を追加してみます。

$ curl -H 'X-Request-ID:123abc' http://localhost:3000/polls

 
すると、curlで渡したHTTPヘッダ X-Request-ID の値がログに出力されました。

I, [2024-01-04T14:57:16.479859 #237177]  INFO -- : [123abc] Started GET "/polls" for 127.0.0.1 at 2024-01-04 14:57:16 +0900
...
I, [2024-01-04T14:57:16.485114 #237177]  INFO -- : [123abc] Completed 200 OK in 3ms (Views: 3.1ms | ActiveRecord: 0.0ms | Allocations: 1096)


開発者向けのエラーメッセージでも、Request-IDとbacktraceをログへ出力する

ここまでで、Request-IDが付与されることでログをトレースできるようになりました。

ただ、「処理を止めるまでもない例外が出たので、開発者向けにはログを出力し、例外自体は握りつぶして正常終了させる」という場合、以下の記事の通り TaggedLogging では backtrace を取得できません。
RailsのCurrentAttributesを使ってX-Request-IDでnginx(Webサーバ)とunicorn(アプリサーバ)のログを追えるようにする方法 - R-Hack(楽天グループ株式会社)


TaggedLogging で開発者向けのログを出力してみた時の様子

では、実際にログへ何が出力されるかをためしてみます。

今回は動作確認が目的なので、コントローラで例外を握りつぶし、例外オブジェクトを logger に渡してみます。

class PollsController < ApplicationController
  def logging_with_exception_object
    raise 'error!'
  rescue StandardError => e
    logger.error(e)
  end

 
curlで動作確認します。

$ curl http://localhost:3000/polls/logging_with_exception_object

 
すると、ログにはエラーメッセージ error! のみ記録されました。ログにbacktraceが含まれないことから、例外を握りつぶした時の状況を追うのは大変そうです。

I, [2024-01-05T09:48:50.410898 #264090]  INFO -- : [9f2b9d25-8d77-487c-b932-1741cd3b1b54] Started GET "/polls/logging_with_exception_object" for 127.0.0.1 at 2024-01-05 09:48:50 +0900
D, [2024-01-05T09:48:50.450455 #264090] DEBUG -- : [9f2b9d25-8d77-487c-b932-1741cd3b1b54]   ActiveRecord::SchemaMigration Load (0.2ms)  SELECT "schema_migrations"."version" FROM "schema_migrations" ORDER BY "schema_migrations"."version" ASC
I, [2024-01-05T09:48:50.471630 #264090]  INFO -- : [9f2b9d25-8d77-487c-b932-1741cd3b1b54] Processing by PollsController#logging_with_exception_object as */*

# 例外を握りつぶしたところで出力したログ
E, [2024-01-05T09:48:50.471945 #264090] ERROR -- : [9f2b9d25-8d77-487c-b932-1741cd3b1b54] error!

I, [2024-01-05T09:48:50.474279 #264090]  INFO -- : [9f2b9d25-8d77-487c-b932-1741cd3b1b54] No template found for PollsController#logging_with_exception_object, rendering head :no_content
I, [2024-01-05T09:48:50.474505 #264090]  INFO -- : [9f2b9d25-8d77-487c-b932-1741cd3b1b54] Completed 204 No Content in 3ms (ActiveRecord: 0.0ms | Allocations: 960)


例外オブジェクトそのものを渡す代わりに、loggerへ例外オブジェクトの各属性を渡してみる

例外オブジェクトを渡すとメッセージのみログに出力されます。

では、loggerへ例外オブジェクトの各属性を渡してみるとどうなるか確認します。


実装

今回は

  • class
  • message
  • backtrace

を渡してみます。

なお、backtraceは文字列の配列になっているため、改行文字で結合しています。

class PollsController < ApplicationController
  def logging_with_backtrace
    raise 'error!!'
  rescue StandardError => e
    logger.error(e.class)
    logger.error(e.message)
    logger.error(e.backtrace.join("\n"))
  end


動作確認

curlで動作確認します。

$ curl http://localhost:3000/polls/logging_with
_backtrace

 
ログを確認すると、各属性が出力されていました。backtraceも確認できました。

I, [2024-01-05T10:06:02.321388 #264090]  INFO -- : [e2f5733f-aeb3-4a3f-9f73-1a51a6abadcb] Started GET "/polls/logging_with_backtrace" for 127.0.0.1 at 2024-01-05 10:06:02 +0900
I, [2024-01-05T10:06:02.322953 #264090]  INFO -- : [e2f5733f-aeb3-4a3f-9f73-1a51a6abadcb] Processing by PollsController#logging_with_backtrace as */*
E, [2024-01-05T10:06:02.323211 #264090] ERROR -- : [e2f5733f-aeb3-4a3f-9f73-1a51a6abadcb] RuntimeError
E, [2024-01-05T10:06:02.323245 #264090] ERROR -- : [e2f5733f-aeb3-4a3f-9f73-1a51a6abadcb] error!!
E, [2024-01-05T10:06:02.323418 #264090] ERROR -- : [e2f5733f-aeb3-4a3f-9f73-1a51a6abadcb] path/to/app/controllers/polls_controller.rb:12:in `logging_with_backtrace'
path/to/vendor/bundle/ruby/3.2.0/gems/actionpack-7.1.2/lib/action_controller/metal/basic_implicit_render.rb:6:in `send_action'
...
path/to/vendor/bundle/ruby/3.2.0/gems/puma-6.4.1/lib/puma/thread_pool.rb:155:in `block in spawn_thread'
I, [2024-01-05T10:06:02.323782 #264090]  INFO -- : [e2f5733f-aeb3-4a3f-9f73-1a51a6abadcb] No template found for PollsController#logging_with_backtrace, rendering head :no_content


ActiveSupport::ErrorReporterを使ってみる

上記の方法で backtrace を取得できましたが、毎回同じようなコードを書くのは手間です。

backtraceを取得する対応として、前述の記事では CurrentAttributes + formatter を使っていました。

ただ、他に方法がないかを調べたところ、Kaigi on Rails 2023 の発表「Exceptional Rails」で紹介されていた ActiveSupport::ErrorReporter が使えそうでした。

 
そこで、今回は ActiveSupport::ErrorReporter による実装をためしてみます。


実装

コントローラでは、例外が発生したらエラーレポートサービスへ通知し、例外自体は握りつぶすよう実装します。

class PollsController < ApplicationController
  def logging_with_error_subscriber
    Rails.error.handle(StandardError) do
      raise 'error!!!!'
    end
  end
end

 
続いて、サブスクライバを作成・登録します。

今回はRailsガイドに従い、 config/initializers/error_subscriber.rb に実装していきます。

また、サブスクライバのreportメソッドの引数 context には

context: リクエストやユーザーの詳細など、エラーに関する詳細なコンテキストを提供するHash。

1.3 エラー通知のオプション | Rails アプリケーションのエラー通知 - Railsガイド

とあるように、requestオブジェクトも含まれています。

そこで、headerから Request-ID を取得し、ログにも出力してみます。

 
ファイルの全体は以下の通りです。

# サブスクライバを定義
class ErrorSubscriber
  def report(error, handled:, severity:, context:, source: nil)
    Rails.logger.error(error.class)
    
    # Request-ID を取得してログへ出力する
    request_id = context[:controller].request.headers.env['action_dispatch.request_id']
    Rails.logger.error(request_id)
    
    Rails.logger.error(error.message)
    Rails.logger.error(error.backtrace.join("\n"))
  end
end

# サブスクライバを登録
Rails.error.subscribe(ErrorSubscriber.new)


動作確認

curlで動作確認します。今回はHTTPリクエストヘッダごとの挙動を確認してみます。


HTTPリクエストヘッダにX-Request-IDがない場合

curlを実行します。

$ curl http://localhost:3000/polls/logging_with_error_subscriber

 
ログを確認すると、backtraceやRailsの生成したRequest-IDが出力されていました。

I, [2024-01-05T10:37:14.731778 #264090]  INFO -- : [db74caa8-8bf3-4278-8463-4b8102eee967] Started GET "/polls/logging_with_error_subscriber" for 127.0.0.1 at 2024-01-05 10:37:14 +0900
I, [2024-01-05T10:37:14.733008 #264090]  INFO -- : [db74caa8-8bf3-4278-8463-4b8102eee967] Processing by PollsController#logging_with_error_subscriber as */*
E, [2024-01-05T10:37:14.733391 #264090] ERROR -- : [db74caa8-8bf3-4278-8463-4b8102eee967] RuntimeError
E, [2024-01-05T10:37:14.733435 #264090] ERROR -- : [db74caa8-8bf3-4278-8463-4b8102eee967] db74caa8-8bf3-4278-8463-4b8102eee967
E, [2024-01-05T10:37:14.733466 #264090] ERROR -- : [db74caa8-8bf3-4278-8463-4b8102eee967] error!!!!
E, [2024-01-05T10:37:14.733661 #264090] ERROR -- : [db74caa8-8bf3-4278-8463-4b8102eee967] path/to/app/controllers/polls_controller.rb:21:in `block in logging_with_error_subscriber'
path/to/vendor/bundle/ruby/3.2.0/gems/activesupport-7.1.2/lib/active_support/error_reporter.rb:76:in `handle'
...
path/to/vendor/bundle/ruby/3.2.0/gems/puma-6.4.1/lib/puma/thread_pool.rb:155:in `block in spawn_thread'
I, [2024-01-05T10:37:14.734010 #264090]  INFO -- : [db74caa8-8bf3-4278-8463-4b8102eee967] No template found for PollsController#logging_with_error_subscriber, rendering head :no_content
I, [2024-01-05T10:37:14.734128 #264090]  INFO -- : [db74caa8-8bf3-4278-8463-4b8102eee967] Completed 204 No Content in 1ms (ActiveRecord: 0.0ms | Allocations: 189)


HTTPリクエストヘッダにX-Request-IDがある場合

curlを実行します。

$ curl -H 'X-Request-ID:123abc' http://localhost:3000/polls/logging_with_error_subscriber

 
ログを確認すると、backtraceやcurlで渡したRequest-IDが出力されていました。

I, [2024-01-05T10:34:00.030751 #264090]  INFO -- : [123abc] Started GET "/polls/logging_with_error_subscriber" for 127.0.0.1 at 2024-01-05 10:34:00 +0900
I, [2024-01-05T10:34:00.031771 #264090]  INFO -- : [123abc] Processing by PollsController#logging_with_error_subscriber as */*
E, [2024-01-05T10:34:00.032011 #264090] ERROR -- : [123abc] RuntimeError
E, [2024-01-05T10:34:00.032066 #264090] ERROR -- : [123abc] 123abc
E, [2024-01-05T10:34:00.032100 #264090] ERROR -- : [123abc] error!!!!
E, [2024-01-05T10:34:00.032221 #264090] ERROR -- : [123abc] path/to/app/controllers/polls_controller.rb:21:in `block in logging_with_error_subscriber'
path/to/vendor/bundle/ruby/3.2.0/gems/activesupport-7.1.2/lib/active_support/error_reporter.rb:76:in `handle'
...
path/to/vendor/bundle/ruby/3.2.0/gems/puma-6.4.1/lib/puma/thread_pool.rb:155:in `block in spawn_thread'
I, [2024-01-05T10:34:00.032553 #264090]  INFO -- : [123abc] No template found for PollsController#logging_with_error_subscriber, rendering head :no_content
I, [2024-01-05T10:34:00.032670 #264090]  INFO -- : [123abc] Completed 204 No Content in 1ms (ActiveRecord: 0.0ms | Allocations: 248)

 
以上より、ActiveSupport::ErrorReporterを使っても、Request-IDをログへ出力することができました。


その他、RailsとRequest-ID・ロギングに関する参考資料


ソースコード

Githubにあげました。
https://github.com/thinkAmi-sandbox/rails_logging_request_id_with_error_reporter-example

今回のプルリクはこちら。
https://github.com/thinkAmi-sandbox/rails_logging_request_id_with_error_reporter-example/pull/1