以前、OpenID Connect によるシングルサインオン環境を構築しました。
Railsとdoorkeeper-openid_connectやOmniAuth を使って、OpenID Connectの OpenID Provider と Relying Party を作ってみた - メモ的な思考的な
OpenID Connect以外でシングルサインオン環境を構築する方法として SAML がありますが、今までさわってきませんでした。
そんな中、書籍「SAML入門」を読む機会がありました。
書籍では
などが分かりやすく記載されており、とてもためになりました。ありがとうございました。
本を読んでみて気持ちが盛り上がり、自分でもSPとIdPの環境を構築してみたくなりました。
そこで、Python + Flask + pysaml2 でSP、KeycloakでIdPを構築し、SAML2 の SP-initiated フローでSAML認証してみたので、メモを残します。
目次
- 環境
- やらないこと
- SP向けのライブラリについて検討
- SAML用のChrome拡張について調査
- Keycloakのセットアップ
- pysaml2を使って、SPを作る
- Keycloakへ設定を追加
- 動作確認
- その他の参考資料
- ソースコード
環境
- WSL2
- SP
- Python 3.11.7
- Flask 3.0.2
- pysaml2 7.5.0
- IdP
- Keycloak 23.0.6
なお、ソースコードは必要に応じて記載しているものの、全部は記載していません。
詳細はGithubのリポジトリを確認してください。
https://github.com/thinkAmi-sandbox/flask_with_pysaml2_and_keycloak-example
やらないこと
あくまで「SAMLの認証フローを体験する」がメインなので、以下は行いません。
- 本番運用に即した、Keycloakやpysaml2の設定
- セキュリティまわりを真剣に考えること
また、SPとIdPの両方を自作すると完成が遅くなりそうでした。
そのため、SAML入門同様、今回はIdPにKeycloakを使うことにして、IdPの自作は行いません。
SP向けのライブラリについて検討
今回はPythonで書いてみようと考え、SAML2関連のライブラリを探したところ、以下の2つがありました。
- pysaml2
- python3-saml
両方とも同じくらいのstarだったため、どんな違いがあるのか調べたところ、2016年のstackoverflowに情報がありました。
single sign on - Python SSO: pysaml2 and python3-saml - Stack Overflow
python3-saml のauthorのコメントだったものの、python3-saml が良さそうに感じました。
ただ、
- サンプルコードを見ると、
oneloginというサービス名が気になった pysaml2+ Keycloak という組み合わせのサンプルコードもあまり多くなかったdjangosaml2やdjango-saml2-authがpysaml2を使っていた
ということから、今回は pysaml2 でSPを作ることにしました。
ライブラリは決まったものの、 pysaml2 を使ってゼロから作るのは大変そうです。
サンプルコードを探したところ、oktaにてサンプルコードが公開されていました。
- SAML-enable your Python application | Okta Developer
- jpf/okta-pysaml2-example: Example SAML Service Provider for Python/Flask using PySAML2
そこで、これをベースに作っていくことにしました。
なお、上記oktaのサンプルだと Flask-Login を使うことでログインまわりをきちんと作っています。
ただ、今回は必要最低限の実装にするので、ログインまわりについては
Flask-Loginは使用しない- その代わり、SAML認証成功時にセッションへデータをセットする
- セッションにデータがあればログイン成功とみなす
とします。
SAML用のChrome拡張について調査
SAMLのリクエスト・レスポンスをChromeで確認できると便利です。
調べた見たところ、SAML-tracer がありました。
SAML-tracer
この拡張ですが、
- SAML入門では、Firefox版がお役立ちツールとして紹介されていたこと
- Githubにリポジトリがあり、PHPのSAML2ライブラリを作っているorganizer製に見えたこと
- やや権限が広そうだけど、SAML使うときだけ有効にすれば良さそう
ということから、今回使ってみることにしました。
この拡張を使うことで、SAMLのパラメータを見たり、

実際のリクエストで使われるSAMLを見れたりと、開発をする上で便利になりました。
Keycloakのセットアップ
Keycloakは、公式のDockerイメージが quay.io で提供されています。
https://quay.io/repository/keycloak/keycloak?tab=tags
今回は、最新バージョンの docker compose で Keycloak をたてることにしました。
そこで、以下の compose.yaml を用意しました。
ちなみに、ポート 8080 はよく見かけるため、 18080 へと変更しています。
services:
  keycloak:
    image: quay.io/keycloak/keycloak:23.0.6
    # dockerコマンドのitオプションと同様にするため、 ttyとstdin_openを付けておく
    tty: true
    stdin_open: true
    ports:
        - 18080:8080
    environment:
      KEYCLOAK_ADMIN: admin
      KEYCLOAK_ADMIN_PASSWORD: admin
    command:
      - start-dev
準備ができたので、起動します。
$ docker compose up -d
続いて、公式ドキュメントの手順に従い、Keycloakの設定を行います。
Docker - Keycloak
- ポートを変更しているので、以下のURLにアクセス
- realmを作る
- nameを
myrealmとする - それ以外はデフォルト
- nameを
- ユーザー作る
myrealmに切り替える- 以下を入力
- Username:
myuser - First Name:
Foo - Last Name:
Bar
- Username:
- ユーザーにパスワードを設定する
Credentialsタブを開く- 以下を入力
- Password:
baz - Password confirmation:
baz - Temporary:
Off
- Password:
- 作成したユーザー
myuserでKeycloakへログインしてみる - Realm settings の
Endpointsをクリックし、エンドポイント情報を確認しておく
pysaml2を使って、SPを作る
各ライブラリのインストール
今回、WSL2上にSPをたてます。
はじめに、pysaml2のREADMEにある通り、 xmlsec1 をインストールします。
$ sudo apt install xmlsec1
続いて、Flaskとpysaml2をインストールします。
$ pip install pysaml2 flask
Flaskアプリの作成
ミニマムな saml_client_for メソッドへと変更
oktaのサンプルコードを一部改変し、ミニマムな実装にします。
まず、今回はHTTP通信だけ使うので、変数 asc_url をSAML Requestのみの
acs_url = url_for(
    'saml_request',
    _external=True)
とします。
変数 settings については、
endpointは以下の2つ分を定義- 各種 signed は
False allow_unsolicitedはTrue- 未設定だと
saml2.response.UnsolicitedResponse: Unsolicited response: id-***エラーが発生する- Keycloak側の設定不足かもしれない
- 未設定だと
metadataにはremoteを追加- これがないと、
saml2.client_base.SignOnError: {'message': 'No supported bindings available for authentication', 'bindings_to_try': ['urn:oasis:names:tc:SAML:2.0:bindings:HTTP-Redirect'], 'unsupported_bindings': ['urn:oasis:names:tc:SAML:2.0:bindings:HTTP-Redirect']}エラーが発生する- ただ、Keycloakの設定不足なのかもしれない
- なお、
metadataのremoteについてはドキュメントに情報が見当たらなく、以下の記事のdjangosaml2の記事を見て追加してみた
- これがないと、
とします。
関数全体は以下の通りです。
def saml_client_for():
    acs_url = url_for(
        'saml_request',
        _external=True)

    settings = {
        'entityid': 'flask',
        'metadata': {
            'remote': [
                {'url': 'http://localhost:18080/realms/myrealm/protocol/saml/descriptor'},
            ],
        },
        'service': {
            'sp': {
                'endpoint': {
                    'assertion_consumer_service': [
                        (acs_url, BINDING_HTTP_REDIRECT),
                        (acs_url, BINDING_HTTP_POST),
                    ]
                },
                'allow_unsolicited': True,
                'authn_requests_signed': False,
                'want_assertions_signed': False,
                'want_response_signed': False,

            }
        }
    }

    spConfig = Saml2Config()
    spConfig.load(settings)
    spConfig.allow_unknown_attributes = True
    saml_client = Saml2Client(config=spConfig)
    return saml_client
SAML Requestを送信する関数を作成
今回のSAML Request は HTTP Redirect Binding とするため、oktaのサンプルコードとほぼ同じです。
なお、今回は SP-initiated フローでの認証のみ動作確認することから、メソッド名を sp_initiated から saml_request へと変更しています。
def saml_request():
    # SAMLクライアントを生成する
    saml_client = saml_client_for()

    # 認証準備をする
    _reqid, info = saml_client.prepare_for_authenticate()

    # HTTP Redirect Binding のリダイレクト先はLocationヘッダに保存されているため、
    # その値を redirect 関数に渡す
    redirect_url = None
    # Select the IdP URL to send the AuthN request to
    for key, value in info['headers']:
        if key == 'Location':
            redirect_url = value
    response = redirect(redirect_url, code=302)
    # NOTE:
    #   I realize I _technically_ don't need to set Cache-Control or Pragma:
    #     http://stackoverflow.com/a/5494469
    #   However, Section 3.2.3.2 of the SAML spec suggests they are set:
    #     http://docs.oasis-open.org/security/saml/v2.0/saml-bindings-2.0-os.pdf
    #   We set those headers here as a 'belt and suspenders' approach,
    #   since enterprise environments don't always conform to RFCs
    response.headers['Cache-Control'] = 'no-cache, no-store'
    response.headers['Pragma'] = 'no-cache'
    return response
SAML ResponseをPOSTで受け付ける関数を作成
元々のサンプルコードでは idp_initiated 関数でしたが、 IdP-initiated フロー向けと誤解しそうなので、関数名を saml_response へと変更しました。
また、 authn_response.parse_assertion() をしないと、 get_identity() や get_subject() で値が取得できなかったことから、修正を加えています。
他に、セッションの中にSAML入門で確認していた各値を設定し、ブラウザ上で表示できるようにしておきます。
なお、セッションの各値についてはpysaml2のドキュメントでは示されていなかったため、デバッガを使って一つ一つどこにあるかを確認しました。
@app.route('/saml/response/keycloak', methods=['POST'])
def saml_response():
    saml_client = saml_client_for()
    authn_response = saml_client.parse_authn_request_response(
        request.form['SAMLResponse'],
        entity.BINDING_HTTP_POST)

    # parse_assertion()してからでないと、get_identity()やget_subject()で値が取れない
    authn_response.parse_assertion()
    user_info = authn_response.get_subject()

    session['saml_attributes'] = {
        'name_id': user_info.text,
        'name_id_format': user_info.format,
        'name_id_name_qualifier': user_info.name_qualifier,
        'name_id_sp_name_qualifier': user_info.sp_name_qualifier,
        'session_index': authn_response.assertion.authn_statement[0].session_index,
        'session_expiration': authn_response.assertion.authn_statement[0].session_not_on_or_after,
        'message_id': authn_response.response.id,
        'message_issue_instant': authn_response.response.issue_instant,
        'assertion_id': authn_response.assertion.id,
        'assertion_not_on_or_after': authn_response.assertion.issue_instant,
        'relay_status': 'NOT_USED',
        'identity': authn_response.get_identity()
    }

    return redirect('/')
SAML Requestを送信するためのリンクやセッションの中身を表示するindexを用意
テンプレートを描画するだけです。
@app.route('/')
def index():
    return render_template('index.html')
テンプレートはこんな感じで、セッションの値の有無により表示を分岐しています。
{% if session['saml_attributes'] %}
    {% set s = session['saml_attributes'] %}

    <h1>KeyCloak Status</h1>
    <table>
        <thead>
            <tr>
                <th>Attribute</th>
                <th>Value</th>
            </tr>
        </thead>
        <tbody>
            <tr>
                <td>Name ID</td>
                <td>{{ s['name_id'] }}</td>
            </tr>
            <tr>
                <td>Name ID Format</td>
                <td>{{ s['name_id_format'] }}</td>
            </tr>
            <tr>
                <td>Name ID Name Qualifier</td>
                <td>{{ s['name_id_name_qualifier'] }}</td>
            </tr>
            <tr>
                <td>Name ID SP Name Qualifier</td>
                <td>{{ s['name_id_sp_name_qualifier'] }}</td>
            </tr>
            <tr>
                <td>Session Index</td>
                <td>{{ s['session_index'] }}</td>
            </tr>
            <tr>
                <td>Session Expiration</td>
                <td>{{ s['session_expiration'] }}</td>
            </tr>
            <tr>
                <td>Message ID</td>
                <td>{{ s['message_id'] }}</td>
            </tr>
            <tr>
                <td>Message Issue Instant</td>
                <td>{{ s['message_issue_instant'] }}</td>
            </tr>
            <tr>
                <td>Assertion ID</td>
                <td>{{ s['assertion_id'] }}</td>
            </tr>
            <tr>
                <td>Assertion NotOnOrAfter</td>
                <td>{{ s['assertion_not_on_or_after'] }}</td>
            </tr>
            <tr>
                <td>Relay Status</td>
                <td>{{ s['relay_status'] }}</td>
            </tr>
            <tr>
                <td>Identity</td>
                <td>{{ s['identity'] }}</td>
            </tr>
        </tbody>
    </table>

{% else %}
    <h1>Login</h1>
    <ul>
      <li><a href="/saml/login/keycloak">KeyCloak</a></li>
    </ul>
{% endif %}
以上で、SP側の実装は完了です。
Keycloakへ設定を追加
続いて、公式ドキュメントを参考にしつつ、SPの情報をKeycloakへ設定します。
Creating a SAML client | Server Administration Guide
- Create Client でクライアントを作成
- clientから
flaskを選択 - Keyタブを選択
Client signature requiredはOffにする
- Client scopes タブから、
flask-dedicatedを選択- デフォルトで作成されている
- Scopeタブを選択
Full scope allowedを Off にする
- Mappersタブを選択
- Advancedタブを選択
Client signature required の設定について (2024/11/13 追記)
Client signature requiredはOffにする
についてコメントをいただきました。ありがとうございます。
コメントいただいた通り、今回は動作検証を主目的として実装したため、
まわりの署名の扱いについては省略しています。
その上で、署名に関して調べてみたときの内容を追記します。
まず、「Client signature required の設定はどのタイミングで使われる署名を要求するものか」については、SAMLリクエストへの署名のようです。
例えば、以下のSAMLクライアント製品のドキュメントを見ると、「クライアント側で署名を追加してKeycloak側で検証を有効にする」旨が記載されています。
10.13.5. KeycloakとのSAML認証の設定 — チュートリアルガイド 第14版 2023-02-08 Accel-Mart Quick
また、SAMLリクエストに署名を追加することで、「特定のSPに対してのみSAMLリクエストを許可する」のようなことができるようです。
- sso - SAML assertion encryption and using same key for encryption as signing - Information Security Stack Exchange
- KeycloakでSAMLログインをテストしたい #テスト - Qiita
最後に、追記の冒頭に書いた通り、今回は署名まわりは省略しています。
そのため、本番環境を構築するときは、
などを行ったほうが良さそうです。
動作確認
ここまでで環境構築が完了したので、実際に動作を確認してみます。
http://localhost:15000/ にアクセスすると、Keycloakでログインするためのリンクが表示されます。

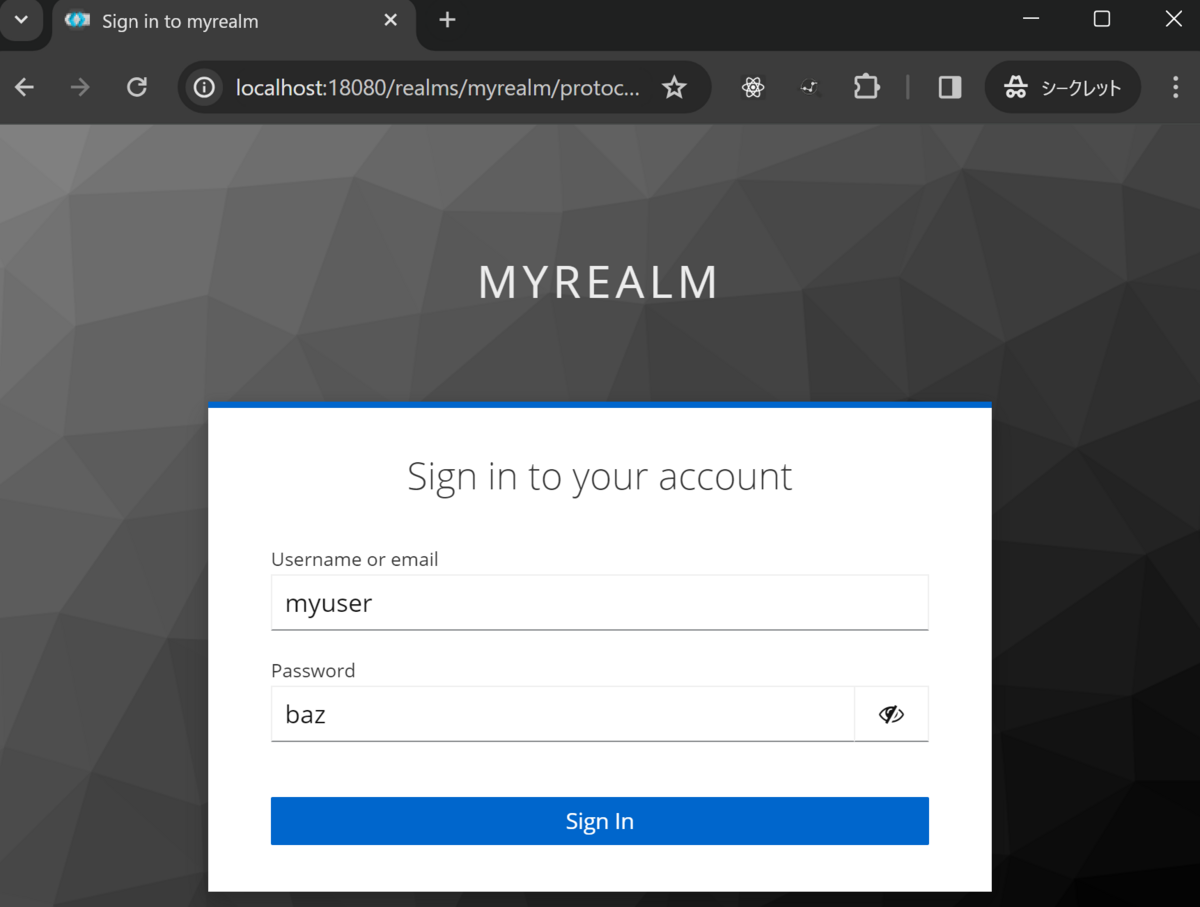
リンクをクリックすると、Keycloak上のログイン画面が表示されるので、ログインユーザーとパスワードを入力します。
ログインに成功するとSPに戻り、SAML Responseの内容が表示されます。

SAML-tracerの状態も確認します。
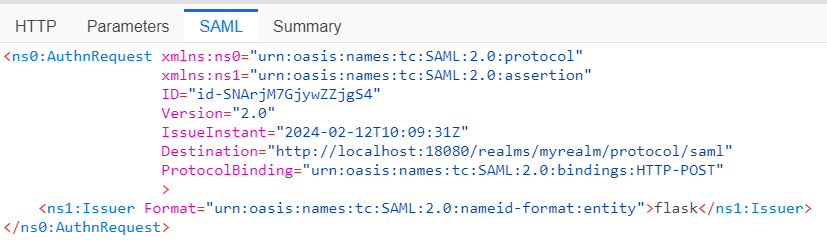
SAML Request の時はこんな感じでした。

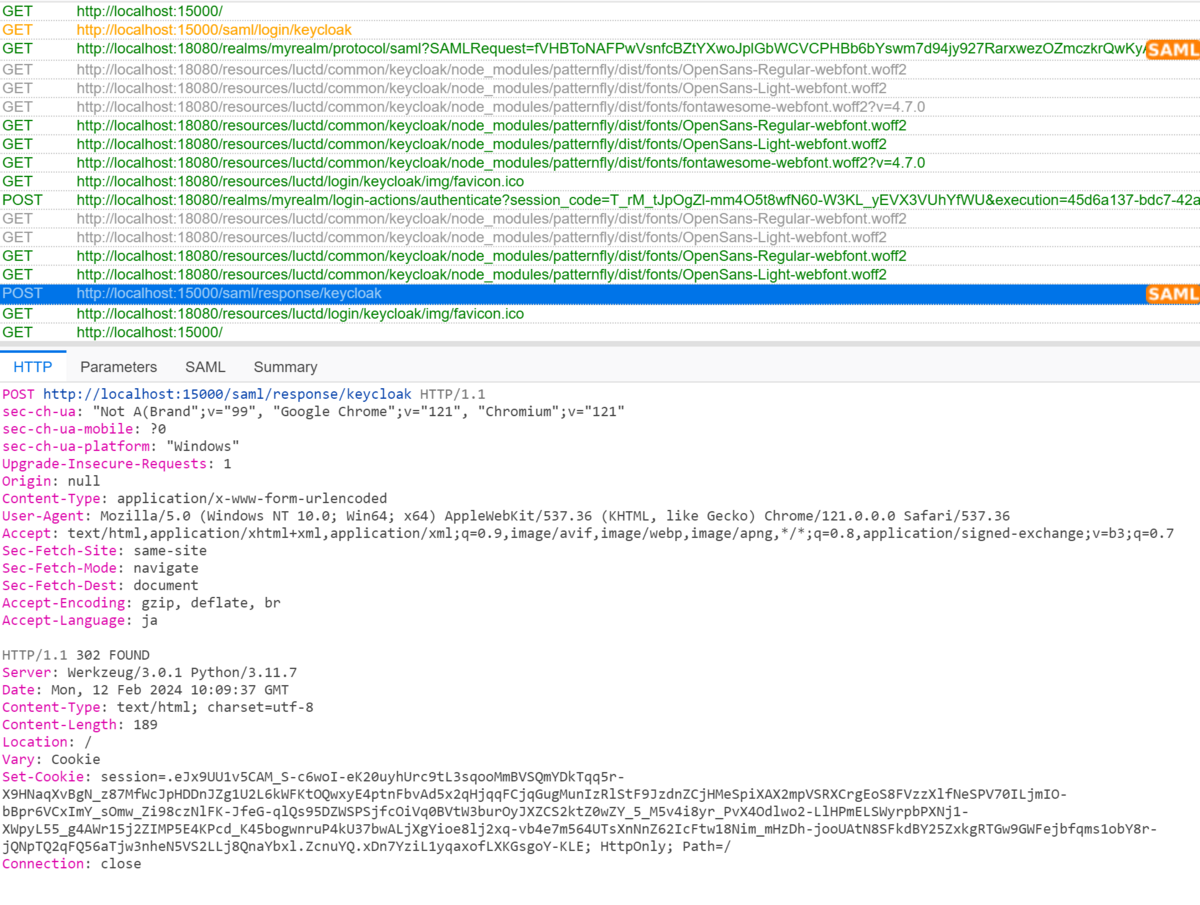
2回目のSAML Response の場合はこんな感じです。
以上で、Python + Flask + pysaml2 でSP、KeycloakでIdPを構築し、SAML2 の SP-initiated フローでSAML認証ができるようになりました。
その他の参考資料
- Keycloakの公式ドキュメント
- pysaml2の設定一覧
- SAML入門を読んだ後に知りたかったこと
- SAMLを試す
- SAML ~ Binding の 巻 ~ #SSO - Qiita
ソースコード
Githubにあげました。
https://github.com/thinkAmi-sandbox/flask_with_pysaml2_and_keycloak-example
今回のプルリクはこちら。
https://github.com/thinkAmi-sandbox/flask_with_pysaml2_and_keycloak-example/pull/1