以前、Railsを使って OpenID Connectの Relying Party (RP) を作りました。
Railsとdoorkeeper-openid_connectやOmniAuth を使って、OpenID Connectの OpenID Provider と Relying Party を作ってみた - メモ的な思考的な
そんな中、Next.jsを使う機会があったため、せっかくなので Next.js でも OpenID Connect の RP を作ってみたくなりました。
Next.jsを使う場合、
- フロントエンドをRPにする
- バックエンドをRPにする
のどちらかを選べそうでした。
現時点ではまだ Next.js に詳しくないため、今回はバックエンドをRPにしてみることにしました。
ただ、作る中で色々考えたことがあったため、メモを残します。
目次
環境
実装すること
- OpenID Connectのフローは
認可コードフローのみ実装 - RPで認証結果を保持するために、以前同様セッションCookieを使う
- セッションCookieのストレージは Redis を使う
- 前回は Active Record を使っており、別のストレージを使いたくなったため
- 以前同様のセキュリティ対策は行う
state・PKCE・nonce- もしライブラリ側で行っていれば、どこで行っているかを確認する
- Next.jsでは、すべてのパスはログイン必須とする
- 今回用意するパスは以下の2つ
//profile
- 今回用意するパスは以下の2つ
実装しないこと
- 以前同様
- OPの同意画面で「Deny」をクリックしたときの動作
- アクセストークンの JWT 化
- ログアウトまわり
- OPの属性を修正したら、RPの属性も同期して修正
構成
- macOS
- Open ID Provider
- Relying Party
localhost:3783で起動- Next.js 11.1.2
- express 4.17.1
- Next.js の Custom Server 機能を使用
- express-openid-connect 2.5.0
- redis 3.1.2
- connect-redis 6.0.0
- セッションストア: Redis
- Dockerで作成し、ポート
16379で起動
- Dockerで作成し、ポート
調査
Next.js で OIDC の RP を作るのに使えそうな npm パッケージを調べてみました。
NextAuth.js
「Authentication for Next.js」として NextAuth.js がありました。
nextauthjs/next-auth: Authentication for Next.js
ビルトインのサポートとしては、READMEに
OAuth 1.0, 1.0A and 2.0
とありました。
また、issueを見たところ、
We don't explicitly have built-in OpenID Connect support currently, but we do have built-in support OAuth providers that support OpenID Connect, such as Google and Apple, Auth0 and others.
とありました。
そのため、NextAuthで OIDC の RP を作りたければ自分で拡張すればよさそうでした。
一方、NextAuthでサポートしているストレージは、READMEによると
Built-in support for MySQL, MariaDB, Postgres, Microsoft SQL Server, MongoDB and SQLite
と、RDBのみでした。
Redisなどのインメモリデータベースが使えるかどうかを調べたところ、issueに
MySQL, Postgres, Microsoft SQL Server and MongoDB are supported. If you want to use a Redis database you would need to write your own adapter. Redis would be a really unconventional choice in a context like this and not something support is planned for.
とありました。
また、コミュニティのデータストアアダプタを見たところ、DynamoDBはあったもののRedisはありませんでした。
nextauthjs/adapters: next-auth adapters maintained by the community to support any database.
他に、NextAuthのTwitterを見たところ
If you use one of the built-in OAuth/OIDC providers, we need your help!
— NextAuth.js (@nextauthjs) August 4, 2021
(Also, this change might open up the door for new providers, so if you were stuck before, check the links, maybe we are ready for you now!)https://t.co/0ryKEEdvDZ
とありました。
今後いろいろ改善されていきそうでしたが、今回はRedisを使いたかったため、他の npm パッケージも探してみることにしました。
express-openid-connect
Next.js にある Custom Server 機能を使うことにより、Next.js のバックエンドを express に差し替えられそうでした。
Advanced Features: Custom Server | Next.js
Custom Server のドキュメントの注意書きには
Note: A custom server can not be deployed on Vercel.
とあるものの、もし Vercel にデプロイしないのであれば、 express の資産を使えそうなのが魅力的でした。
また、OpenID Connect の npm パッケージを調べると、 node-openid-client が気になりました。
panva/node-openid-client: OpenID Certified™ Relying Party (OpenID Connect/OAuth 2.0 Client) implementation for Node.js.
READMEに
Filip Skokan has certified that openid-client conforms to the following profiles of the OpenID Connect™ protocol
とあったためです。
そこで、 node-openid-client を組み込んでいて express でも動く npm パッケージを探したところ、 express-openid-connect がありました。
auth0/express-openid-connect: An Express.js middleware to protect OpenID Connect web applications.
Auth0のプロジェクトであったため、Auth0で使うものなのかなと思いましたが、READMEを読む限り他のOPでも使えそうでした。
また、Next.js向けについてはissueがあり
We don't have NestJS support in our roadmap currently, but we are always reviewing this based on demand.
Suggestion: add nestjs support · Issue #221 · auth0/express-openid-connect
と書かれていました。
ただ、Next.js の Custome Server として express を使った時も使えるかどうかは分かりませんでした。
そこで、 express-openid-connect を使って RP を作ってみることにしました。
Relying Partyの作成
各種インストール
まずは create-next-app します。
% npx create-next-app nextjs_relying_party_of_express_with_all_required
...
Success! Created nextjs_relying_party_of_express_with_all_required at path/to/nextjs_relying_party_of_express_with_all_required
Inside that directory, you can run several commands:

  yarn dev
    Starts the development server.

  yarn build
    Builds the app for production.

  yarn start
    Runs the built app in production mode.

We suggest that you begin by typing:

  cd nextjs_relying_party_of_express_with_all_required
  yarn dev
続いて必要な npm パッケージを追加します。
手元では yarn を使っていたため、yarn でインストールします。
% cd nextjs_relying_party_of_express_with_all_required

% yarn add express express-openid-connect redis connect-redis
Next.js を Custom Server の express へ差し替え
今回は express へ差し替えます。
まずは、公式の examples の server.js を元に、ポートだけ修正したものを用意します。
https://github.com/vercel/next.js/blob/canary/examples/custom-server-express/server.js
// server.js
const express = require('express')
const next = require('next')

const port = parseInt(process.env.PORT, 10) || 3783
const dev = process.env.NODE_ENV !== 'production'
const app = next({ dev })
const handle = app.getRequestHandler()

app.prepare().then(() => {
  const server = express()

  server.all('*', (req, res) => {
    return handle(req, res)
  })

  server.listen(port, (err) => {
    if (err) throw err
    console.log(`> Ready on http://localhost:${port}`)
  })
})
続いて、 package.json を修正し、 dev の場合は express で起動するように修正します。
合わせて、デバッグ起動できるように package.json を編集します。
Express のデバッグ
"dev": "DEBUG=express:* node server.js",
差し替えが終わったので動作確認します。
% yarn run dev
で起動後、 http://localhost:3783/ にアクセスして Next.js の画面が表示されればOKです。
セッションストアのRedisを用意
今回はDockerでRedisを用意します。
docker compose で起動するよう、 docker-compose.yml ファイルを用意します。
この時、expressからはポート 16379 で接続できるようにします。
version: '3'
services:
  redis:
    image: "redis:latest"
    ports:
      - "16379:6379"
    volumes:
      - "./data/redis:/data"
Redisを起動しておきます。
% docker-compose up -d
.env.local を用意
今回のアプリでは、OPのホスト名などは環境変数から読み込むようにします。
そこで、 Next.js で環境変数を設定するファイル .env.local を用意します。
Basic Features: Environment Variables | Next.js
# OPからもらうクライアントID
CLIENT_ID_OF_MY_OP=<OPからもらった値>

# OPからもらうクライアントシークレット
CLIENT_SECRET_OF_MY_OP=<OPからもらった値>

# シークレット
SECRET_OF_OIDC=<任意の値>

# OPホスト
OP_BASE_URL=http://localhost:3780

# UserInfoエンドポイント
USERINFO_ENDPOINT=$OP_BASE_URL/oauth/userinfo

# RPのホスト
NEXT_HOST=http://localhost

# RPのポート
PORT=3783

# セッションストレージ用Redisのホストとポート
REDIS_HOST=localhost
REDIS_PORT=16379
express-openid-connect を express のミドルウェアとして追加
続いて、expressのミドルウェアに express-openid-connect を追加します。
APIドキュメントを参考に、 auth の設定を行います。
ConfigParams | express-openid-connect
const { auth } = require('express-openid-connect');
// ...
app.prepare().then(() => {
  // ...
  // express-openid-connectの設定を追加
  server.use(auth({
    issuerBaseURL: process.env.OP_BASE_URL,
    baseURL: `${process.env.NEXT_HOST}:${process.env.PORT}`,
    clientID: process.env.CLIENT_ID_OF_MY_OP,
    clientSecret: process.env.CLIENT_SECRET_OF_MY_OP,
    secret: process.env.SECRET_OF_OIDC,
    authorizationParams: {
      response_type: 'code',
      scope: 'openid',
    },
// ...
express-openid-connectでのIDトークン検証の有無について
以前、RubyのOmniAuthで実装した時は、IDトークンの検証は自分でやる必要がありました。
express-openid-connectの場合はどうかを調べたところ、
I can confirm that the ID Token's signature is verified before the afterCallback hook is called
Insecure example in the documentation? · Issue #206 · auth0/express-openid-connect
と書かれていました。
また、認証レスポンスを受け取るリダイレクトURIのパス ( localhost:3783/callback ) では、
- https://github.com/auth0/express-openid-connect/blob/v2.5.0/middleware/auth.js#L62
- https://github.com/auth0/express-openid-connect/blob/v2.5.0/middleware/auth.js#L113
- https://github.com/panva/node-openid-client/blob/v4.7.5/lib/client.js#L372
の順で呼ばれ、 node-openid-client 側でIDトークンの検証が行われていました。
デバッガを使っても、 node-openid-client 側の callback の処理で止まりました。

そのため、IDトークンの検証は自分で行わなくても良さそうでした。
なお、もし認識に誤りがありましたら、ご指摘ください。
セッションストレージとして Redis を追加
auth の属性 session を使い、セッションストレージとして Redis を設定します。
なお、Redisクライアントは公式ドキュメントを参考に設定します。
Redis with Node.js (node_redis) | Redis Documentation Center
app.prepare().then(() => {
// ...
  // Redisクライアントを定義
  const redisClient = redis.createClient({
    host: process.env.REDIS_HOST,
    port: parseInt(process.env.REDIS_PORT, 10),
  });

  // express-openid-connectの設定を追加
  server.use(auth({ ... },

    // 追加
    session: {
      name: 'sessionOfExpressJs', // sessionの名前を変える
      store: new RedisStore({client: redisClient}) // セッションストアをRedisにする
    }
  }));
ちなみに、 .env.local の値を読み込む場所には
This loads process.env.DB_HOST, process.env.DB_USER, and process.env.DB_PASS into the Node.js environment automatically allowing you to use them in Next.js data fetching methods and API routes.
Loading Environment Variables | Basic Features: Environment Variables | Next.js
のような制限があります。
そのため、
const redisClient = redis.createClient({
  host: process.env.REDIS_HOST,
  port: parseInt(process.env.REDIS_PORT, 10),
});

app.prepare().then(() => {
// ...
}
のように定義すると、
...
info  - Loaded env from path/to/nextjs_relying_party_of_express_with_all_required/.env.local
events.js:292
      throw er; // Unhandled 'error' event
      ^

Error: connect ECONNREFUSED 127.0.0.1:6379
と、 .env.local から値は読み込まれず、デフォルト値がそのまま使われてしまいます。
Next.js の page を作成
今回のpageとして
/- トップページ
- profil への遷移ボタンあり
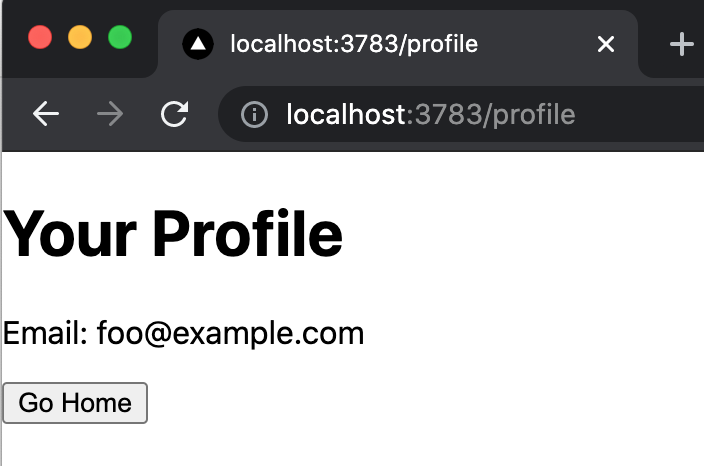
/profile- UserInfoエンドポイントから取得したメールアドレスを表示
- index への遷移ボタンあり
の2つを用意します。
pages/index.js
トップページには、 /profile へ遷移するためのボタンを Link コンポーネントと <button> を組み合わせて使います。
なお、Link コンポーネントと <button> を組み合わせる場合は、以下にある通り passHref を使います。
- If the child is a custom component that wraps an <a> tag | next/link | Next.js
- Material-UIとNext.jsのLinkを使うと、refで困る。 - Qiita
import Link from 'next/link'

export default function Home() {
  return (
    <>
      <h1>Index page</h1>
      <Link href="/profile" passHref>
        <button>Go Profile</button>
      </Link>
    </>
  )
}
pages/profile.js
UserInfoエンドポイントへのリクエストは express-openid-connect で用意している方法を使います。
https://github.com/auth0/express-openid-connect/blob/master/EXAMPLES.md#6-calling-userinfo
なお、今回は /profile にアクセスするたびに、 UserInfo エンドポイントへのアクセスが発生する作りとなっています。
import Link from 'next/link';

export const getServerSideProps = async function ({ req, res }) {
  // UserInfoエンドポイントへリクエストを投げて、値を取得する
  // この書き方だとアクセスするたびにUserInfoへリクエストを投げるので注意
  return await req.oidc.fetchUserInfo()
    .then(response => {
      return {
        props: {
          email: response.email
        }
      }
    })
}

export default function Profile({ email }) {
  return (
    <>
      <h1>Your Profile</h1>
      <p>Email: {email}</p>

      <Link href="/" passHref>
        <button>Go Home</button>
      </Link>
    </>
  )
}
OP の OAuth Application として RP を登録
OPの http://localhost:3780/oauth/applications/ を開き、今回作成した RP を OAuth Applicationとして登録します。
| 項目 | 値 |
|---|---|
| Name | 任意 (next_express_rp など) |
| Redirect URI | http://localhost:3783/callback (express-openid-connectのコールバックURI) |
| Confidential | チェックを入れる |
| Scopes | openid |
動作確認
未ログインの状態で / や /profile へアクセスした時の動作を確認します。
未ログインで / にアクセスする場合
画面遷移
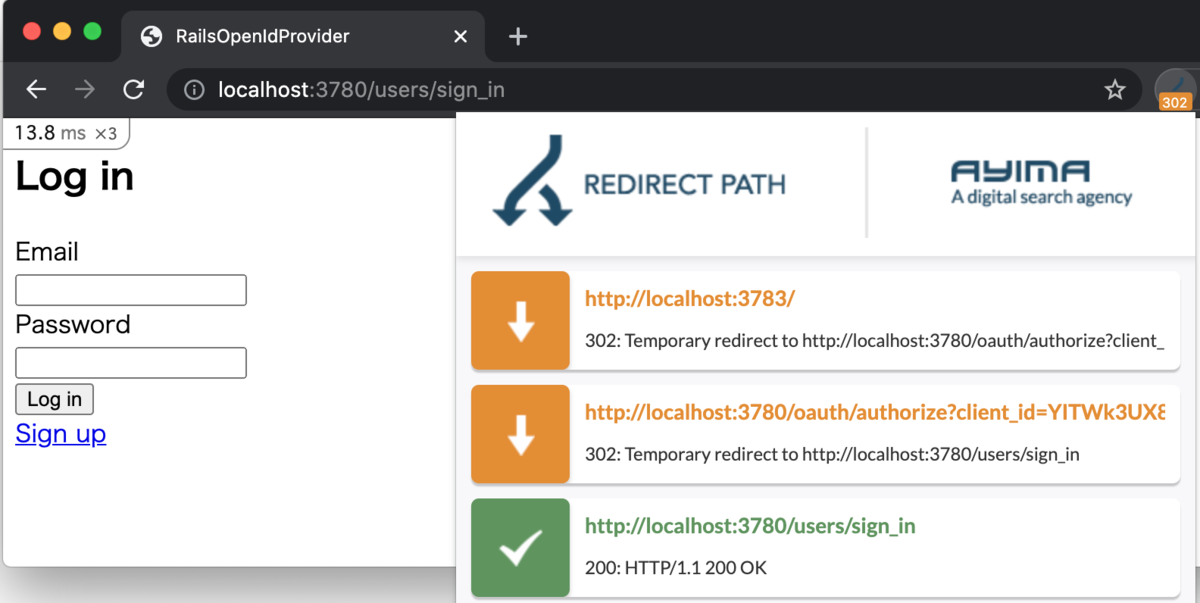
/ にアクセスしたところ、OPのログイン画面へ遷移します。
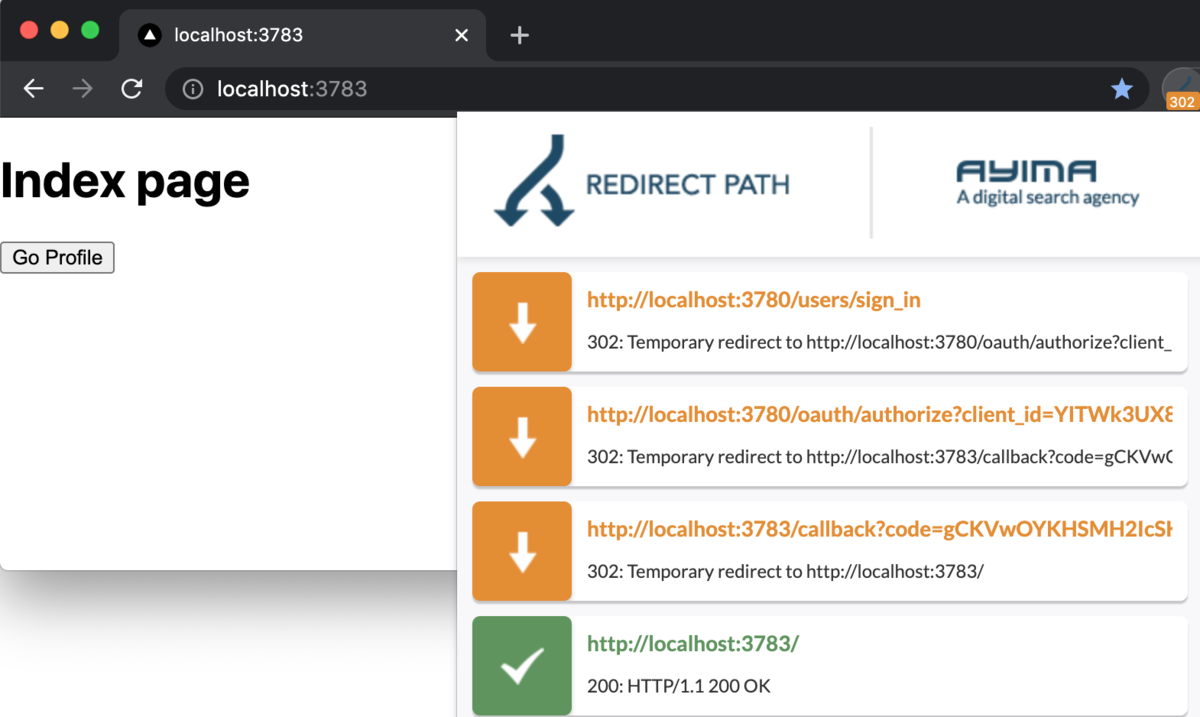
ログインすると、RPの / へ遷移しました。
/profile へ遷移するボタンをクリックすると、emailが表示されました。
セッションストアの中身
せっかくなので、セッションストアの中身を確認します。
Jetbrains系IDEで確認しようとしましたが、今のところ公式では Redis の中身を確認する方法がありません。
We are working on our roadmap for 2022.
This is the most upvoted issue in our tracker and thus rather important. However, support for Redis isn't straightforward and requires quite a bit of time and investment. Thus it's really important for us to understand clearly what you would expect in terms of support in DataGrip and other IntelliJ-based IDEs.
Would viewing objects and data, cover the majority of the needs? Do you write queries against your Redis data sources? Is data export crucial in your use-cases?
These answers can help us better understand what would be required on our behalf before we could make any commitment to supporting this feature in the next roadmap.
そこで、プラグイン redis simple を使って確認します。
redis simple - IntelliJ IDEs Plugin | Marketplace

上記画像にある通り一画面におさまらないため、コピペした値を貼り付けてみます。
こんな形式で値が保存されているようです。
{
    "header": {
        "iat": 1630942184,
        "uat": 1630942188,
        "exp": 1631028588
    },
    "data": {
        "access_token": "QQ2GnLHFlqZVrNo-J-ggymFTZRJtQt1CPi6za1P1cnA",
        "token_type": "Bearer",
        "expires_at": 1630942244,
        "scope": "openid",
        "created_at": 1630942184,
        "id_token": "eyJ0e***"
    }
}
id_token にはIDトークンが入っているようですので、デコードしてみます。
{
  "iss": "http://localhost:3780",
  "sub": "1",
  "aud": "<OPから払い出されたクライアントID>",
  "exp": 1630942304,
  "iat": 1630942184,
  "nonce": "Hv6NwZUbfeurTX_si_KVQqiesCEZbBuU8B-nHmaeVhI"
}
OPのログ
OPのログから、OpenID Connectの一連の流れが確認できました。
# OpenID Connect Discovery 1.0 エンドポイントにて、OPの情報取得
Started GET "/.well-known/openid-configuration" for 127.0.0.1 at 2021-09-07 00:29:39 +0900
...
Completed 200 OK in 2ms (Views: 0.5ms | ActiveRecord: 0.0ms | Allocations: 778)


# 認可エンドポイントにリクエストするが、HTTP 401
Started GET "/oauth/authorize?
client_id=***
&scope=openid
&response_type=code
&redirect_uri=http%3A%2F%2Flocalhost%3A3783%2Fcallback
&nonce=Hv6NwZUbfeurTX_si_KVQqiesCEZbBuU8B-nHmaeVhI
&state=eyJyZXR1cm5UbyI6Ii8ifQ
&code_challenge_method=S256
&code_challenge=Fhixi79s1chqcCcuJBgj2_f-GwsX_lEED6vsft0Rsis" for 127.0.0.1 at 2021-09-07 00:29:39 +0900
...
Completed 401 Unauthorized in 0ms (ActiveRecord: 0.0ms | Allocations: 187)


# ログイン画面の表示
Started GET "/users/sign_in" for 127.0.0.1 at 2021-09-07 00:29:39 +0900
...
Completed 200 OK in 4ms (Views: 3.4ms | ActiveRecord: 0.0ms | Allocations: 1565)


# ログイン実行・成功し、認可エンドポイントへリダイレクト
Started POST "/users/sign_in" for 127.0.0.1 at 2021-09-07 00:29:44 +0900
...
  Parameters:
{
  "authenticity_token"=>"[FILTERED]",
  "user"=>{
    "email"=>"foo@example.com",
    "password"=>"[FILTERED]"},
    "commit"=>"Log in"
  }
}
Redirected to http://localhost:3780/oauth/authorize?***
Completed 302 Found in 241ms (ActiveRecord: 0.1ms | Allocations: 2645)


# 認可エンドポイントへリダイレクト後に処理を行い、認証レスポンスを返す
Started GET "/oauth/authorize?
client_id=***
&scope=openid
&response_type=code
&redirect_uri=http%3A%2F%2Flocalhost%3A3783%2Fcallback
&nonce=Hv6NwZUbfeurTX_si_KVQqiesCEZbBuU8B-nHmaeVhI&state=eyJyZXR1cm5UbyI6Ii8ifQ
&code_challenge_method=S256
&code_challenge=Fhixi79s1chqcCcuJBgj2_f-GwsX_lEED6vsft0Rsis" for 127.0.0.1 at 2021-09-07 00:29:44 +0900
...
Redirected to http://localhost:3783/callback?code=nCT2UBJFKRs4xDUvuqwy_PQ4fWydsJv6DQjoV4TOZGM&state=eyJyZXR1cm5UbyI6Ii8ifQ
Completed 302 Found in 30ms (ActiveRecord: 3.8ms | Allocations: 21095)


# トークンエンドポイントへのリクエストとトークンレスポンス
Started POST "/oauth/token" for 127.0.0.1 at 2021-09-07 00:29:44 +0900
...
  Parameters:
{
  "grant_type"=>"authorization_code",
  "code"=>"[FILTERED]",
  "redirect_uri"=>"http://localhost:3783/callback",
  "code_verifier"=>"rIUSSmrrfjpDzwwg9QO_8x2y_wRRAZbGSsvMhcQ5Hhw"
}
...
Completed 200 OK in 40ms (Views: 0.2ms | ActiveRecord: 3.6ms | Allocations: 22240)


# IDトークンの署名検証のために、OPの公開鍵を取得
Started GET "/oauth/discovery/keys" for 127.0.0.1 at 2021-09-07 00:29:44 +0900
...
Completed 200 OK in 1ms (Views: 0.2ms | ActiveRecord: 0.0ms | Allocations: 356)


# UserInfoエンドポイントへアクセス
Started GET "/oauth/userinfo" for 127.0.0.1 at 2021-09-07 00:29:47 +0900
...
Completed 200 OK in 6ms (Views: 3.6ms | ActiveRecord: 0.3ms | Allocations: 4820)
未ログインで /profile にアクセスする場合
/ と同じような遷移をしていました。

ソースコード
Githubに上げました。
https://github.com/thinkAmi-sandbox/oidc_op_rp-sample
また、今回分のPRはこちらです。
https://github.com/thinkAmi-sandbox/oidc_op_rp-sample/pull/5