前回、Next.js と express-openid-connect を使った Relying Party を書きました。
Next.js と express-openid-connect を使って、認証が必要/不要な各ページを持つ Relying Party を作ってみた - メモ的な思考的な
上記の記事では JavaScript で実装していましたが、せっかくなので TypeScript 化することにしました。
ただ、TypeScript 化する中で色々悩んだことがあったため、メモを残します。
目次
- 環境
- 実装
- TypeScriptのままで動作させる
- 動作確認
- ソースコード
環境
実装すること
- Next.js と express-openid-connect を使った Relying Party を TypeScript 化
- TypeScript化に合わせ、ESLint設定を変更
実装しないこと
- Prettier を入れる
構成
Relying PartyをTypeScript化したくらいで、前回と変わりません。
- macOS
- Open ID Provider
- Relying Party
localhost:3784で起動- Next.js 11.1.2
- express 4.17.1
- Next.js の Custom Server 機能として使用
- express-openid-connect 2.5.0
- redis 3.1.2
- connect-redis 6.0.0
- セッションストア: Redis
- Dockerで作成し、ポート
16380で起動
- Dockerで作成し、ポート
実装
Next.js を TypeScript 化
公式ドキュメントに従い、Next.js を TypeScript 化します。
Existing projects | Basic Features: TypeScript | Next.js
今回はすでに JavaScript で作った Next.js アプリがあるため、 Existing projects に従って作業することにします。
そこで、
tsconfig.jsonを作成- Next.js を起動
したところ、エラーになりました。
# tsconfig.json を作成する
% touch tsconfig.json


# 起動するとエラーになる
% yarn run dev
...
It looks like you're trying to use TypeScript but do not have the required package(s) installed.

Please install typescript and @types/react by running:

        yarn add --dev typescript @types/react

If you are not trying to use TypeScript, please remove the tsconfig.json file from your package root (and any TypeScript files in your pages directory).
エラーメッセージによるとパッケージが足りていないようなので、インストールします。
% yarn add --dev typescript @types/react
再度 yarn run dev すると、起動しました。
% yarn run dev
...
We detected TypeScript in your project and created a tsconfig.json file for you.

event - compiled successfully
> Ready on http://localhost:3784
起動後ディレクトリを見たところ、ファイル next-env.d.ts ができていました。公式ドキュメントによると
A file named next-env.d.ts will be created in the root of your project. This file ensures Next.js types are picked up by the TypeScript compiler. You cannot remove it or edit it as it can change at any time.
https://nextjs.org/docs/basic-features/typescript#existing-projects
のようです。
next-env.d.tsの意味 - Qiita
不足しているパッケージの追加と .eslintrc.json の更新
公式ドキュメントの
You're now ready to start converting files from .js to .tsx and leveraging the benefits of TypeScript!.
に従い、 pages ディレクトリにある各コンポーネントを tsx 化していきます。
ためしに、 404.js を 404.tsx にしたところ
Error: Failed to load parser '@typescript-eslint/parser' declared in '.eslintrc.json » eslint-config-next/core-web-vitals » path/to/nextjs_relying_party_with_public_page/node_modules/eslint-config-next/index.tsx#overrides[0]': Cannot find module 'typescript'
というエラーが出ました。
そこで、まずは不足しているパッケージを追加します。
# ESLintまわり
% yarn add -D @typescript-eslint/parser @typescript-eslint/eslint-plugin

# 使用中のパッケージの型定義を追加
% yarn add -D @types/express @types/redis @types/connect-redis
.eslintrc.json を書き換えます。
{
  "parser": "@typescript-eslint/parser",
  "plugins": ["@typescript-eslint"],
  "extends": [
    "next/core-web-vitals",
    "eslint:recommended",
    "plugin:@typescript-eslint/recommended"
  ]
}
pagesディレクトリの各コンポーネントを tsx 化
準備ができたので、順番に tsx 化していきます。
404.tsx 化
こちらは戻り値の型 JSX.Element を追加します。
export default function Custom404(): JSX.Element {
  return <h1>404 - Page Not Found</h1>
}
なお、 JSX.Element は型定義を見ると、
# https://github.com/DefinitelyTyped/DefinitelyTyped/blob/c20bff8d46570278a10ec76102af314d1cdca6e3/types/react/index.d.ts#L3083

declare global {
    namespace JSX {
        interface Element extends React.ReactElement<any, any> { }
// ...
でした。
JSX.Element や React.ReactElement などの用語は、以下が参考になりました。
Reactのコンポーネント周りの用語を整理する | blog.ojisan.io
_app.tsx 化
こちらは公式ドキュメント通りに変更します。
Custom App | Basic Features: TypeScript | Next.js
import '../styles/globals.css'
import {AppProps} from "next/app";

function MyApp({ Component, pageProps }: AppProps): JSX.Element {
  return <Component {...pageProps} />
}

export default MyApp
index.tsx 化
このファイルでは getServerSideProps を使っています。
そのため、まずは getServerSideProps 部分をTypeScript化します。
getServerSideProps 部分は特に変更していないため、公式ドキュメント通りの型 GetServerSideProps を指定します。
Static Generation and Server-side Rendering
| Basic Features: TypeScript | Next.js
import {GetServerSideProps} from "next";

export const getServerSideProps: GetServerSideProps = async function () {
  return {
    props: {
      host: process.env.NEXT_HOST,
      port: process.env.PORT,
    }
  }
}
続いて、コンポーネント部分をTypeScript化します。
getServerSideProps で取得した process.env の各値はどんな型かを調べたところ、
# https://github.com/DefinitelyTyped/DefinitelyTyped/blob/6bf1eeabf96a96d292a37797f21961a9003bb719/types/node/process.d.ts#L107

interface ProcessEnv extends Dict<string> {
    /**
      * Can be used to change the default timezone at runtime
      */
    TZ?: string;
}
とありました。
なお、型を再定義したほうが扱いやすいようですが、今回はサンプルなので特に変更しません。
型が分かったので、型を定義します。
type Props = {
  host: string
  port: string
}

export default function Home({ host, port }: Props): JSX.Element {
  return (
    <>
      <h1>Index page</h1>
      <a href={`${host}:${port}/profile`}>Go</a>
    </>
  )
}
profile.tsx 化
getServerSideProps の戻り値の型定義
こちらも getServerSideProps の戻り値の型定義から見ていきます。
index.tsx と異なり、
export const getServerSideProps = async function ({ req, res }: Args): Promise<ReturnValues> {
  if (!req.oidc.isAuthenticated()) {
// ...
    if (!res.oidc.errorOnRequiredAuth && req.accepts('html')) {
      await res.oidc.login()
      return {
        props: {
          email: ''
        }
      }
    }
    return {
      notFound: true
    }
  }

// ...
のように、異なる型で値が返ってくるため、 GetServerSideProps が使えなさそうでした。
そこで、TypeScriptの合併型 (Union型)にて、戻り値の型を定義します。
type ReturnValues = {
  props: {
    email: string
  }
} | {
  notFound: boolean
}
あとは async な関数なので、Promise<T> を使うことで、
export const getServerSideProps = async function ({ req, res }): Promise<ReturnValues> {
となりました。
getServerSideProps の引数の型定義
型定義をするため、必要な情報を調べます。
引数 req や res は関数の内部で
export const getServerSideProps = async function ({ req, res }: Args): Promise<ReturnValues> {
  if (!req.oidc.isAuthenticated()) {
// ...
と、 req.oidc.isAuthenticated() のような使い方をしています。
req や res の属性 oidc は express-openid-connect で追加されています。
そこで、express-openid-connect の型定義を見ると、 req は
interface OpenidRequest extends Request {
  /**
   * Library namespace for authentication methods and data.
   */
  oidc: RequestContext;
}
でした。
https://github.com/auth0/express-openid-connect/blob/v2.5.0/index.d.ts#L40
続けて、 oidc の isAuthenticated は OpenidRequest 型の中で定義されていました。
https://github.com/auth0/express-openid-connect/blob/v2.5.0/index.d.ts#L85
interface RequestContext {
  /**
   * Method to check the user's authenticated state, returns `true` if logged in.
   */
  isAuthenticated: () => boolean;
// ...
一方、 res は
interface OpenidResponse extends Response {
  /**
   * Library namespace for authentication methods and data.
   */
  oidc: ResponseContext;
}
でした。
https://github.com/auth0/express-openid-connect/blob/v2.5.0/index.d.ts#L61
そこで、
import {OpenidRequest, OpenidResponse} from "express-openid-connect";

type Args = {
  req: OpenidRequest
  res: OpenidResponse
}
という型を定義することで
export const getServerSideProps = async function ({ req, res }: Args): Promise<ReturnValues> {
となりました。
ちなみに:引数の分割代入に対する型指定をワンライナーで書く場合
ちなみに、
type Args = {
  req: OpenidRequest
  res: OpenidResponse
}

export const getServerSideProps = async function ({ req, res }: Args): Promise<ReturnValues> {}
をワンライナーで書く場合は
expeort const getServerSideProps = async function ({ req, res }: {req: OpenidRequest, res: OpenidResponse}): Promise<ReturnValues> {}
となります。
TypeScript - TypeScriptで関数の引数に分割代入したときの型指定方法|teratail
express-openid-connectの型定義 ResponseContext をアンビエント宣言で拡張
ふとコードを見てみると、

と、
TS2339: Property 'errorOnRequiredAuth' does not exist on type 'ResponseContext'.
というエラーが出ていました。
ResponseContextの型定義を見てみると、
interface ResponseContext {
  login: (opts?: LoginOptions) => Promise<void>;
  logout: (opts?: LogoutOptions) => Promise<void>;
}
と、 errorOnRequiredAuth がありませんでした。
https://github.com/auth0/express-openid-connect/blob/v2.5.0/index.d.ts#L147
ただ、 errorOnRequiredAuth は ミドルウェア requiresAuth で使っているものを移植しただけなので、型定義に errorOnRequiredAuth を追加しても問題無さそうでした。
https://github.com/auth0/express-openid-connect/blob/v2.5.0/middleware/requiresAuth.js#L20
そこで、以下を参考にアンビエント宣言で errorOnRequiredAuth を型定義に追加します。
なお、以下により、アンビエント宣言だけを行い、 typeRoots での設定は行いません。
- typeRootsの誤解 -- TypeScriptで、npmからインストールしたパッケージに型定義ファイル (*.d.ts) が存在しない場合の正しい対処方法 - Qiita
- node.js - TypeScript - Cannot import self in types override in other types root, TS7016 - Stack Overflow
上記で見た通り ResponseContext は interface だったため、types/express-openid-connect/index.d.ts ファイルを用意し、アンビエント宣言します。
import 'express-openid-connect'

declare module 'express-openid-connect' {
  interface ResponseContext {
    errorOnRequiredAuth? :boolean
  }
}
すると、エラーが無くなりました。
コンポーネントの型定義
こちらは今まで通りです。
 type Props = {
  email: string
}

export default function Profile({ email }: Props): JSX.Element {
  return (
    <>
      <h1>Your Profile</h1>
      <p>Email: {email}</p>

      <Link href="/" passHref>
        <button>Go Home</button>
      </Link>
    </>
  )
}
カスタムサーバの server.js を TypeScript 化
続いて、カスタムサーバ部分を TypeScript 化します。
TypeScript化で影響のあったところは、
- RedisClientまわり
- server.listen()時のエラーハンドリングまわり
でした。
後者については、以下を参考に server.on('error') の構文に差し替えました。
- javascript - How to handle errors with Express .listen() (in Typescript)? - Stack Overflow
- javascript - How to check error in express listen callback? - Stack Overflow
- Cannot catch listen() addressinuse error.... · Issue #2856 · expressjs/express
import express from 'express'
import { auth } from 'express-openid-connect'
import  next from 'next'
// Redisの設定
import redis from 'redis'
import connectRedis from 'connect-redis'
const RedisStore = connectRedis(auth)

const dev = process.env.NODE_ENV !== 'production'

const app = next({ dev })
const handle = app.getRequestHandler()

app.prepare().then(() => {
  const server = express();
  const port = parseInt(process.env.PORT, 10)

  // Redisクライアントを定義
  // TypeScriptでのエラーが出るため、undefined にならないようにしておく
  const redisPort = process.env.REDIS_PORT || '16380'
  const redisClient = redis.createClient({
    host: process.env.REDIS_HOST,
    port: parseInt(redisPort, 10),
  });

  // express-openid-connectの設定を追加
  server.use(auth({
    issuerBaseURL: process.env.OP_BASE_URL,
    baseURL: `${process.env.NEXT_HOST}:${process.env.PORT}`,
    clientID: process.env.CLIENT_ID_OF_MY_OP,
    clientSecret: process.env.CLIENT_SECRET_OF_MY_OP,
    secret: process.env.SECRET_OF_OIDC,
    authorizationParams: {
      response_type: 'code',
      scope: 'openid',
    },
    session: {
      name: 'sessionOfExpressPublic', // sessionの名前を変える
      store: new RedisStore({client: redisClient}) // セッションストアをRedisにする
    },
    authRequired: false,
  }));

  server.all('*', (req, res) => {
    return handle(req, res)
  })

  server.listen(port, () => {
    console.log(`> Ready on http://localhost:${port}`)
  }).on('error', function(e) {
    console.log('Error happened: ', e.message)
  })
})
tsconfigの strict を true にした時の対応
ここまでは tsconfig の compilerOptions において、 strict は false でした。
厳密にやっても問題ないだろうと考え、 strict を true にしたところ、 server.ts にて以下のエラーが出ました。
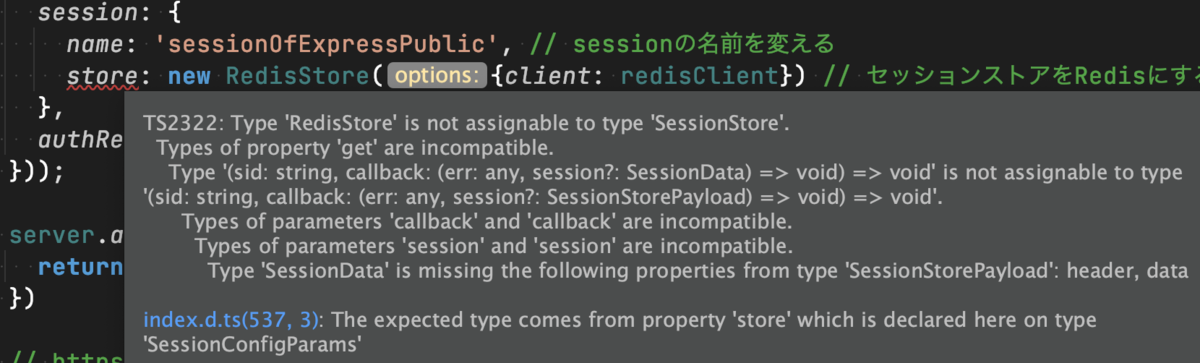
エラーになった箇所ですが、 express-openid-connect の example からそのまま持ってきている実装でした。
https://github.com/auth0/express-openid-connect/blob/master/EXAMPLES.md#9-use-a-custom-session-store
また、リポジトリを見るとissueが上がっていました。
TypeScript errors when defining custom session store · Issue #234 · auth0/express-openid-connect
今後改善される可能性があるため、今回は TypeScript 化をあきらめました。
そのため、
session: {
   // ...
  // eslint-disable-next-line @typescript-eslint/ban-ts-comment
  // @ts-ignore
  store: new RedisStore({client: redisClient}) // セッションストアをRedisにする
},
のようにエラーを無視するようにしました。
以上で TypeScript 化は終わりました。
TypeScriptのままで動作させる
今の状態でコンパイルして Next.js を動作するようにもできますが、ローカルで開発するのには手間なので、TypeScript のままで動作させたくなりました。
方法を探したところ、
- ts-node
- ts-node-dev
- nodemon
あたりが見つかりました。
- 参考
ただ、 ts-node-dev を使ってみたところ、
TypeError: Unexpected response from worker: undefined
    at ChildProcessWorker._onMessage (path/to/nextjs_relying_party_with_public_page/node_modules/jest-worker/build/workers/ChildProcessWorker.js:264:15)
    at ChildProcess.emit (events.js:327:22)
    at emit (internal/child_process.js:903:12)
    at processTicksAndRejections (internal/process/task_queues.js:81:21)
[ERROR] 15:42:30 TypeError: Unexpected response from worker: undefined
というエラーが発生しました。
ts-node-dev のリポジトリを見ると、同じ現象のissueがありました。
tsnd fails to run jest-worker with enableWorkerThreads: false · Issue #255 · wclr/ts-node-dev
issueのコメントに
The only solution that I found is to use node-dev directly. Fortunately, they introduced Typescript support out of the box so I don't need ts-node-dev anymore.
とあったため、TypeScript化した Next.js では使うのが難しいのかなと思いました。
ここで、改めてTypeScriptを使う公式サンプルを見たところ、 ts-node + nodemon を使っていました。
https://github.com/vercel/next.js/blob/canary/examples/custom-server-typescript/package.json
そこで今回は Next.js のサンプルや以下の記事を参考に、ts-node + nodemon で書いてみます。
Next.jsをExpressカスタムサーバ + TypeScriptで動かす設定 - Qiita
tsconfig.server.json の追加
参考 Qiita のままで問題ないです。
{
  "extends": "./tsconfig.json", // tsconfig.jsonの設定を継承する
  "compilerOptions": {
    "module": "commonjs", // Next.jsとExpressの両方を連携させるために、commmonjsを利用する
    "outDir": "dist", // ビルドファイルの出力先
    "noEmit": false // Next.jsはBabelを使用してTypeScriptをコンパイルするので、TSコンパイラはjsを出力しない。設定を上書きする。
  },
  "include": ["server"] // TSコンパイラにserverディレクトリのみをコンパイル対象として認識させる。
}
nodemon.json の追加
こちらは公式サンプルの通りです。
{
  "watch": ["server"],
  "exec": "ts-node --project tsconfig.server.json server/index.ts",
  "ext": "js ts"
}
package.json の修正
nodemon で動くよう、 scripts の dev を修正します。
{
  "name": "nextjs_relying_party_with_public_page",
// ...
  "scripts": {
    "dev": "nodemon",
// ...
動作確認
yarn run dev し、今まで通り http://localhost:3784/ へアクセスできればOKです。
ソースコード
Githubに上げました。
https://github.com/thinkAmi-sandbox/oidc_op_rp-sample
今回のPRはこちらです。
https://github.com/thinkAmi-sandbox/oidc_op_rp-sample/pull/7