Reactにて、JSON Schemaからフォームを生成してくれるライブラリ react-jsonschema-form がありました。
https://rjsf-team.github.io/react-jsonschema-form/docs/
react-jsonschema-form には live playground もあるため、実装で気になった所があれば容易に試すこともできそうです。
https://rjsf-team.github.io/react-jsonschema-form/
ただ、今回は実際に自分で環境を作って書いてみたことから、そのときのメモを残します。
目次
- 環境
- サポートしているJSON Schemaのバージョンについて
- 公式ドキュメントのintroductionを試す
- ボタンを追加・変更する
- uiSchemaを使って、入力項目をカスタマイズする
- uiSchemaのui:widgetを使って、入力項目の見た目を変える
- ソースコード
環境
- React 18.2.0
- react-jsonschema-form 5.13.2
- React Router 6.20.0
サポートしているJSON Schemaのバージョンについて
そもそも、JSON Schemaにはバージョンがあるのかを調べてみたところ、バージョンは存在し、かつ、 2020-12 が最新のようでした。
続いて、今回のライブラリ react-jsonschema-form がサポートしているJSON Schemaのバージョンを調べてみました。
しかし、ドキュメントには明記してなかったことから、リポジトリのプルリクを調べてみました。
- 2021年の記録だと、
draft 7 - その後のプルリクを見ても、
draft 7のままに見える
以上より、 react-jsonschema-form は draft-7 をサポートしていると理解しました。
公式ドキュメントのintroductionを試す
まずは、公式ドキュメントには introduction を試してみます。
https://rjsf-team.github.io/react-jsonschema-form/docs/
最初にReact環境をセットアップします。今回はViteを使います。
$ npm create vite@latest
✔ Project name: … rjsf_mui_example
✔ Select a framework: › React
✔ Select a variant: › TypeScript

Scaffolding project in /path/to/rjsf/rjsf_mui_example...

Done. Now run:

  cd rjsf_mui_example
  npm install
  npm run dev

npm notice
npm notice New major version of npm available! 8.19.2 -> 10.2.1
npm notice Changelog: https://github.com/npm/cli/releases/tag/v10.2.1
npm notice Run npm install -g npm@10.2.1 to update!
npm notice
thinkami@LAPTOP-JEC6S15S:~/dev/projects/react/rjsf$ cd rjsf_mui_example/
thinkami@LAPTOP-JEC6S15S:~/dev/projects/react/rjsf/rjsf_mui_example$ npm install

added 208 packages, and audited 209 packages in 21s

40 packages are looking for funding
  run `npm fund` for details

found 0 vulnerabilities
続いて、 react-jsonschema-form をセットアップします。
$ npm install @rjsf/core @rjsf/utils @rjsf/validator-ajv8 --save

added 26 packages, and audited 235 packages in 11s

41 packages are looking for funding
  run `npm fund` for details

found 0 vulnerabilities
準備ができたため、次にドキュメントのintroductionに従って実装していきます。
import {RJSFSchema} from "@rjsf/utils";
import validator from '@rjsf/validator-ajv8';
import Form from '@rjsf/core'

const schema: RJSFSchema = {
    title: 'Todo',
    type: 'object',
    required: ['title'],
    properties: {
        title: { type: 'string', title: 'Title', default: 'A new task' },
        done: { type: 'boolean', title: 'Done?', default: false },
    }
}

const log = (type) => console.log.bind(console, type)

function App() {
  return (
      <Form
          schema={schema}
          validator={validator}
          onChange={log('changed')}
          onSubmit={log('submitted')}
          onError={log('errors')}
      />
  )
}

export default App
この状態でReactを起動すると、以下のようにJSON Schemaを元にしたフォームが表示されました。

様子はわかったものの、もう少しさわってみることにします。
ボタンを追加・変更する
introductionだと submit ボタンのみを持つフォームが表示されました。
ただ、submit以外のボタンも追加したいときはどうすればよいかを調べたところ、公式ドキュメントには以下の記載がありました。childernを渡せば良さそうです。
You can provide custom buttons to your form via the Form component's children. If no children are provided, by default a Submit button will be rendered.
https://rjsf-team.github.io/react-jsonschema-form/docs/api-reference/form-props#children
実際に試してみます。
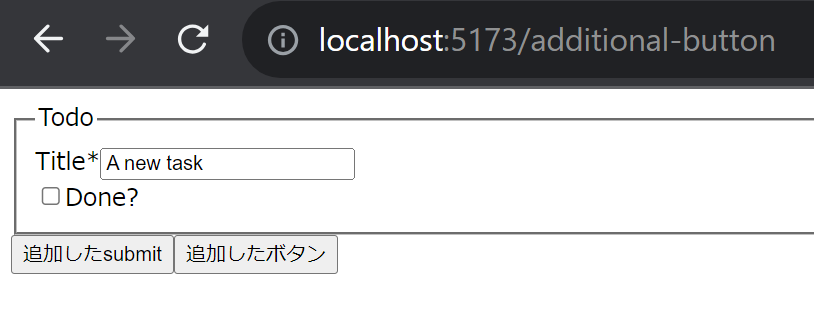
今回はFormタグのchildrenとして、複数の button を渡してみます。
<Form
  schema={schema}
  validator={validator}
  onChange={log('changed')}
  onSubmit={log('submitted')}
  onError={log('errors')}
>
  <button type='submit'>追加したsubmit</button>
  <button type='button'>追加したボタン</button>
</Form>
この状態で表示してみると、複数のボタンが表示されました。
uiSchemaを使って、入力項目をカスタマイズする
画面の入力項目をカスタマイズする方法を調べたところ、以下の記載がありました。 Formの uiSchema propsに適切な値を渡せば良さそうです。
JSON Schema is limited for describing how a given data type should be rendered as a form input component. That's why this library introduces the concept of uiSchema. A UI schema is basically an object literal providing information on how the form should be rendered, while the JSON schema tells what. The uiSchema object follows the tree structure of the form field hierarchy, and defines how each property should be rendered.
https://rjsf-team.github.io/react-jsonschema-form/docs/api-reference/uiSchema/
では実際に試してみます。
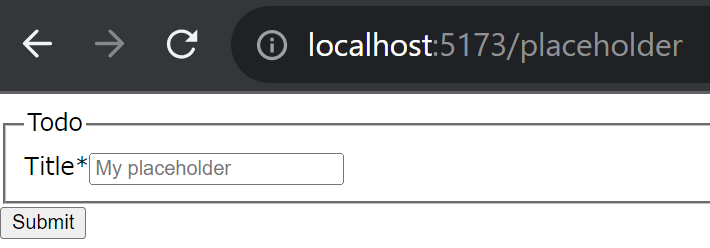
今回は、 titlte という入力項目に placeholder を追加してみます。
まずは RJSFSchema 型の properties に、 title を用意します。
const schema: RJSFSchema = {
  title: 'Todo',
  type: 'object',
  required: ['title'],
  properties: {
    title: { type: 'string', title: 'Title', default: '' },
  }
}
続いて、UiSchema 型のオブジェクトを用意し、以下を定義します。
- キー
titleのオブジェクトを用意RJSFSchemaのpropertiesのキーと名前を揃える
- placeholderを表示する
ui:placeholderキーを追加し、値にplaceholderで表示したい内容を記載
const uiSchema: UiSchema = {
  // propertiesのkey(title)と合わせるようにして定義
  title: {
    'ui:placeholder': 'My placeholder'
  }
}
あとは、FormのProps uiSchema に設定します。
export const Placeholder = () => {
  return (
    <Form schema={schema} validator={validator} uiSchema={uiSchema} />
  )
}
実装が終わったため表示してみると、指定したplaceholderが表示されました。
uiSchemaのui:widgetを使って、入力項目の見た目を変える
続いて、入力項目の見た目を変えてみます。
見た目を変えるには widget と fields の2つの方法があるようです。
The API allows to specify your own custom widget and field components:
- A widget represents a HTML tag for the user to enter data, eg. input, select, etc.
- A field usually wraps one or more widgets and most often handles internal field state; think of a field as a form row, including the labels.
https://rjsf-team.github.io/react-jsonschema-form/docs/advanced-customization/custom-widgets-fields/
今回は widget を使って見た目を変えてみます。
まず、ライブラリで用意している widget には何があるかを調べたところ、以下に ***Widget という名前で列挙されていました。
https://rjsf-team.github.io/react-jsonschema-form/docs/advanced-customization/custom-widgets-fields/
また、各widgetは、入力項目ごとに指定できるものが異なっているようでした。
https://rjsf-team.github.io/react-jsonschema-form/docs/usage/widgets
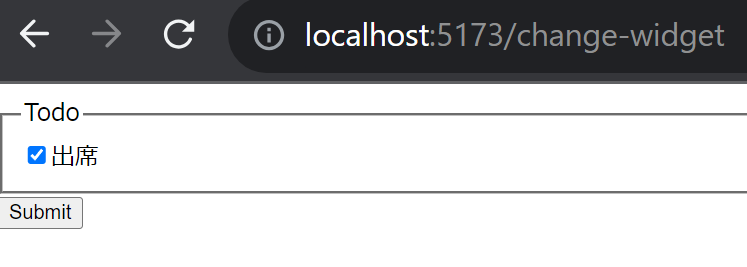
今回は boolean な入力項目を select なwidgetへと変えてみます。
デフォルトのwidgetの場合
まずは boolean な入力項目のwidgetをデフォルトのまま表示した場合の様子を見てみます。
const schema: RJSFSchema = {
  title: 'Todo',
  type: 'object',
  required: ['attendance'],
  properties: {
    attendance: { type: 'boolean', title: '出席', default: true },
  }
}

export const ChangeWidget = () => {
  return (
    <Form schema={schema} validator={validator} />
  )
}
widgetがデフォルトの場合、以下のように表示されました。
widgetを変更した場合
booleanのwidgetはデフォルトの他に、 radio や select が選べるようです。
そこで今回は select での表示としてみます。
まず、uiSchemaを定義します。
const uiSchema: UiSchema = {
  attendance: {
    'ui:widget': 'select'
  }
}
続いてFormの uiSchema props を指定します。
export const ChangeWidget = () => {
  return (
    <Form schema={schema} validator={validator} uiSchema={uiSchema} />
  )
}
表示してみると、入力項目の見た目がHTMLの select へと変更されていました。

ソースコード
Githubに上げました。
https://github.com/thinkAmi-sandbox/rjsf_mui-example
今回のプルリクはこちら。
https://github.com/thinkAmi-sandbox/rjsf_mui-example/pull/1