RailsでWebpacker以外の方法で React のSPAアプリが作れないかを調べたところ、 vite_rails がありました。
Rails Integration | Vite Ruby
webpackやRailsのWebpackerに詳しくないため、React と Rails と Vite.js を組み合わせてSPAが作れそうなのは魅力的でした。
そこで、 vite_rails を試すため、React + Rails + Vite.js なSPAアプリをモノレポで作ってみました。
目次
- 環境
- 実装することとしないこと
- 実装
- ソースコード
環境
- バックエンド
- フロントエンド
- TypeScript 4.4.4
- React.js 17.0.2
- React Router 5.2.1
- Vite.js 2.6.13
実装することとしないこと
実装すること
- React + Rails + Vite.js なSPAアプリをモノレポで作る
- vite_rails により、
bin/viteやconfig/vite.jsonを作成する - Railsから切り離しやすくするため、ReactのディレクトリはRailsのアプリディレクトリ (
app) の外側に置く
実装しないこと
- Reactのディレクトリ構造をきちんと考えること
- いろいろな構成が考えられますが、今回は適当に作ります
実装
セットアップ
Rails
rails new します。
今回のフロントエンドは Vite.js でセットアップするため、JavaScript まわりの生成はスキップします。
(JavaScriptとは関係ないものもスキップしていますが、今回試す範囲には影響ないはず)
% rails new react_with_vite_rails --skip-action-mailbox --skip-action-text --skip-action-cable --skip-sprockets --skip-javascript --skip-turbolinks --skip-jbuilder --skip-system-test
ちなみに、Rails 6.1 から最小限にするフラグ --minimal が追加されたようです。
Rails 6.1でrails newの生成を最小限にするフラグが追加(翻訳)|TechRacho by BPS株式会社
vite_rails
公式ドキュメントに従い、セットアップを行います。
Getting Started | Vite Ruby
Gemfileに追加します。
gem 'vite_rails'
bundle installします。
% bundle install

If you upgraded the gem manually, please run:
        bundle exec vite upgrade
vite_rails の install を行います。
% bundle exec vite install
Creating binstub
Check that your vite.json configuration file is available in the load path:

        No such file or directory @ rb_sysopen - path/to/react_with_vite_rails/config/vite.json

Creating configuration files
Installing sample files
Installing js dependencies

> esbuild@0.13.11 postinstall path/to/react_with_vite_rails/node_modules/esbuild
> node install.js

+ vite@2.6.13
+ vite-plugin-ruby@3.0.3
added 35 packages from 83 contributors and audited 51 packages in 7.872s

6 packages are looking for funding
  run `npm fund` for details

found 0 vulnerabilities

Adding files to .gitignore

Vite ⚡️ Ruby successfully installed! 🎉
bundle exec vite install 後に、Railsのアプリの中の app/frontend/entrypoints ディレクトリに application.js ファイルが作成されました。
ただ、今回はRailsのアプリの外に React 用のディレクトリを作るため、今は放置しておきます。
Vite.js のインストール
React + TypeScript な構成で作ります。
今回は、 ルートディレクトリの下に frontend ディレクトリを作成し、その中で React まわりを作成します。
% yarn create vite
yarn create v1.22.11
warning package.json: No license field
[1/4] 🔍  Resolving packages...
[2/4] 🚚  Fetching packages...
[3/4] 🔗  Linking dependencies...
[4/4] 🔨  Building fresh packages...
success Installed "create-vite@2.6.6" with binaries:
      - create-vite
      - cva
✔ Project name: … frontend
✔ Select a framework: › react
✔ Select a variant: › react-ts

Scaffolding project in path/to/react_with_vite_rails/frontend...

Done. Now run:

  cd frontend
  yarn
  yarn dev

✨  Done in 10.76s.
vite_rails と Vite.js の間で設定を調整
ここまでで vite_rails と Vite.js により、
が複数作成されています。
また、 tsconfig.json が Vite.js で作成された frontend ディレクトリの中にあります。
これらのファイルを調整するとともに、調整後の設定を vite_rails に伝えるため config/vite.json へ反映します。
package.json
2つの設定をマージします。
なお、 Vite.js のインストールバージョンが双方で異なっていたため、新しいバージョンの方を採用しました。
{
  "name": "frontend",
  "version": "0.0.0",
  "scripts": {
    "dev": "vite",
    "build": "tsc && vite build",
    "serve": "vite preview"
  },
  "dependencies": {
    "react": "^17.0.0",
    "react-dom": "^17.0.0"
  },
  "devDependencies": {
    "@types/react": "^17.0.0",
    "@types/react-dom": "^17.0.0",
    "@vitejs/plugin-react": "^1.0.0",
    "typescript": "^4.3.2",
    "vite": "^2.6.13",
    "vite-plugin-ruby": "^3.0.3"
  }
vite.config.ts
こちらもマージします。
vite_rails が生成した vite.config.ts に、 react プラグインを追加します。
import { defineConfig } from 'vite'
import RubyPlugin from 'vite-plugin-ruby'
import react from '@vitejs/plugin-react'

export default defineConfig({
  plugins: [
    RubyPlugin(),
    react(),  // 追加
  ],
})
tsconfig.json
frontend/tsconfig.json を tsconfig.json へ移動します。
今回は中身を変更しません。
config/vite.json
Reactのコンポーネントなどは Vite.js で生成した場所においてゆくため、 sourceCodeDir を rails_vite が生成した app/frontend から、Vite.jsで生成した frontend へと切り替えます。
{
  "all": {
    // 変更前
    //    "sourceCodeDir": "app/frontend",
    // 変更後
    "sourceCodeDir": "frontend",
    "watchAdditionalPaths": []
  },
以上で調整が終わりました。調整の詳細は、以下のコミットとなります。
https://github.com/thinkAmi-sandbox/react_with_vite_rails-sample/commit/ecb76c98455d32c79db02d1d6d8de50697cd7575
RailsのViewの上で、React のコンポーネントを動かす
RailsのControllerとViewを生成
Controller と View を生成します。
% bin/rails g controller hello index
Running via Spring preloader in process 29384
      create  app/controllers/hello_controller.rb
       route  get 'hello/index'
      invoke  erb
      create    app/views/hello
      create    app/views/hello/index.html.erb
      invoke  test_unit
      create    test/controllers/hello_controller_test.rb
      invoke  helper
      create    app/helpers/hello_helper.rb
      invoke    test_unit
      invoke  assets
      invoke    css
      create      app/assets/stylesheets/hello.css
Layoutの修正
vite_rails のタグを Layout に追加します。
vite_client_tag- Hot Module Reload 用
vite_react_refresh_tag- React 向けに、 追加が必要な Hot Module Reload 用
vite_javascript_tag 'main.tsx'- 今回は React のエントリポイントディレクトリにある
main.tsxを指定- このファイルに、React Routerのルーティングを書く予定
- 今回は React のエントリポイントディレクトリにある
また、CSSの読み込みは行わないので、 stylesheet_link_tag 'application', media: 'all' はコメントアウト(削除)しておきます。
app/views/layouts/application.html.erb
<!DOCTYPE html>
<html>
  <head>
    <title>ReactWithViteRails</title>
    <meta name="viewport" content="width=device-width,initial-scale=1">
    <%= csrf_meta_tags %>
    <%= csp_meta_tag %>

    <!-- 追加 開始 --->
    <%= vite_client_tag %>
    <%= vite_react_refresh_tag %>
    <%= vite_javascript_tag 'main.tsx' %>
    <!-- 追加 終了 --->
  </head>

  <body>
    <%= yield %>
  </body>
</html>
Viewの修正
Controllerはそのままにします。
Viewに React 用の id を設定します。
app/views/hello/index.html.erb
<div id="root"></div>
routesを修正
hello#index を root として設定します。
config/routes.rb
Rails.application.routes.draw do
  root 'hello#index'
end
pumaの起動ポートを修正
他のアプリと重複するのを避けるため、適当なポートへ変更しておきます。
port ENV.fetch("PORT") { 7100 }
Helloコンポーネントを作成
hello と表示するだけのコンポーネントです。
frontend/src/components/Hello.tsx
const Home = (): JSX.Element => {
    return (
        <>
            <h1>hello</h1>
        </>
    )
}

export default Home
main.tsx を修正
先ほど作成した Hello コンポーネントを組み込んで表示します。
(なお、importする時に名前を誤って Home にしてしまいましたが、あとで直すので気にしないこととします)
frontend/src/main.tsx
import ReactDOM from "react-dom";
import React from "react";
import Home from "./components/Hello";

ReactDOM.render(
    <React.StrictMode>
        <Home />
    </React.StrictMode>,
    document.getElementById('root')
)
config/vite.json を修正
エントリポイントディレクトリを Vite.js で生成した frontend の下の src に変更します。
これで、Railsの Layouts で <%= vite_javascript_tag 'main.tsx' %> とした時に、 frontend/src/main.tsx が読み込まれるようになります。
{
  "all": {
    "sourceCodeDir": "frontend",
    "entrypointsDir": "src",  // 追加
    "watchAdditionalPaths": []
  },
...
}
動作確認
ここまでで準備ができたため、RailsとVite.jsの両サーバを起動して動作を確認します。
Vite.jsのサーバ
$ bin/vite dev
Railsのサーバ
% bin/rails s
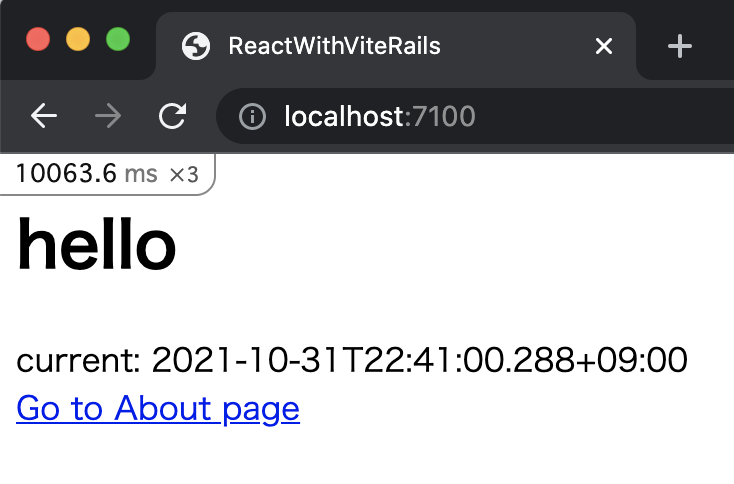
http://localhost:7100 にアクセスしたところ、 hello が表示されました。

ここまでのコミットはこちら。
https://github.com/thinkAmi-sandbox/react_with_vite_rails-sample/commit/7da5085e782b0333c4c54325e8ef9b2b00bef5d6
axiosをセットアップし、RailsのAPIからデータを取得して表示する
続いて、RailsのAPIからデータを取得し、画面に表示することを試してみます。
RailsのAPIを作成
このAPIはJSONを返すだけなので、 --no-assets で生成します。
% rails g controller api --no-assets
Running via Spring preloader in process 47954
      create  app/controllers/api_controller.rb
      invoke  erb
      create    app/views/api
      invoke  test_unit
      create    test/controllers/api_controller_test.rb
      invoke  helper
      create    app/helpers/api_helper.rb
      invoke    test_unit
生成されたコントローラーを修正します。
React側でローディング中の表示を行うため、重い処理をしているつもりで sleep を入れてあります。
また、日時を画面に表示できれば良いので、日時の表示形式は特に考えず、そのままレスポンスすることにします。
app/controllers/api_controller.rb
class ApiController < ApplicationController
  def now
    # 重い処理をしているつもり
    sleep 1

    # レスポンスを返す
    render json: {
      current: Time.now
    }
  end
end
routesも追加します。
config/routes.rb
Rails.application.routes.draw do
  root 'hello#index'

  get 'api/now'  # 追加
end
Rails側の実装が終わったため、続いてReact側を実装します。
axiosのインストール
% yarn add axios
% yarn add -D @types/axios
APIからデータを取得するカスタムフックを作成
今回はAPIからデータを取得するところをカスタムフックとして作成します。
frontend/src/hooks/useFetchApi.tsx
import axios, {AxiosError} from 'axios'
import {useEffect, useState} from "react";

type ResponseData = {
    current: string
}

export interface Response {
    data: ResponseData
    error: AxiosError | null,
    loading: boolean
}

export const useFetchApi = () => {
    const [response, setResponse] = useState<Response>({ data: { current: '' }, error: null, loading: false })

    useEffect(() => {
        fetchRequest()
    }, [])

    const fetchRequest = () => {
        setResponse(prevState => ({ ...prevState, loading: true }))
        axios.get<ResponseData>('http://localhost:7100/api/now').then((response) => {
            setResponse({ data: response.data, error: null, loading: false })
        }).catch(error => {
            setResponse({ data: { current: '' }, error: error, loading: false })
        })
    }

    return response
}
「カスタムフックの結果を表示する」コンポーネントの作成
APIから取得した現在時刻をそのまま表示します。
frontend/src/components/CurrentTime.tsx
import {useFetchApi} from "../hooks/useFetchApi";

const CurrentTime = (): JSX.Element => {
    const { data, error, loading } = useFetchApi()

    if (loading) return <div>...loading</div>
    if (error) return <div>{error.message}</div>

    return (
        <div>current: {data.current}</div>
    )
}

export default CurrentTime
main.tsx にコンポーネントを追加
現在時刻を表示するコンポーネントを追加します。
import ReactDOM from "react-dom";
import React from "react";
import Hello from "./components/Hello";
import CurrentTime from "./components/CurrentTime";

ReactDOM.render(
    <React.StrictMode>
        <Hello />
        <CurrentTime />
    </React.StrictMode>,
    document.getElementById('root')
)
動作確認
最初は loading 表示になります。

1秒くらい経過すると、現在時刻が表示されました。

React Routerでのルーティングを追加
Rails側
フロントエンドでルーティングするため、マッチしないルートが来てもフロントへ渡します。
Rails.application.routes.draw do
  root 'hello#index'
  get 'api/now'

  # マッチしないルートはフロントに流す
  get '*all', to: 'hello#index'
  # For details on the DSL available within this file, see https://guides.rubyonrails.org/routing.html
end
React Routerのインストール
% yarn add react-router-dom
% yarn add -D @types/react-router-dom
各ページのコンポーネントを作成
今回は
- HelloPage
- 今まで作ってきた、現在時刻を表示するコンポーネントをここへ移動
- AboutPageへのリンクあり
- AboutPage
- HelloPageへのリンクあり
- NotFoundPage
- どのルートにもマッチしない場合に表示
- HelloPageへのリンクあり
の3つのページのコンポーネントを作成します。
HelloPage
今まで作ってきたコンポーネントを移動したものです。
また、フロントでルーティングするため、React Routerの Link コンポーネントを使っています。
https://reactrouter.com/web/api/Link
import Hello from "../components/Hello";
import CurrentTime from "../components/CurrentTime";
import {Link} from "react-router-dom";

const HelloPage = (): JSX.Element => {
    return (
        <>
            <Hello />
            <CurrentTime />

            <Link to="/about">Go to About page</Link>
        </>
    )
}

export default HelloPage
AboutPage
import { Link } from 'react-router-dom'

const AboutPage = (): JSX.Element => {
    return (
        <>
            <h1>About Page</h1>
            <Link to="/">Go to Hello page</Link>
        </>
    )
}

export default AboutPage
NotFoundPage
中身はAboutPageと変わりません。
import { Link } from 'react-router-dom'

const NotFoundPage = (): JSX.Element => {
    return (
        <>
            <h1>Not Found Page</h1>
            <Link to="/">Go to Hello page</Link>
        </>
    )
}

export default NotFoundPage
main.tsxにReact Routerを組み込む
マッチさせたい順に設定するため、
/about/- その他
の順に Route を書きます。
import ReactDOM from "react-dom";
import React from "react";
import {Switch} from "react-router"
import {BrowserRouter, Route} from "react-router-dom";
import HelloPage from "./pages/HelloPage";
import AboutPage from "./pages/AboutPage";
import NotFound from "./pages/NotFound";

ReactDOM.render(
    <React.StrictMode>
        <BrowserRouter>
            <Switch>
                <Route path="/about">
                    <AboutPage />
                </Route>

                <Route exact path="/">
                    <HelloPage />
                </Route>

                <Route>
                    <NotFound />
                </Route>
            </Switch>
        </BrowserRouter>
    </React.StrictMode>,
    document.getElementById('root')
)
以上で実装は終わりです。コミットはこちら。
https://github.com/thinkAmi-sandbox/react_with_vite_rails-sample/commit/bc350f88e0bc3ca4e6ec2dfc1392939e8fbff5a0
動作確認
/ にアクセスした時
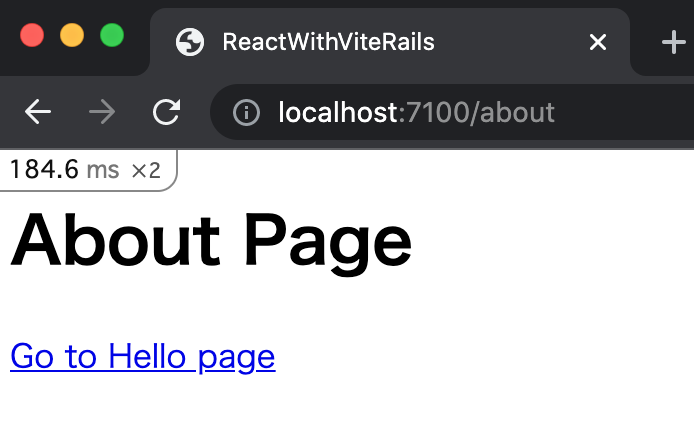
/about にアクセスした時
/foo にアクセスした時
ルートとしては存在しないため、NotFoundPage が表示されます。

以上より、Webpackerを使わずに、 React + Rails + Vite.js なSPAアプリをモノレポで作っても動作することが分かりました。
ソースコード
Githubに上げました。
https://github.com/thinkAmi-sandbox/react_with_vite_rails-sample
今回のPRはこちらです。
https://github.com/thinkAmi-sandbox/react_with_vite_rails-sample/pull/1