Play Framework アプリに React を組み込んでみる機会がありました。
ただ、Reactを使って SPA にするのではなく、まずは
- ルーティングは Play Framework (バックエンド)が担当
- Play Framework の View上で React が動く
- Scriptタグでコンパイルした React を読み込む
という、MPA (Multi Page Application) な Play Framework アプリの作成を考えました。
MPAで作るにはどうすれば良いかを調べたところ、以下の記事がありました。とても分かりやすく参考になりました。ありがとうございました。
Integrate Vue.js into existing Play Framework project | CyberAgent Developers Blog
上記の記事のまとめには
本ブログではVue.jsを既存のPlay Frameworkに統合する方法を紹介しましたが、AngularJS、Reactを統合する方法もほぼ同じです。ぜひこれを参考に、様々な Modern WebSiteを作っていきましょう。
と書かれていたことから、React であっても作れるかもしれないと考え、この記事をベースに作ってみることにしました。
ただ、いろいろ悩んだことがあったため、メモを残します。
目次
- 環境
- 課題:Assets のフィンガープリントを誰が付与するか
- 実装
- 動作確認
- ソースコード
環境
実装すること
- Play Framework の View に React を組み込むこと
- 1つのViewで1つのReact アプリ
- Viewでは script タグで読み込む
- React を始めとする Assets には、フィンガープリントが付いていること
73ee83e91609731acc7ecffc9854ecfb-vendor.jsみたいなの
- React は TypeScript で書くこと
sbt runで、Play と React の両方をコンパイルした上で動作すること
実装しないこと
- SPAなアプリにすること
- Reactから Play Framework の API にアクセスすること
- Viteでビルドするが、バックエンドとは統合しないこと
- Backend Integration | Vite
- DjangoやLaravelのように統合しやすくなった時に考える
構成
- Play Frameworkまわり
- Reactまわり
- React 17.0.2
- create-react-app ではなく、 Vite でセットアップ
- TypeScript 4.4.3
- React 17.0.2
- ビルドツール
- vite 2.6.2
作るもの
方針
ページは以下の3つを作ります。Reactの有無などは以下の通りです。
| No | URL | 説明 | Reactファイル |
|---|---|---|---|
| 1 | / |
いわゆるHome | なし |
| 2 | /apple |
りんご一覧ページ | apple.js |
| 3 | /sweet_potato |
さつまいも一覧ページ | sweet_potato.js |
なお、各ページのルーティングはサーバサイドで行います。
ディレクトリ構造
主なディレクトリとファイルは以下の通りです。
.
├── app
│   ├── controllers/    # Play の Controller
│   └── views/          # PlayのView
├── build.sbt
├── conf/
│   ├── application.conf
│   ├── logback.xml
│   ├── messages
│   └── routes
├── frontend/
│   ├── node_modules/
│   ├── package.json
│   ├── project
│   │   ├── build.properties
│   │   └── target/
│   ├── src/
│   │   ├── components/          # React の各コンポーネント
│   │   ├── pages/
│   │   │   ├── apple/           # `/apple` ページ
│   │   │   └── sweet_potato/    # `/sweet_potate` ページ
│   │   └── vite-env.d.ts
│   ├── target/
│   ├── tsconfig.json
│   ├── vite.config.ts
│   └── yarn.lock
├── logs/
├── project/
├── public/
│   └── vite_assets/             # Viteでビルドした時の出力先 兼 PlayのAssets
├── target/
└── test/
完成イメージ
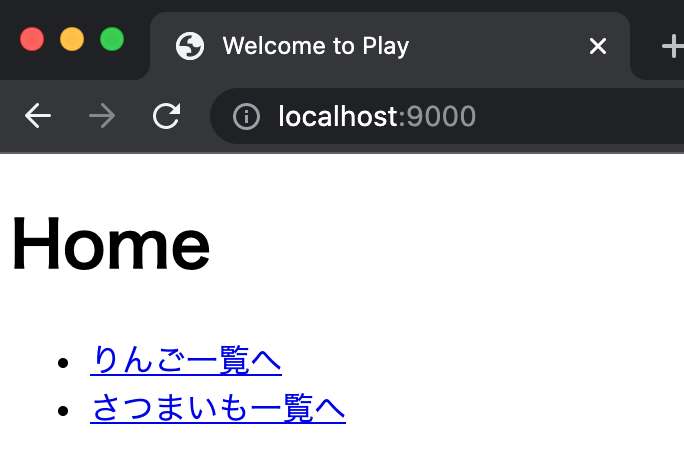
Home
React を使わない Twirl だけのページです。各ページへのリンクを置いてあります。
りんご一覧ページ
Homeにある りんご一覧ページへ をクリックすると、このページへ遷移します。
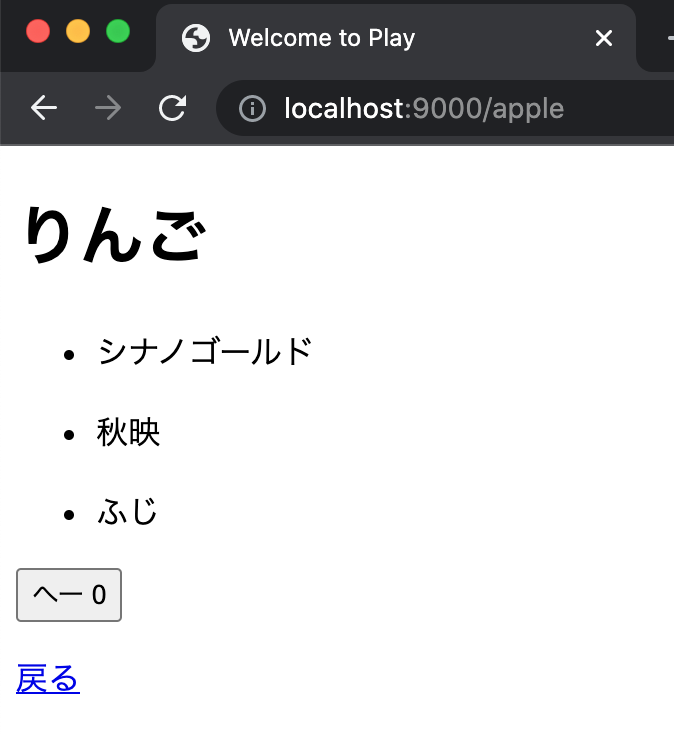
なお、 へー ボタンを押すと、数字がカウントアップします。
カウントアップは React Hooks の useState を使い、 Twirl 上で React が動作することを確認します。

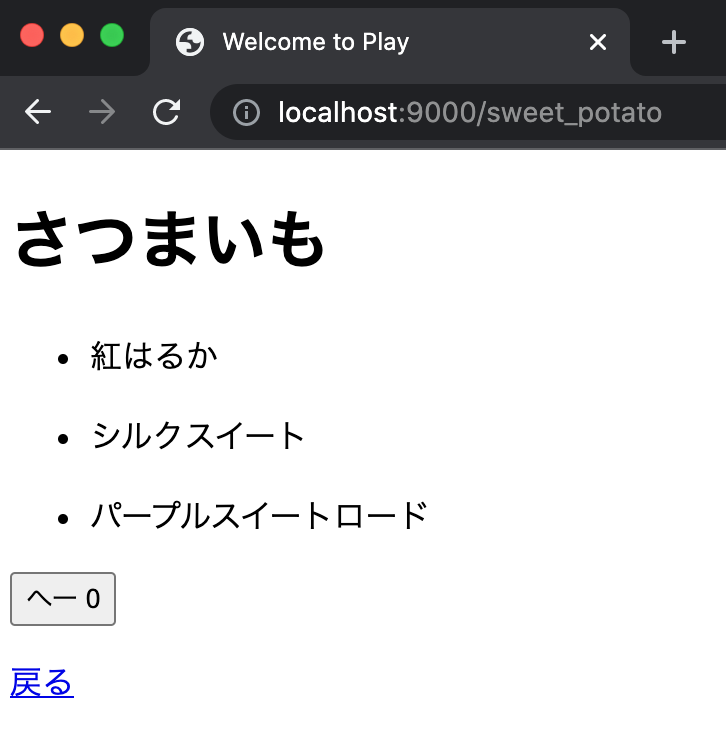
さつまいも一覧ページ
こちらはりんご一覧ページと同じです。
課題:Assets のフィンガープリントを誰が付与するか
Play Frameworkでは routes に
GET /assets/*file controllers.Assets.versioned(path="/public", file: Asset)
と書いて、Twirlに
<link rel="stylesheet" href="@routes.Assets.versioned("assets/css/app.css")">
と書くことで、フィンガープリントが付いた Assets へのリンクが自動で作成されます。
Using reverse routing and static state | Assets Overview - 2.8.x
では、各ファイルにフィンガープリントを付与するのはどこで行えばよいのかを考えてみます。
Reactで付与するのも良いのですが、 React 以外の Asset を使うことも想定されます。
そこで、
- React では付与しない
- Playのビルド時に
sbt-digestを使って付与する
なことができるかを調べてみます。
Reverse routing and fingerprinting for public assets | Assets Overview - 2.8.x
今回の React アプリは create-react-app を使って作成します。ただ、 create-react-app で作ったReactアプリではフィンガープリントを無効にするのは難しそうでした。
Generate build without hashed file names. · Issue #821 · facebook/create-react-app
対応するには
- ファイルのリネーム
- create-react-appのeject
など、少々つらい方面でした。
それ以外の方法を調べたところ、Vue.jsを作ったEvan You氏が開発した Vite というビルドツールがありました。
Home | Vite
Viteのドキュメントを見たところ、
create-react-appなしでも、Reactアプリの生成やビルドができそうMulti-Page Appの機能を使えば、画面ごとに React アプリを用意できそう- 内部で使用している
rollup.jsの機能により、ファイルのフィンガープリントを取り除けそう- 出力時のファイル名から
[hash]を取り除けば良さそう - output.entryFileNames | rollup.js
- 出力時のファイル名から
と分かりました。
そこで今回は Vite を使ってみることにしました。
実装
Play Framework と React の初期セットアップ
まずは sbt new で Play Framework アプリを生成します。
 % sbt new playframework/play-scala-seed.g8
...
name [play-scala-seed]: mpa_app_with_play_react_vite
organization [com.example]: com.example.thinkami
続いて Vite を使い React をセットアップします。
# ディレクトリを移動
% cd mpa_app_with_play_react_vite


# Vite でセットアップ
% npm init vite@latest
npx: installed 6 in 2.148s
...

# React アプリを入れるディレクトリを `frontend` として設定
✔ Project name: … frontend

# React を選択
✔ Select a framework: › react

# TypeScript を使うため、 `react-ts` を選択
✔ Select a variant: › react-ts

Done. Now run:

  cd frontend
  npm install
  npm run dev


# `frontend` ディレクトリへ移動してインストール
% cd frontend
% yarn install


# Node.jsの型定義を使うため、追加でインストール
% yarn add -D @types/node
これで Play Framework + React の初期セットアップができました。
React の 各Component を作成
List コンポーネント
一覧表示するためのコンポーネントを用意します。
// src/components/List.tsx

export type Props = {
    items: string[]
}

const Component = ({items}: Props): JSX.Element => {
    return (
        <ul>
            {items.map((item) => (
                <li key={item}>
                    <p>{item}</p>
                </li>
            ))}
        </ul>
    )
}
export default Component
Counter コンポーネント
へー ボタンを用意し、クリックするたびに +1 するための処理を入れます。
// src/components/Counter.tsx

import {useState} from "react";

const Component = (): JSX.Element => {
    const [count, setCount] = useState(0)

    return (
        <>
            <button type="button" onClick={() => setCount((count) => count + 1)}>
                へー {count}
            </button>
        </>
    )
}
export default Component
ListApp コンポーネント
ListとCounterを組み合わせたコンポーネントです。
りんご一覧とさつまいも一覧のページのひな形になっています。
// src/components/ListApp.tsx

import List from "./List";
import Counter from "./Counter";

export type Props = {
    name: string
    items: string[]
}

const ListApp = ({name, items}: Props): JSX.Element => {
    return (
        <>
            <h1>{name}</h1>
            <List items={items} />
            <Counter />
            <p><a href="/">戻る</a></p>
        </>
    )
}
export default ListApp
Reactの各ページを作成
先ほど作成したコンポーネントを ReactDOM.render します。
りんご一覧ページは以下の通りです。
さつまいも一覧ページは ListApp の引数 name だけが異なるため、ここでは省略します。
// src/pages/apple/index.tsx

import React from "react";
import ReactDOM from "react-dom";
import ListApp from "../../components/ListApp";

ReactDOM.render(
    <React.StrictMode>
        <ListApp name={'りんご'} items={['シナノゴールド', '秋映', 'ふじ']} />
    </React.StrictMode>,
    document.getElementById('root')
)
ここまでで React の必要なページとコンポーネントができました。
Viteの設定ファイル frontend/vite.config.ts を編集
Viteでのビルド設定を vite.config.ts に記載します。
出力先ディレクトリの設定
Play Framework の Assets ディレクトリである public の中に出力すると、その先は Play Framework に任せることができそうです。
そこで、
- 出力時、以前のビルドファイルをクリアする
- 出力先を
public/vite_assetsディレクトリにする
の各設定を追加します。
なお、出力先は frontend ディレクトリの外側になるため、 resolve() と __dirname と .. を使って指定します。
javascript - fs: how do I locate a parent folder? - Stack Overflow
export default defineConfig({
  plugins: [react()],
  build: {
    // 再度ビルドした時に、以前のファイルを消す
    emptyOutDir: true,
    // ビルドしたファイルを変更する
    outDir: resolve(__dirname, '..', 'public', 'vite_assets'),
Multi-Page Appの設定を追加
今回はViewごとにReactのエントリポイントを用意する必要があります。
そこで、Multi-Page Appとなるよう、以下の記事に従い rollupOptions の Input に設定を行います。
Multi-Page App | Building for Production | Vite
今回は
- エントリポイント
src/pages/apple/index.tsxを元にapple.jsを出力 - エントリポイント
src/pages/sweet_potato/index.tsxを元にsweet_potato.jsを出力
となるよう、Inputのキーにはビルドしてできるファイル名を、値にはエントリポイントのファイル名を指定します。
export default defineConfig({
  build: {
    rollupOptions: {
      input: {
        apple: resolve(__dirname, 'src', 'pages', 'apple', 'index.tsx'),
        sweet_potato: resolve(__dirname, 'src', 'pages', 'sweet_potato', 'index.tsx')
      },
出力ファイル名の設定を追加
今回はフィンガープリントを付けない形での出力ファイル名とするため、rollupOptions の Output に設定を行います。
build.rollupOptions | Configuring Vite | Vite
rollupOptionsについては rollup.js のドキュメントに記載があります。
今回は
- entryFileNames
- chunkFileNames
- assetFileNames
を設定します。
export default defineConfig({
  build: {
    rollupOptions: {
      output: {
        entryFileNames: '[name].js',
        chunkFileNames: '[name].js',
        assetFileNames: '[name][extname]',
      }
以上で Vite の設定も完了です。
Play Framework の実装
Controller
今回は View をそのまま表示するだけです。
ここでは AppleController だけ記載しますが、他もほぼ同じ Controller です。
package controllers
import play.api.mvc._
import javax.inject._

@Singleton
class AppleController @Inject()(val cc: ControllerComponents) extends AbstractController(cc) {
  def index(): Action[AnyContent] = Action { implicit request: Request[AnyContent] =>
    Ok(views.html.apple())
  }
}
View
index.scala.html
Twirl そのままです。Reactを使っているページへのリンクを付けています。
@()

@main("Welcome to Play") {
  <h1>Home</h1>
  <ul>
    <li><a href="/apple">りんご一覧へ</a></li>
    <li><a href="/sweet_potato">さつまいも一覧へ</a></li>
  </ul>
}
apple.scala.html
ビルドしたJavaScriptを script タグで読み込みます。
@()

@main("Welcome to Play") {
  <div id="root"></div>

  <script type="module" src="@routes.Assets.versioned("vite_assets/vendor.js")"></script>
  <script type="module" src="@routes.Assets.versioned("vite_assets/apple.js")"></script>
}
sweet_potato.scala.html
apple.scala.html とは、2つ目の script タグの src のみ異なります。
@()

@main("Welcome to Sweet Potato") {
  <div id="root"></div>

  <script type="module" src="@routes.Assets.versioned("vite_assets/vendor.js")"></script>
  <script type="module" src="@routes.Assets.versioned("vite_assets/sweet_potato.js")"></script>
}
routes
各コントローラのルーティングを追加します。
なお、Assetsのルーティングはデフォルトのままです。
GET     /                           controllers.HomeController.index()
GET     /apple                      controllers.AppleController.index()
GET     /sweet_potato               controllers.SweetPotatoController.index()

# Map static resources from the /public folder to the /assets URL path
GET     /assets/*file               controllers.Assets.versioned(path="/public", file: Asset)
Play Frameworkのビルド設定
sbt run でフロントエンドとバックエンドが両方コンパイルできるようにする
Play Frameworkのアプリを sbt run で起動すると、 dev mode となります。
公式ドキュメントによると、dev modeで起動する場合、以下のメソッドを使うことにより処理を差し込めそうです。
- beforeStarted(): Unit - called before the play application is started, but after all “before run” tasks have been completed.
- afterStarted(): Unit - called after the play application has been started.
- afterStopped(): Unit - called after the play process has been stopped.
そこで、冒頭でも紹介した記事を参考にしながら必要なものを実装していきます。
Integrate Vue.js into existing Play Framework project | CyberAgent Developers Blog
PlayKeys.playRunHooks 用のクラスを作成
PlayKeys.playRunHooks 用のクラスとして、 project/PlayDevRunHook.scala を実装します。
import java.io.PrintWriter
import play.sbt.PlayRunHook
import sbt._

import scala.io.Source
import scala.sys.process.Process
import scala.util.Using

object PlayDevRunHook {
  def apply(base: File): PlayRunHook = {
    val frontendBase = base / "frontend"
    val packageJsonPath = frontendBase / "package.json"
    // フロントエンドのビルド時に vite_assets にあるファイルが消されてしまうので、package.json と同じディレクトリに置いておく
    val packageJsonHashPath = frontendBase / "package.json.hash"

    object FrontendBuildProcess extends PlayRunHook {
      var process: Option[Process] = None

      override def beforeStarted(): Unit = {
        println("Hook to Play Framework dev run -- beforeStarted")

        val currPackageJsonHash = Using(Source.fromFile(packageJsonPath)) { source =>
          source.getLines().mkString.hashCode().toString
        }.getOrElse("")

        val oldPackageJsonHash = getStoredPackageJsonHash

        // frontend/package.json が変更されたら、もう一度 'yarn install` コマンドを実行する
        if (!oldPackageJsonHash.contains(currPackageJsonHash)) {
          println(s"Found new/changed package.json. Run yarn install ...")

          // 同期的にインストールを実行
          Process("yarn install", frontendBase).!

          updateStoredPackageJsonHash(currPackageJsonHash)
        }
      }

      override def afterStarted(): Unit = {
        println(s"> Watching frontend changes in $frontendBase")
        // フロントエンドのビルド用のプロセスを立ち上げ、非同期で実行する
        process = Option(Process("yarn build --watch", frontendBase).run)
      }

      override def afterStopped(): Unit = {
        // フロントエンドのビルド用のプロセスを停止する
        process.foreach(_.destroy)
        process = None
      }

      private def getStoredPackageJsonHash: Option[String] = {
        if (packageJsonHashPath.exists()) {
          val hash = Using(Source.fromFile(packageJsonHashPath)) { source =>
            source.getLines().mkString
          }
          Some(hash.getOrElse(""))
        } else {
          None
        }
      }

      private def updateStoredPackageJsonHash(hash: String): Unit = {
        Using(new PrintWriter(packageJsonHashPath)) { writer =>
          writer.write(hash)
        }
      }
    }

    FrontendBuildProcess
  }
}
修正箇所としては
- 今回のアプリでは
yarn installやyarn build --watchは一箇所でしか使わないため、Shell object をインライン化 - 元の実装ではビルドしたアプリの出力先に
package.json.hashを出力していたが、Viteでビルドする時に出力先のファイルをすべて削除してしまうため、package.jsonと同じディレクトリに置く scala.util.Usingの使用や、戻り値の型を追加するなど、IDEでの警告に対応
です。
なお、 Shell object の記法について、一部調べたことがあったため、メモとして残します。
object Shell {
  def execute(cmd: String, cwd: File, envs: (String, String)*): Int = {
    Process(cmd, cwd, envs: _*).!
  }

  def invoke(cmd: String, cwd: File, envs: (String, String)*): Process = {
    Process(cmd, cwd, envs: _*).run
  }
}
まず、可変長引数まわりです。
envs: (String, String)*の(String, String)*は可変長引数としてのタプルです。Process(cmd, cwd, envs: _*)の_*は、可変長引数を Process に渡しています。
このあたりは、Pythonと比較した記法が紹介されている以下がわかりやすかったです。
syntax - What does param: _* mean in Scala? - Stack Overflow
次は、Process のメソッド
!run
の違いです。
これについては、Scala Standard Library に記載があり、ざっくり run は非同期・ ! は同期での実行と理解しました。
Starting Processes
To execute all external commands associated with a ProcessBuilder, one may use one of four groups of methods. Each of these methods have various overloads and variations to enable further control over the I/O. These methods are:
- run: the most general method, it returns a scala.sys.process.Process immediately, and the external command executes concurrently.
- !: blocks until all external commands exit, and returns the exit code of the last one in the chain of execution.
- !!: blocks until all external commands exit, and returns a String with the output generated.
- lazyLines: returns immediately like run, and the output being generated is provided through a LazyList[String]. Getting the next element of that LazyList may block until it becomes available. This method will throw an exception if the return code is different than zero -- if this is not desired, use the lazyLines_! method.
build.sbt に追記
公式ドキュメントの記述に従い、 build.sbt に追加します。
// sbt run 時に、フロントエンドもコンパイルする
PlayKeys.playRunHooks += PlayDevRunHook(baseDirectory.value)
ビルド時に Assets にフィンガープリントを付与する
JavaScript などの Assets の Cache Busting として、ビルド時にフィンガープリントを付与するよう設定します。
Play Framework の場合、sbt-web と sbt-digest を使います。
- sbt/sbt-web: Library for building sbt plugins for the web
- sbt/sbt-digest: sbt-web plugin for checksum files
sbt-digest のREADMEと以下の記事を参考に、設定を行います。
Play Frameworkでブラウザキャッシュ対策(Cache Busting) - Qiita
まず project/plugins.sbt に以下を追加します。
addSbtPlugin("com.typesafe.sbt" % "sbt-digest" % "1.1.4")
続いて、 build.sbt に追記します。
なお、今回は開発環境でもフィンガープリントを付与する設定を行います。
lazy val root = (project in file("."))
  .enablePlugins(PlayScala)
  .enablePlugins(SbtWeb)  // 追加

// 開発環境でもフィンガープリントを付与
Assets / pipelineStages := Seq(digest)
ちなみに、sbt 1.5 より、 pipelineStages in Assets ではなく Assets / pipelineStages となったようです。
Migrating to slash syntax | sbt Reference Manual — Migrating from sbt 0.13.x
dist taskにて、Play Framework に React を含めるようにする
Play Framework では dist taskを使うことでバイナリバージョンができます。
その dist task にも React を含めるよう、 build.sbt に設定を追加します。
lazy val frontEndBuild = taskKey[Unit]("Execute dashboard frontend build command")

val frontendPath = "frontend"
val frontEndFile = file(frontendPath)

frontEndBuild := {
  println(Process("yarn install", frontEndFile).!!)
  println(Process("yarn build", frontEndFile).!!)
}

dist := (dist dependsOn frontEndBuild).value
stage := (stage dependsOn dist).value
動作確認
sbt run 時にフロントエンドもコンパイルされること
ログを見たところ、コンパイルされていました。
% sbt run
...
[info] p.c.s.AkkaHttpServer - Listening for HTTP on /0:0:0:0:0:0:0:0:9000
> Watching frontend changes in path/to/mpa_app_with_play_react_vite/frontend

(Server started, use Enter to stop and go back to the console...)

yarn run v1.22.11
warning package.json: No license field
$ tsc && vite build --watch
vite v2.6.2 building for production...

watching for file changes...

build started...
transforming...
✓ 31 modules transformed.
rendering chunks...
../public/vite_assets/apple.js          0.26 KiB / gzip: 0.21 KiB
../public/vite_assets/sweet_potato.js   0.33 KiB / gzip: 0.23 KiB
../public/vite_assets/ListApp.js        0.48 KiB / gzip: 0.30 KiB
../public/vite_assets/vendor.js         129.47 KiB / gzip: 41.77 KiB
built in 1646ms.
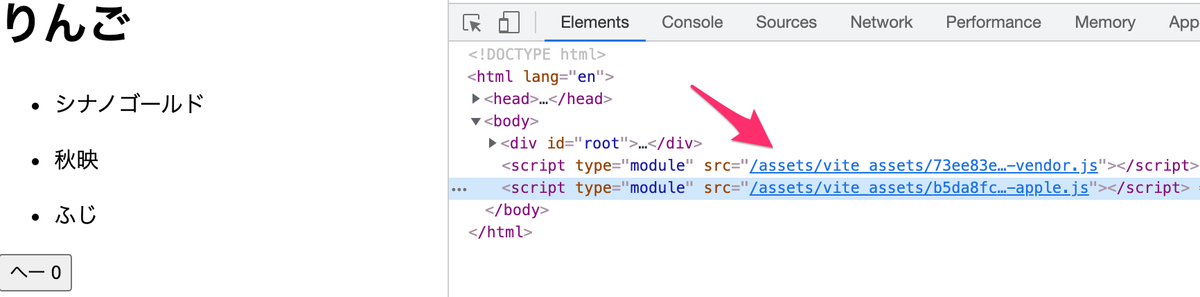
scriptタグにフィンガープリントが付いていること
Elementを開いてみると、scriptタグにフィンガープリントが付与されていることを確認できました。
ソースコード
Github に上げました。
https://github.com/thinkAmi-sandbox/mpa_app_with_play_react_vite
今回のPRはこちらです。
https://github.com/thinkAmi-sandbox/mpa_app_with_play_react_vite/pull/1