PythonのReportLabで、表(TableやTableStyle)について調べてみた

ReportLabでpdfに表を描いてみたところ、悩んだところがあったため、メモを残しておきます。

なお、詳細はReportLabの公式ドキュメント中の「ReportLab PDF LibraryUser Guide」のp77〜にも記載があります。

 
目次


環境

 
今回使うReportLabの実装は、基本的な形は以下となります。必要に応じてこのクラスを継承、_draw()メソッドをオーバーライドして各表を描きます。

注意点として、デフォルトと異なり、pdfの原点を左上(bottomup=False)にしてあります。

base.py

from django.http import HttpResponse
from django.views import View

from reportlab.lib.pagesizes import A4
from reportlab.lib.pagesizes import portrait
from reportlab.pdfbase import pdfmetrics
from reportlab.pdfbase.cidfonts import UnicodeCIDFont
from reportlab.pdfgen import canvas
from reportlab.lib.units import mm


class BaseView(View):
    filename = 'example.pdf'
    title = 'title: example'
    font_name = 'HeiseiKakuGo-W5'
    is_bottomup = False

    def get(self, request, *args, **kwargs):
        # pdf用のContent-TypeやContent-Dispositionをセット
        response = HttpResponse(status=200, content_type='application/pdf')
        response['Content-Disposition'] = 'filename="{}"'.format(self.filename)
        # 即ダウンロードしたい時は、attachmentをつける
        # response['Content-Disposition'] = 'attachment; filename="{}"'.format(self.filename)

        # 日本語が使えるゴシック体のフォントを設定する
        pdfmetrics.registerFont(UnicodeCIDFont(self.font_name))

        # A4縦書きのpdfを作る
        size = portrait(A4)

        # pdfを描く場所を作成:位置を決める原点は左上にする(bottomup)
        # デフォルトの原点は左下
        doc = canvas.Canvas(response, pagesize=size, bottomup=self.is_bottomup)

        # pdfのタイトルを設定
        doc.setTitle(self.title)

        # pdf上にも、タイトルとして使用したクラス名を表示する
        doc.drawString(10*mm, 10*mm, self.__class__.__name__)

        self._draw(doc)

        return response


    def _draw(self, doc):
        pass


複数列・複数行の表を作成

複数列・複数行の表を描くには、

  • 複数列:配列の要素が複数あるデータを用意
  • 複数行:2次元配列としてデータを用意

とします。

以下の場合、3列3行の表のデータとなります。

data = [
    ['行1-列1', '行1-列2-*********', '行1-列3-*********-*********'],
    ['行2-列1', '行2-列2-*********', '行2-列3-*********-*********'],
    ['行3-列1', '行3-列2-*********', '行3-列3-*********-*********'],
]

 
上記のデータを使って表を描いてみます。

multi_rows.py

class BasicMultiRows(BaseView):
    def _draw(self, doc):
        # 複数行の表を用意したい場合、二次元配列でデータを用意する
        data = [
            ['行1-列1', '行1-列2-*********', '行1-列3-*********-*********'],
            ['行2-列1', '行2-列2-*********', '行2-列3-*********-*********'],
            ['行3-列1', '行3-列2-*********', '行3-列3-*********-*********'],
        ]

        table = Table(data)
        # TableStyleを使って、Tableの装飾をします
        table.setStyle(TableStyle([
            # 表で使うフォントとそのサイズを設定
            ('FONT', (0, 0), (-1, -1), self.font_name, 9),
            # 四角に罫線を引いて、0.5の太さで、色は黒
            ('BOX', (0, 0), (-1, -1), 1, colors.black),
            # 四角の内側に格子状の罫線を引いて、0.25の太さで、色は赤
            ('INNERGRID', (0, 0), (-1, -1), 0.25, colors.red),
            # セルの縦文字位置を、TOPにする
            # 他にMIDDLEやBOTTOMを指定できるのでお好みで
            ('VALIGN', (0, 0), (-1, -1), 'TOP'),
        ]))

        # tableを描き出す位置を指定
        table.wrapOn(doc, 50*mm, 10*mm)
        table.drawOn(doc, 50*mm, 10*mm)

        # pdfを保存
        doc.save()

 
結果は以下の通りです。bottomup=Falseなので、原点は左上になります。

indexの降順で、表の上から下に並びます。

f:id:thinkAmi:20170117060903p:plain

 
ちなみに、bottomup=Trueにした場合、原点は左下となり、こんな感じになります。

indexの昇順で、表の上から下に並びます。

f:id:thinkAmi:20170117060906p:plain


複数列・複数行の表で、セルの高さや幅を指定

上の例では、表のセルの高さや幅は自動計算で設定されました。

任意の位置にあるセルの高さや幅を指定したい場合は、Tableオブジェクトを生成する際にrowHeights(行の高さ)やcolWidths(列の幅)を使います。

列・行ごとに設定したい場合はタプルで長さを渡し、全て一律で設定したい場合は単一値を指定します。

 
例えば、列幅は左から20mm・40mm・60mm、行の高さは一律10mmとしたい場合、

table = Table(data, colWidths=(20*mm, 40*mm, 60*mm,), rowHeights=10*mm)

と書くと、結果は以下となります。

f:id:thinkAmi:20170117060926p:plain


セルごとの設定

一番左の列のみ色を塗る

ここまでは表のセル全体に関する設定でしたので、次はセルごとの設定を行います。

ReportLabでは、セルごとの設定はTableStyleを使います。

TableStyleで指定するセル位置の表記は、ExcelでいうところのR1C1形式にて、(列, 行)のタプルで表現します。

また、列と行のindexは0から始まります。

 
例えば、5x5の表に対して左側の列だけ色塗りをする場合、

table.setStyle(TableStyle([
    ('VALIGN', (0, 0), (-1, -1), 'TOP'),
    # 指定された範囲の背景色を変える
    ('BACKGROUND', (0, 0), (0, 4), colors.lightpink),
]))

のようにTableStyleのコンストラクタにて、

  • タプルの2番目の要素に、開始セル位置: (0, 0)
  • タプルの3番目の要素に、終了セル位置: (0, 4)

をそれぞれ指定します。

結果は、
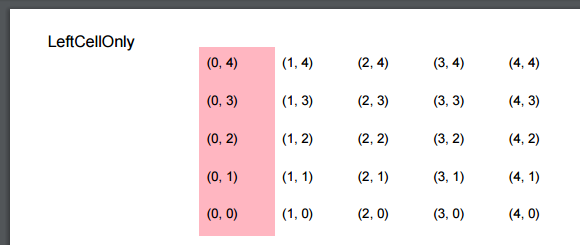
f:id:thinkAmi:20170117060928p:plain

となります。


一番左の列のみ色を塗る (indexはマイナスバージョン)

(列, 行)のindexにはマイナス値も設定することができます。

Pythonのindexのマイナス値と同じ考え方ですので、-1は最後、-2は最後から2番目となります。

例えば左側の列だけ色塗りするには、

table.setStyle(TableStyle([
    ('BACKGROUND', (0, 0), (0, -1), colors.lightpink),
]))

のように指定します。

f:id:thinkAmi:20170117060931p:plain

応用として、中央の範囲を色塗りする場合は、

table.setStyle(TableStyle([
    ('BACKGROUND', (1, 0), (3, 4), colors.lightpink),
]))

とすると、
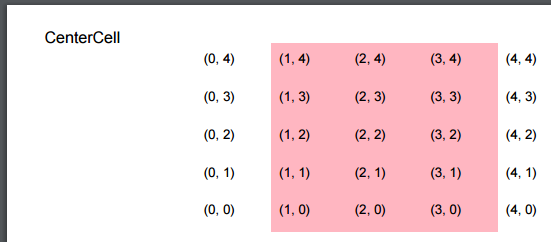
f:id:thinkAmi:20170117060934p:plain

となります。

 
また、マイナスのindexを使う場合は、

table.setStyle(TableStyle([
    ('BACKGROUND', (1, 0), (-2, -1), colors.lightpink),
]))

とすると、
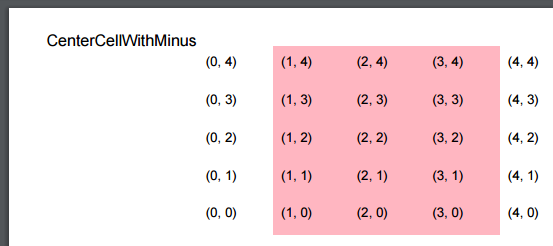
f:id:thinkAmi:20170118060743p:plain

となります。


罫線を引く

ReportLabではTableStyleのLine Commandsを使って罫線を引きます。

Line Commandsにはいくつかの種類がありますので、それぞれ試してみます。

なお、Line Commandsの形式は以下の通りです。

table.setStyle(TableStyle([
    # 決められた範囲で、太さや色を指定して、罫線を引く
    (<Line Comamnd名のリテラル>, 開始セルを示したタプル, 終了セルを示したタプル, 線の太さを示す数値, 線の色),
]))


セルの左側に罫線を引く

LINEBEFOREを使います。

table.setStyle(TableStyle([
    ('LINEBEFORE', (0, 0), (0, 4), 0.25, colors.black),
]))

f:id:thinkAmi:20170117060945p:plain


セルの右側に罫線を引く

LINEAFTERを使います。

table.setStyle(TableStyle([
    ('LINEAFTER', (0, 0), (0, 4), 0.25, colors.black),
]))

f:id:thinkAmi:20170117060948p:plain


セルの上に罫線を引く (bottomupの影響あり)

LINEABOVEを使います。

table.setStyle(TableStyle([
    ('LINEABOVE', (0, 0), (0, 4), 0.25, colors.black),
]))

なお、今回の場合、bottomup=Falseと原点を左上にしていますので、セルの下側に罫線があります。

f:id:thinkAmi:20170117060953p:plain


セルの下に罫線を引く (bottomupの影響あり)

LINEBELOWを使います。

table.setStyle(TableStyle([
    ('LINEBELOW', (0, 0), (0, 4), 0.25, colors.black),
]))

なお、こちらもbottomup=Falseの影響を受け、セルの上側に罫線があります。
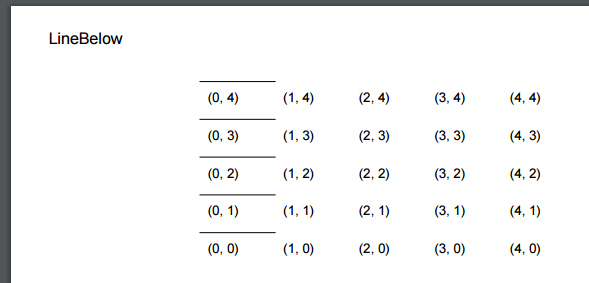
f:id:thinkAmi:20170117060958p:plain


セルの外枠に罫線を引く

BOXを使います。

table.setStyle(TableStyle([
    ('BOX', (0, 0), (0, 4), 0.25, colors.black),
]))

f:id:thinkAmi:20170117061002p:plain

 
もしくは、OUTLINEでも同じ結果になります。

table.setStyle(TableStyle([
    ('OUTLINE', (0, 0), (0, 4), 0.25, colors.black),
]))
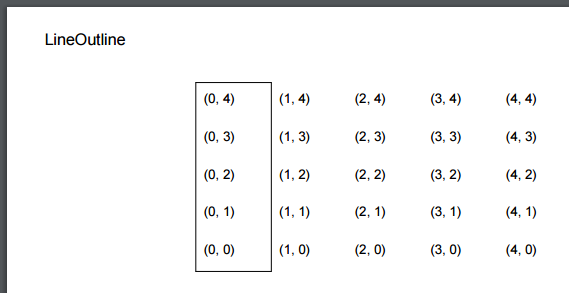
f:id:thinkAmi:20170117061007p:plain


セルの内側に格子状の罫線を引く

INNERGRIDを使います。

なお、今までの例と異なり、分かりやすくするためにセルの範囲を中央にしてあります。

table.setStyle(TableStyle([
    ('INNERGRID', (1, 1), (3, 3), 0.25, colors.black),
]))

f:id:thinkAmi:20170117061011p:plain


セルのすべてに罫線を引く

GRIDを使います。

なお、こちらも、分かりやすくするためにセルの範囲を中央にしてあります。

table.setStyle(TableStyle([
    ('GRID', (1, 1), (3, 3), 0.25, colors.black),
]))

f:id:thinkAmi:20170117061015p:plain


セルを結合する

SPANを使います。

下記の例は、

  • 2列2行目から4列4行目までをSAPNで結合
  • 2列2行目から3列3行目までの背景色をlightpink

としています。

なお、SAPNで結合した部分にあるデータは、最初のセルを除いて削除されることに注意します。

table.setStyle(TableStyle([
    # わかりやすくするため、全範囲をグリッドにしておく
    ('GRID', (0, 0), (-1, -1), 0.25, colors.black),
    # 指定した範囲のセルを結合して、背景色を入れる
    # ただし、結合した部分のデータは最初のセルを除いて削除されることに注意
    ('SPAN', (1, 1), (3, 3)),
    ('BACKGROUND', (1, 1), (2, 2), colors.lightpink),
]))

f:id:thinkAmi:20170117061019p:plain


ソースコード

GitHubに上げてあります。table_styleアプリが今回のアプリです。
thinkAmi-sandbox/Django_ReportLab_on_Heroku-sample

Django + ReportLabをHerokuで動かしてpdfを表示する

最近、Pythonでpdfを作成する機会がありました。

Pythonのpdf作成ライブラリには何があるのかを調べたところ、ReportLabが一番有名そうでした。

 
また、DjangoのドキュメントにもReportLabの記載がありました。
Django で PDF を出力する | Django documentation | Django

 
そこで、Django + ReportLabのアプリを作り、Herokuにてpdfを表示してみました。

 
目次


環境


環境の準備

# Python3.5.2でvirtualenv準備
$ eval "$(pyenv init -)"

$ python --version
Python 3.5.2

$ virtualenv env
...
Installing setuptools, pip, wheel...done.

$ source env/bin/activate

# pipでinstall
(env) $ pip install django reportlab uwsgi
...
Successfully installed django-1.10.5 olefile-0.44 pillow-4.0.0 reportlab-3.3.0 uwsgi-2.0.14

# Djangoアプリの生成
(env) $ django-admin startproject myproject .
(env) $ python manage.py startapp myapp


Djangoアプリの内容

以下を参考に、今回は「はろーわーるど」という日本語をpdf出力してみます。
PythonでPDFを生成したい そしてサイコロを作りたい - [[ともっくす alloc] init]

 
Viewのソースコードはこんな感じです。

from django.views import View
from django.http import HttpResponse

from reportlab.lib.pagesizes import A4
from reportlab.lib.pagesizes import portrait
from reportlab.lib.units import mm
from reportlab.pdfbase import pdfmetrics
from reportlab.pdfbase.cidfonts import UnicodeCIDFont
from reportlab.pdfgen import canvas

class PdfView(View):
    def get(self, request, *args, **kwargs):
        # pdf用のContent-TypeやContent-Dispositionをセット
        response = HttpResponse(status=200, content_type='application/pdf')
        response['Content-Disposition'] = 'filename="example.pdf"'
        # 即ダウンロードしたい時は、attachmentをつける
        # response['Content-Disposition'] = 'attachment; filename="example.pdf"'

        self._create_pdf(response)
        return response

    def _create_pdf(self, response):
        # 日本語が使えるゴシック体のフォントを設定する
        font_name = 'HeiseiKakuGo-W5'
        pdfmetrics.registerFont(UnicodeCIDFont(font_name))

        # A4縦書きのpdfを作る
        size = portrait(A4)

        # pdfを描く場所を作成:pdfの原点は左上にする(bottomup=False)
        doc = canvas.Canvas(response, pagesize=size, bottomup=False)

        # フォントとサイズ(9)を指定して、左から20mm・上から18mmの位置に「はろーわーるど」を表示
        doc.setFont(font_name, 9)
        doc.drawString(20*mm, 18*mm, 'はろーわーるど')

        # pdfの書き出し
        doc.save()

 
他には、Herokuで動かすため、

  • Procfile
  • runtime.txt
  • requirements.txt
  • uwsgi.ini

を用意します。

各ファイルの内容は以前記事を参考にします。
DjangoをHeroku + uWSGIで動かしてみた - メモ的な思考的な


ローカルでの動作確認

(env) $ python manage.py runserver

# Adminなどのmodelは使わないため、runserver時のエラーは無視する
You have 13 unapplied migration(s). Your project may not work properly until you apply the migrations for app(s): admin, auth, contenttypes, sessions.
Run 'python manage.py migrate' to apply them.


Herokuへデプロイ

(env) $ heroku login
Enter your Heroku credentials.
Email:<you@example.com>
Password (typing will be hidden): <your password>
Logged in as <you>

(env) $ heroku create
Creating app... done, ⬢ <your app>
https://<your app>.herokuapp.com/ | https://git.heroku.com/<your app>.git

# collectstatic不要なので、環境変数をセット
(env) $ heroku config:set DISABLE_COLLECTSTATIC=1
Setting DISABLE_COLLECTSTATIC and restarting ⬢ <your ap>... done, v3
DISABLE_COLLECTSTATIC: 1

(env) $ git push heroku master
...
 + xxxxxx...xxxxxxx master -> master


動作確認

(env) $ heroku open

ブラウザでpdfが開き、「はろーわーるど」が表示されました。

f:id:thinkAmi:20170114072442p:plain


ソースコード

GitHubに上げました。
thinkAmi-sandbox/Django_ReportLab_on_Heroku-sample

HerokuにDjangoアプリをデプロイするとcollectstaticが自動実行される

HerokuにDjangoアプリをデプロイしたところ、

remote:  !     Error while running '$ python manage.py collectstatic --noinput'.
remote:        See traceback above for details.
remote: 
remote:        You may need to update application code to resolve this error.
remote:        Or, you can disable collectstatic for this application:
remote: 
remote:           $ heroku config:set DISABLE_COLLECTSTATIC=1
remote: 
remote:        https://devcenter.heroku.com/articles/django-assets
remote:  !     Push rejected, failed to compile Python app.
remote: 
remote:  !     Push failed
remote: Verifying deploy...
remote: 
remote: !   Push rejected to <your app>.

というエラーメッセージが表示されてデプロイできなかった時のメモです。

 
その時のDjangoアプリは、

という構成でした。

 
エラーメッセージより、collectstatic不要なら環境変数DISABLE_COLLECTSTATICを設定すれば良さそうでした。たしかに今回のDjangoアプリは静的ファイルがないので、collectstaticは不要です。

 
また、エラーメッセージの中にあったURLを見たところ、

When a Django application is deployed to Heroku, $ python manage.py collectstatic --noinput is run automatically during the build. A build will fail if the collectstatic step is not successful.

Collectstatic during builds | Django and Static Assets | Heroku Dev Center

と、Herokuへのデプロイ時にはcollectstaticが自動実行されるとのことでした。

 
そこで、

$ heroku config:set DISABLE_COLLECTSTATIC=1
Setting DISABLE_COLLECTSTATIC and restarting ⬢ <your app>... done, v3
DISABLE_COLLECTSTATIC: 1

と、Heroku環境変数を設定しました。

その後、再度デプロイしたところ、問題なく完了しました。

DjangoをHeroku + uWSGIで動かしてみた

最近uWSGIにふれたため、HerokuでuWSGIを動かしてみようと思いました。

ただ、Herokuのチュートリアルではgunicornを動かしていました。
Getting Started on Heroku with Python | Heroku Dev Center

HerokuでuWSGIで動かす方法を調べたところ、uWSGIのドキュメントに記載がありました。
How to use Django with uWSGI | Django documentation | Django

そこで今回は、Django + uWSGIアプリをHerokuで動かしてみることにしました。

目次


環境

  • Mac OS X 10.11.6
  • Herokuアカウントは登録済、他は何もしていない
  • Python 3.5.2
  • Django 1.10.4
    • アプリの構成
      • PostgreSQL (9.6.1) を使用
        • Heroku上でmigrateやloaddataできるかも試す
      • 静的ファイルの配信あり
  • uWSGI 2.0.14
  • Djangoアプリ用のPythonライブラリ
    • dj-database-url0.4.1
    • psycopg2 2.6.2
    • whitenoise 3.2.2


MacでHeroku環境の準備

Homebrewによる Heroku Toolbeltのインストール

HomebrewでHeroku Toolbeltを管理したいため、Homebrewでインストールします。

# インストール
$ brew install heroku-toolbelt
...
🍺  /usr/local/Cellar/heroku/5.6.1-0976cf3: 12,942 files, 79.7M, built in 2 minutes 18 seconds


SSH鍵の登録

Herokuへpushする時に使用するSSH鍵を生成し、Herokuに登録します。
Managing Your SSH Keys | Heroku Dev Center

# 鍵生成
$ ssh-keygen -t rsa -b 4096 -C "you@example.com" -f ~/.ssh/id_rsa_heroku

# Herokuへログイン
$ heroku login
Enter your Heroku credentials.
Email: <typing>
Password (typing will be hidden): <typing>
Logged in as you@example.com

# HerokuにSSH鍵を追加
$ heroku keys:add ~/.ssh/id_rsa_heroku.pub
Uploading ~/.ssh/id_rsa_heroku.pub SSH key... done


MacPostgreSQLの準備

HomebrewでPostgreSQLをインストール

以下を参考に、HomebrewでPostgreSQLをインストールします。
MacにPostgreSQLをインストール - Qiita

# インストール
$ brew install postgresql
==> Installing dependencies for postgresql: readline
...
🍺  /usr/local/Cellar/readline/7.0.1: 46 files, 2M
==> Installing postgresql
...
==> /usr/local/Cellar/postgresql/9.6.1/bin/initdb /usr/local/var/postgres
==> Caveats
If builds of PostgreSQL 9 are failing and you have version 8.x installed,
you may need to remove the previous version first. See:
  https://github.com/Homebrew/homebrew/issues/2510

To migrate existing data from a previous major version (pre-9.0) of PostgreSQL, see:
  https://www.postgresql.org/docs/9.6/static/upgrading.html

To migrate existing data from a previous minor version (9.0-9.5) of PostgreSQL, see:
  https://www.postgresql.org/docs/9.6/static/pgupgrade.html

  You will need your previous PostgreSQL installation from brew to perform `pg_upgrade`.
  Do not run `brew cleanup postgresql` until you have performed the migration.

To have launchd start postgresql now and restart at login:
  brew services start postgresql
Or, if you don't want/need a background service you can just run:
  pg_ctl -D /usr/local/var/postgres start
==> Summary
🍺  /usr/local/Cellar/postgresql/9.6.1: 3,242 files, 36.4M


initdbの実行

以下を参考にinitdbを実行します。
initdb - PostgreSQL 9.6.1文書

initdb時の設定は以下の通りです。

# initdbの実行
$ initdb /usr/local/var/postgres -E utf8 --locale=C
The files belonging to this database system will be owned by user "<your_name>".
This user must also own the server process.

The database cluster will be initialized with locale "C".
The default text search configuration will be set to "english".

Data page checksums are disabled.

# エラー出た
initdb: directory "/usr/local/var/postgres" exists but is not empty
If you want to create a new database system, either remove or empty
the directory "/usr/local/var/postgres" or run initdb
with an argument other than "/usr/local/var/postgres".

 
エラーが出たためディレクトリを確認します。

$ cd /usr/local/var/
$ ls -al
total 0
drwxrwxr-x   6 you  admin  204 12 29 07:01 .
drwxr-xr-x  14 root          wheel  476 11 14 11:03 ..
drwxr-xr-x   4 you  admin  136 10 26 18:26 homebrew
drwxr-xr-x   2 you  admin   68 12  9 13:33 log
drwxr-xr-x  19 you  admin  646 12 17 07:21 mysql
drwx------  24 you  admin  816 12 29 07:01 postgres

 
エラーメッセージ通り、postgresディレクトリがすでに存在しているため、これを削除します。

# postgresディレクトリを削除
$ rm -r /usr/local/var/postgres
$ ls -al
total 0
drwxrwxr-x   5 you  admin  170 12 29 07:09 .
drwxr-xr-x  14 root          wheel  476 11 14 11:03 ..
drwxr-xr-x   4 you  admin  136 10 26 18:26 homebrew
drwxr-xr-x   2 you  admin   68 12  9 13:33 log
drwxr-xr-x  19 you  admin  646 12 17 07:21 mysql

 
もう一度initdbします。

# initdbの実行
$ initdb /usr/local/var/postgres -E utf8 --locale=C
...
WARNING: enabling "trust" authentication for local connections
You can change this by editing pg_hba.conf or using the option -A, or
--auth-local and --auth-host, the next time you run initdb.

Success. You can now start the database server using:

    pg_ctl -D /usr/local/var/postgres -l logfile start

WARNINGは出ているものの、今回は開発環境のため無視します。

これでインストールが終わりました。


Mac起動時にPostgreSQL自動起動させる

インストール時の最後のメッセージに自動起動設定に関するメッセージが出ていました。

ただ、brew servicesでも管理できるとのことなので、以下を参考にHomebrewで自動起動設定を行います。
OS X に PostgreSQL を Homebrew でインストールして brew services で起動する - Qiita

# 自動起動設定
$ brew services start postgresql
==> Successfully started `postgresql` (label: homebrew.mxcl.postgresql)

$ brew services list
Name         Status  User         Plist
chromedriver stopped
mysql        stopped
postgresql   started <your_name> ~/Library/LaunchAgents/homebrew.mxcl.postgresql.plist


データベース確認

現在のデータベースを確認します。

# データベースの確認
$ psql -l
                                   List of databases
   Name    |    Owner     | Encoding | Collate | Ctype |       Access privileges
-----------+--------------+----------+---------+-------+-------------------------------
 postgres  | <your_name>  | UTF8     | C       | C     |
 template0 | <your_name>  | UTF8     | C       | C     | =c/<your_name>              +
           |              |          |         |       | <your_name>=CTc/<your_name>
 template1 | <your_name>  | UTF8     | C       | C     | =c/<your_name>              +
           |              |          |         |       | <your_name>=CTc/<your_name>
(3 rows)


ユーザの作成

Django向けに、postgresユーザを作成します。開発環境なので、パスワードは無しです。

まずは現在のユーザの一覧を確認します。

# 現在のユーザ一覧を確認
$ psql -q -c'select * from pg_user' postgres
   usename    | usesysid | usecreatedb | usesuper | userepl | usebypassrls |  passwd  | valuntil | useconfig
--------------+----------+-------------+----------+---------+--------------+----------+----------+-----------
 <your_name>  |       10 | t           | t        | t       | t            | ******** |          |

 
続いて、ユーザを作成します。

# ユーザを作成
$ createuser postgres

# 作成したユーザがいるか確認
$ psql -q -c'select * from pg_user' postgres
   usename    | usesysid | usecreatedb | usesuper | userepl | usebypassrls |  passwd  | valuntil | useconfig
--------------+----------+-------------+----------+---------+--------------+----------+----------+-----------
 <your_name>  |       10 | t           | t        | t       | t            | ******** |          |
 postgres     |    16386 | f           | f        | f       | f            | ******** |          |
(2 rows)


作成したユーザがオーナーのdatabaseを作成

postgresユーザがオーナーのdatabaseを作成します。

今回のデータベース名はtry_heroku_django_uwsgiとします。

# データベースを作成、Ownerは`postgres`ユーザ
$ createdb -O postgres try_heroku_django_uwsgi

# 作成したデータベースの確認
$ psql -l
                                          List of databases
          Name           |    Owner     | Encoding | Collate | Ctype |       Access privileges       
-------------------------+--------------+----------+---------+-------+-------------------------------
 postgres                | <your_name>  | UTF8     | C       | C     |
 template0               | <your_name>  | UTF8     | C       | C     | =c/<your_name>               +
                         |              |          |         |       | <your_name> =CTc/<your_name>
 template1               | <your_name>  | UTF8     | C       | C     | =c/<your_name>               +
                         |              |          |         |       | <your_name> =CTc/<your_name>
 try_heroku_django_uwsgi | postgres     | UTF8     | C       | C     |
(4 rows)

 
以上でMacPostgreSQLの準備が終わりました。


MacDjango + uWSGIアプリを作成

Django, uWSGIなどのPythonライブラリをインストール

virtualenvを使ってインストールします。

$ mkdir try_heroku_django_postgres
$ cd try_heroku_django_postgres/

# pyenvを有効化してvirtualenvを作成
$ eval "$(pyenv init -)"
$ python --version
Python 3.5.2
$ virtualenv env
...

# 必要なライブラリをインストール
$ source env/bin/activate
(env) $ pip install django uwsgi dj_database_url psycopg2 whitenoise
...
Successfully installed django-1.10.4 uwsgi-2.0.14 dj-database-url-0.4.1 psycopg2-2.6.2 whitenoise-3.2.2


Djangoアプリの作成
プロジェクトとアプリの作成
(env) $ django-admin startproject myproject .
(env) $ python manage.py startapp myapp


コードを書く

昔の自分のメモを参考に、今回の内容に合わせて作成します。 Django + Herokuでdj-ringo-tabetterを作った時の作業メモ - メモ的な思考的な

ソースコード全体をGitHubに上げましたので、詳しい内容は省略します。

作成した時のポイントは以下の通りです。


migrationとloaddata

Mac上でmigrationとloaddataができるかを試します。

(env) $ python manage.py makemigrations
...
(env) $ python manage.py migrate
...
(env) $ python manage.py loaddata initial_data
Installed 2 object(s) from 1 fixture(s)


requirements.txtを作成

HerokuでPythonライブラリをインストールするため、requirements.txtを作成します。

(env) $ pip freeze > requirements.txt


gitリポジトリの作成

Herokuへpushするため、gitリポジトリを作成します。

なお、今回はこのリポジトリ専用のuser.nameとuser.emailも設定します。

$ git init .

# リポジトリ専用のuser.nameとuser.emailを設定
$ git config user.name "<your_name>"
$ git config user.email "<your_email>@example.com"

# 確認
$ git config user.name
your_name
$ git config user.email
<your_email>@example.com

$ git add .
$ git commit -m 'add samples'


Heroku環境の構築

Herokuへログイン
# ログイン
(env)$ heroku login
Enter your Heroku credentials.
# メールアドレスを入力
Email: <you@example.com>
# パスワードを入力
Password (typing will be hidden):
Logged in as <you@example.com>


Herokuアプリを作成

今回は開発的なものなので、アプリ名はデフォルトのままにします。

# Herokuアプリを作成
(env)$ heroku create
Creating app... done, ⬢ <foo-bar-1234>
https://<foo-bar-1234>.herokuapp.com/ | https://git.heroku.com/<foo-bar-1234>.git


Heroku Postgresを追加
# Heroku Postgresを追加
(env)$ heroku addons:create heroku-postgresql:hobby-dev
Creating heroku-postgresql:hobby-dev on ⬢ <foo-bar-1234>... free
Database has been created and is available
 ! This database is empty. If upgrading, you can transfer
 ! data from another database with pg:copy
Created postgresql-<ham-5678> as DATABASE_URL
Use heroku addons:docs heroku-postgresql to view documentation


DjangoアプリのリポジトリをHerokuへpushしてデプロイ
# Herokuへpush
(env)$ git push heroku master
...
remote: Compressing source files... done.
remote: Building source:
remote:
remote: -----> Python app detected
# runtime.txtで指定したバージョンのPythonがインストールされる
remote: -----> Installing python-3.5.2
# requirements.txtで指定したPythonライブラリがインストールされる
remote:      $ pip install -r requirements.txt
...
remote:        Successfully installed Django-1.10.4 dj-database-url-0.4.1 psycopg2-2.6.2 uWSGI-2.0.14 whitenoise-3.2.2
# collectstaticが実行される
remote:      $ python manage.py collectstatic --noinput
remote:        62 static files copied to '/tmp/build_9e36a428ccb437382bf6801f5cf09071/staticfiles'.
remote:
remote: -----> Discovering process types
remote:        Procfile declares types -> web
...
# デプロイ成功
remote: Verifying deploy... done.
To https://git.heroku.com/<foo-bar-1234>.git
 * [new branch]      master -> master


Heroku上での作業

環境変数の確認

ON_HEROKU環境変数が読み込まれていることを確認します。

# 環境変数の確認
(env)$ heroku config

DATABASE_URL: <url>
ON_HEROKU:    yes

 
もし設定されていない場合は、以下の方法で設定します。

# 環境変数の追加
(env)$ heroku config:set ON_HEROKU=yes
Setting ON_HEROKU and restarting ⬢ <foo-bar-1234>.. done, v6
ON_HEROKU: yes


migrateとloaddata

Djangoアプリのmigrateとloaddataを行います。

# migrate
$ heroku run python manage.py migrate
Running python manage.py migrate on ⬢ <foo-bar-1234>... up, run.9469 (Free)
...

  Applying sessions.0001_initial... OK

# loaddata
$ heroku run python manage.py loaddata initial_data
Running python manage.py loaddata initial_data on ⬢ <foo-bar-1234>... up, run.8331 (Free)
Installed 2 object(s) from 1 fixture(s)


Herokuアプリの確認

ブラウザが開くので、動作を確認します。

# Herokuアプリを開く
$ heroku open


uWSGIでホストされてることを確認

Herokuのログを見て、uWSGIで動いていることを確認します。

# Herokuのログを見る
$ heroku logs
...
heroku[web.1]: Process exited with status 0
heroku[web.1]: Starting process with command `uwsgi uwsgi_heroku.ini`
app[web.1]: [uWSGI] getting INI configuration from uwsgi_heroku.ini
app[web.1]: *** Starting uWSGI 2.0.14 (64bit) on [xxx] ***
app[web.1]: compiled with version: 4.8.4 on xxx
app[web.1]: os: Linux-3.13.0-105-generic #152-Ubuntu SMP xxx
app[web.1]: machine: x86_64
app[web.1]: nodename: xxx
app[web.1]: clock source: unix
app[web.1]: detected number of CPU cores: 8
app[web.1]: pcre jit disabled
app[web.1]: current working directory: /app
app[web.1]: detected binary path: /app/.heroku/python/bin/uwsgi
app[web.1]: your processes number limit is 256
app[web.1]: your memory page size is 4096 bytes
app[web.1]: detected max file descriptor number: 10000
app[web.1]: lock engine: pthread robust mutexes
app[web.1]: thunder lock: disabled (you can enable it with --thunder-lock)
app[web.1]: uwsgi socket 0 bound to TCP address :xxx fd 3
app[web.1]: Python version: 3.5.2 (default, Jun 28 2016, 18:49:03)  [GCC 4.8.4]
app[web.1]: *** Python threads support is disabled. You can enable it with --enable-threads ***
app[web.1]: Python main interpreter initialized at 0x2854720
app[web.1]: your server socket listen backlog is limited to 100 connections
app[web.1]: your mercy for graceful operations on workers is 60 seconds
app[web.1]: mapped 145536 bytes (142 KB) for 1 cores
app[web.1]: *** Operational MODE: single process ***
app[web.1]: WSGI app 0 (mountpoint='') ready in 1 seconds on interpreter 0x2854720 pid: 4 (default app)
app[web.1]: *** uWSGI is running in multiple interpreter mode ***
app[web.1]: spawned uWSGI worker 1 (pid: 7, cores: 1)
app[web.1]: spawned uWSGI master process (pid: 4)
heroku[web.1]: State changed from starting to up
heroku[router]: at=info method=GET path="/" host=<foo-bar-1234>.herokuapp.com request_id=xxx fwd="xxx.xxx.xxx.xxx" dyno=web.1 connect=0ms service=88ms status=200 bytes=559
app[web.1]: {address space usage: 288747520 bytes/275MB} {rss usage: 30261248 bytes/28MB} [pid: 7|app: 0|req: 1/1] xxx.xxx.xxx.xxx () {48 vars in 896 bytes} [xxx] GET / => generated 471 bytes in 87 msecs (HTTP/1.1 200) 2 headers in 88 bytes (1 switches on core 0)
heroku[router]: at=info method=GET path="/static/image/shinanogold.png" host=<foo-bar-1234>.herokuapp.com request_id=xxx fwd="xxx.xxx.xxx.xxx" dyno=web.1 connect=0ms service=3ms status=200 bytes=5762
app[web.1]: {address space usage: 288747520 bytes/275MB} {rss usage: 30441472 bytes/29MB} [pid: 7|app: 0|req: 2/2] xxx.xxx.xxx.xxx () {50 vars in 985 bytes} [xxx] GET /static/image/shinanogold.png => generated 5584 bytes in 2 msecs via sendfile() (HTTP/1.1 200) 5 headers in 178 bytes (0 switches on core 0)

uWSGIで動いているようです。


ソースコード

GitHubにあげました。
thinkAmi-sandbox/Django_on_Heroku_uWSGI-sample

2016年の振り返りと2017年の目標

昨年も振り返りと目標を立てていたので、今年も行います。


目標の振り返り

2015年の振り返りと2016年の目標 - メモ的な思考的なで立てた目標を振り返ってみます。


できる限り手を動かして、何かのアプリを作る

手は動かしていましたが、何かのアプリを作ることはできませんでした。

ただ、写経ではあるもののPythonWSGIサーバを作りました。

 
WSGIサーバの作成を通じて、Webサーバの動作やWSGIに関する知識を深めることができました。

そのおかげで最近いろいろと助かっています。


SCとる

無事にとれました。

あとは論文のある試験だけなので、これで一段落といったところです。


その他

GitHub

f:id:thinkAmi:20161231230606p:plain


転職

今までWindowsPython書いていましたが、MacPythonを書くようになりました。ご縁に感謝しています。

まわりはできる方々ばかりで、常に良い刺激が得られる環境となりました。ありがたい限りです。

また、テストコードが必要な環境に置かれているのも良い感じです。


人生の夏休み

一ヶ月ほど人生の夏休みをとりました。

いろいろとやったような気もしますが、何もできなかったような気もします。

それでも、お世話になった方々へのご挨拶などができ、気持ちの切り替えにつながりました。


勉強会

2015年に比べ、勉強会への参加が増えました。

  1. デブサミ2016の二日目に行ってきました #devsumi - メモ的な思考的な
  2. Tokyo ComCamp 2016 powered by MVPs に参加しました #JCCMVP - メモ的な思考的な
  3. Android Study Jams&機械学習予習会に行ってきました #GDG信州 - メモ的な思考的な
  4. Google I/O報告会 2016 in 信州に参加しました #io16jp #GDG信州 - メモ的な思考的な
  5. #stapy #glnagano 第7回 Python勉強会 in GEEKLAB.NAGANOに参加しました - メモ的な思考的な
  6. #gcpug #glnagano GCPUG信州 キックオフ勉強会(機械学習/TensorFlow)に参加しました - メモ的な思考的な
  7. #nseg #jxug #glnagano JXUGC No.19 Xamarin ハンズオン 長野大会 featuring NSEG に参加しました - メモ的な思考的な


2017年の目標っぽいもの

まだ生活リズムが整っていないこともあり、

  • Pythonの基礎知識を身につける
  • MacLinuxに慣れる
  • 生活リズムを整える

と、昨年よりもさらに抽象的な目標としたいと思います。

少なくとも生活リズムを整えて身近なイベントには参加したいところです*1

 
そんな感じですが、今年もよろしくお願いします。

*1:が、少なくともあと半年は見通しが立たなかったりします...

Python + pytestで、プレフィクスがアンダースコア2つの関数(プライベート関数)をテストする

pytestにて、プライベート関数のテストで悩んだことがあったため、メモを残します。

なお、今回のテスト対象コードは以下とします。

target.py

def __double_underscore_function():
    return 'double'

 
目次


環境

  • Windows10
  • Python 3.6.0 (32bit)
  • pytest 3.0.5


プライベート関数のimportについて

通常のコードの場合

Pythonでは変数・関数・メソッド名の先頭に_ (アンダースコア)があると、それらはプライベートなものとして扱われます。

 
ただ、プライベート関数の場合

standard_usage.py

from target import __double_underscore_function
import target

def main():
    print(f'from import: {__double_underscore_function()}')
    print(f'import: {target.__double_underscore_function()}')

if __name__ == '__main__':
    main()

と関数の中で使った場合でも

>python standard_usage.py
from import: double
import: double

と正常に動作します。

 
一方、

from target import __double_underscore_function

class Main(object):
    def run_with_import_from(self):
        print(f'from import: {__double_underscore_function()}')

    def run_with_import(self):
        print(f'import: {target.__double_underscore_function()}')

if __name__ == '__main__':
    m = Main()
    m.run_with_import()

と、クラスの中で使った場合

  • run_with_import_from()の場合、NameError: name '_Main__double_underscore_function' is not defined
  • run_with_import()の場合、AttributeError: module 'target' has no attribute '_Main__double_underscore_function'

という例外が送出されます。

マングリングっぽい動きです。
9.6. プライベート変数 | 9. クラス — Python 3.5.2 ドキュメント


テストコードの場合

テストコードの場合も同様で、

test_pytest_ver.py

import pytest
from target import __double_underscore_function
import target


class Test_function(object):
    def test_double_underscore_prefix_function_using_from_import(self):
        assert __double_underscore_function() == 'double'

    def test_double_undersocre_prefix_function_using_import(self):
        assert target.__double_underscore_function() == 'double'

と書くと、

>pytest test_pytest_ver.py
============================= test session starts =============================
platform win32 -- Python 3.6.0, pytest-3.0.5, py-1.4.32, pluggy-0.4.0
rootdir: path\to\dir, inifile: pytest.ini
collected 2 items

test_pytest_ver.py FF

================================== FAILURES ===================================
___ Test_function.test_double_underscore_prefix_function_using_from_import ____

self = <test_pytest_ver.py.Test_function object at 0x04530930>

    def test_double_underscore_prefix_function_using_from_import(self):
>       assert __double_underscore_function() == 'double'
E       NameError: name '_Test_function__double_underscore_function' is not defined

test_pytest_ver.py.py:8: NameError
______ Test_function.test_double_undersocre_prefix_function_using_import ______

self = <test_pytest_ver.py.Test_function object at 0x045274D0>

    def test_double_undersocre_prefix_function_using_import(self):
>       assert target.__double_underscore_function() == 'double'
E       AttributeError: module 'target' has no attribute '_Test_function__double_underscore_function'

test_pytest_ver.py.py:11: AttributeError
========================== 2 failed in 0.19 seconds ===========================

エラーになり、テストが正常に実行できません。


対応

手元で動かしたところ、以下のどちらかの方法で対応できそうでした(ただ、他にもより良い方法があれば知りたいです)。

  • クラスの外側でテストする
  • import時にasエイリアスを付ける


クラスを使わないテストコードにする

クラスによるグループ化を諦めて、クラスを使わないテストコードにします。

test_pytest_ver.py

from target import __double_underscore_function

def test_double_underscore_prefix_function_using_from_import():
    assert __double_underscore_function() == 'double'

実行してみます。

>pytest test_pytest_ver.py
============================= test session starts =============================
platform win32 -- Python 3.6.0, pytest-3.0.5, py-1.4.32, pluggy-0.4.0
rootdir: path\to\dir, inifile: pytest.ini
collected 1 items

test_pytest_ver.py .

========================== 1 passed in 0.05 seconds ===========================

テストできました。


import時にasエイリアスを付ける

クラスでグループ化したい場合は、import ... asエイリアスを付けたテストコードにします。

test_pytest_ver.py

from target import __double_underscore_function as double_underscore_function

class Test_function(object):
    def test_double_undersocre_prefix_function_using_from_import_alias(self):
        assert double_underscore_function() == 'double'

実行してみます。

>pytest test_pytest_ver.py
============================= test session starts =============================
platform win32 -- Python 3.6.0, pytest-3.0.5, py-1.4.32, pluggy-0.4.0
rootdir: path\to\dir, inifile: pytest.ini
collected 1 items

test_tmp.py .

========================== 1 passed in 0.05 seconds ===========================

テストできました。


その他

プレフィクスがアンダースコア1つの場合

マングリングは働かないため、普通にimportしても動作します。

そのため、

# テスト対象のコード
def _single_underscore_function():
    return 'single'

というテスト対象コードに対して

# テストコード
from target import _single_underscore_function

class Test_function(object):
    def test_single_underscore_prefix_function_using_from_import(self):
        assert _single_underscore_function() == 'single'

と書けば動作します。


標準モジュールunittestの場合

unittestではunittest.TestCaseを継承してテストコードを書く必要があります。

そのため、import ... asとする方法しかなさそうです。

import unittest
from target import __double_underscore_function
import target
from target import __double_underscore_function as double_underscore_function


class Test_function(unittest.TestCase):
    @unittest.expectedFailure
    def test_double_underscore_prefix_function_using_from_import(self):
        self.assertEqual(__double_underscore_function(), 'double')
        # => NameError: name '_Test_function__double_function' is not defined

    @unittest.expectedFailure
    def test_double_undersocre_prefix_function_using_import(self):
        assert target.__double_underscore_function() == 'double'
        # => AttributeError: module 'target' has no attribute '_Test_function__double_underscore_function'

    def test_double_undersocre_prefix_function_using_from_import_alias(self):
        self.assertEqual(double_underscore_function(), 'double')
        # => pass


if __name__ == '__main__':
    unittest.main()


ソースコード

GitHubに上げました。test_double_underscore_prefix_moduleディレクトリ以下が今回のファイルです。
thinkAmi-sandbox/python_pytest-sample

Pythonのテストコードで、モジュールをモックに差し替える

Pythonにて、開発環境に無いモジュールをimportしているプロダクションコードに対して、テストコードを書く機会がありました。

ただ、テストコードにてモジュールをモックに差し替える方法で悩んだため、メモを残します。

 
目次


環境


対応

以下を参考に、sys.modules辞書の該当モジュールをモックに差し替えます。
python - How to mock an import - Stack Overflow

 
例えば、

# 開発環境で使えないモジュールたち
from disabled_package import disabled_module
from disabled_package.disabled_module import disabled_submodule

class Target(object):
    def square(self, value):
        # モジュールに含まれる関数(call_function())や定数(CONST)を使用
        disabled_module.call_function(disabled_submodule.CONST)

        return value ** 2

というコードがあり、モジュール

  • disabled_package
  • disabled_package.disabled_module

が開発環境で使えないとします。

 
この状態で

import pytest
from target import Target

class Test_Target(object):
    def test_square(self):
        # Arrange
        sut = Target()
        # Act
        actual = sut.square(2)
        # Assert
        assert actual == 4

というテストコードを作成・実行しても、

(env) >pytest
============================= test session starts =============================
platform win32 -- Python 3.5.2, pytest-3.0.5, py-1.4.32, pluggy-0.4.0
rootdir: path\to\python_mock_sample, inifile: pytest.ini
collected 0 items / 1 errors

=================================== ERRORS ====================================
_______________ ERROR collecting mocking_module/test_target.py ________________
ImportError while importing test module 'path\to\python_mock_sample\mocking_module\test_target.py'.
Hint: make sure your test modules/packages have valid Python names.
Traceback:
test_target.py:11: in <module>
    from target import Target
target.py:1: in <module>
    from disabled_package import disabled_module
E   ImportError: No module named 'disabled_package'
!!!!!!!!!!!!!!!!!!! Interrupted: 1 errors during collection !!!!!!!!!!!!!!!!!!!
=========================== 1 error in 0.33 seconds ===========================

失敗します。

 
そのため、テストコードを修正し、

import pytest
from unittest.mock import Mock

# モジュールをモックへ差し替えるように追加
import sys
sys.modules['disabled_package'] = Mock()
sys.modules['disabled_package.disabled_module'] = Mock()

from target import Target

class Test_Target(object):
    def test_square(self):
        # Arrange
        sut = Target()
        # Act
        actual = sut.square(2)
        # Assert
        assert actual == 4

テスト対象コードのimport前に、開発環境で使えないモジュールをモックへと差し替えます。

 
その後、テストを実行したところ、

(env) >pytest
============================= test session starts =============================
platform win32 -- Python 3.5.2, pytest-3.0.5, py-1.4.32, pluggy-0.4.0
rootdir: D:\Sandbox\python_mock_sample, inifile: pytest.ini
collected 1 items

test_target.py .

========================== 1 passed in 0.09 seconds ===========================

成功しました。

 
ちなみに、sys.modules

ロード済みモジュールのモジュール名とモジュールオブジェクトの辞書。

sys.modules | 28.1. sys — システムパラメータと関数 — Python 2.7.x ドキュメント

とのことです。

 
確認のため

import sys
import pytest

def main():
    print(sys.modules['pytest'])

を作成・実行してみたところ、

<module 'pytest' from 'path\\to\\python_mock_sample\\env\\lib\\site-packages\\pytest.py'>

と、モジュールオブジェクトが入っていました。

これにより、モジュールオブジェクトをモックに差し替えられることが分かりました。


ソースコード

GitHubに上げました。e.g_mocking_moduleディレクトリの中が今回のコードです。
thinkAmi-sandbox/python_mock-sample